
Hi Everyone,

It's Share it on a Sunday and this week we are making One Sheet Wonders with a sheet of 6" x 6" paper. Normally, I would cut up some designer series paper and use that but this time I decided that I wanted to stamp my own design and use that instead. So, I started with a 6" x 6" piece of whisper white card stock, let me show you what I made:
Materials
1 piece of whisper white card stock 6" 6", scraps for the sentiments
5 card bases made from thick whisper white card 5 7/8" x 8 1/4"
Scraps of pool party and petal pink card stock for the mats and layers (I will list them with each card design)
Scraps of silver foil for the leaves
Gorgeous Posies stamp set
Forever Fern stamp set
Very Versailles stamp set
Ornate Thanks stamp set
Pool party ink
Petal pink ink
Early espresso ink
Gorgeous grape ink
Granny apple green ink
Stitched rectangle dies
Forever Flourishing dies
Stampin Cut and Emboss machine
3D Old World Paper embossing folder
Trimmer
Simply scored
Bone folder
Multipurpose adhesive
Dimensionals
Silver edged ribbon
Mini glue dots
Paper snips
Instructions
Score the thick whisper white on the long side at 4 1/8" to make the card bases and fold and burnish them.
To create the image
I first stamped the script stamp from Very Versailles in petal pink all over the whisper white card.
Then stamped the large flower from Gorgeous Posies in pool party at full strength and then second generation in a random pattern all over the whisper white. Then stamp an image on a post it note and fussy cut to use for a mask.
Using the mask to cover the flower, stamp some leaf images around the flowers using granny apple green ink.
Then stamp the twiggy images in early espresso in any gaps, using the mask again if necessary.
Finally, stamp the dotty image in the centre of the large flowers using gorgeous grape ink.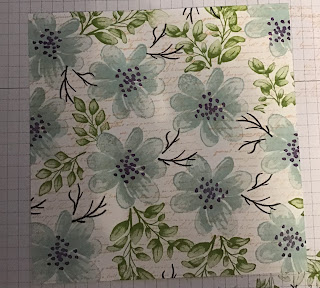

Stamp the sentiment on scraps of whisper white in both pool party and petal pink and die cut using the stitched rectangle dies.
Die cut some leaves from the silver foil.
To cut the 6" x 6" piece of card stock, follow the template below:

Card 1
Cut a piece of pool party 3 7/8" x 5 5/8" and run through the machine using the embossing folder. Adhere to the card front.
Cut a mat from petal pink 3 1/4" x 4 1/4" and adhere the 3" x 4" stamped image to it, leaving a border all around the edge. Adhere this to the centre of the card front with dimensionals.
Layer one of the pink sentiments on a scrap of petal pink with glue and then fussy cut round it with paper snips leaving a very small border of pink showing. Fix this to the bottom centre of the stamped panel with dimensionals.
Make a bow with the silver edged ribbon and fix to the bottom of the image panel under the sentiment with a glue dot.
Decorate the inside of the card with some flowers and another sentiment if required.


Card 2
Stamp 3 flowers in pool party at full strength and 3 second generation randomly on the card front and decorate the inside if required. Add the dotty image to the centres of the full strength flowers using gorgeous grape ink.
Use the 3/4" strip of the stamped image and mount it on mat of pool party which is 7/8" x 5 5/8" Add this strip to the bottom of the card leaving a 1/2" at the bottom of the card.
Mount one of the pool party sentiments on a scrap of pool party card and cut round it leaving a very small border. Add this to the top centre of the card front using dimensionals. Add some silver leaves behind the sentiment.

Card 3
Using one of the 1 1/2" strips of the stamped image, layer this up on a piece of pool party which is 1 7/8" x 4 3/8" and adhere the the right hand side of the whisper white card front.
Layer one of the pool party sentiments on a piece of pool party card and cut around it leaving a small border. Add this to the left of the card, in the centre, overlapping the image and attach some silver leaves underneath.
Decorate the inside of the card if required.

Card 4
Cut a piece of pool party card 3 7/8" x 5 5/8" and run through the machine in the 3D embossing folder, then adhere to the card front.
Add the 1 1/4" x 5 5/8" strip to a layer of petal pink 1 1/2" x 5 3/4" and fix to the card front using dimensionals across the centre of the card.
Add one of the petal pink sentiments to a piece of petal pink card and cut around it leaving a small border and fix to the centre of the decorated strip. Add some leaves to both sides of the decorated strip.

Decorate the inside of the card if required.
Card 5
Cut a piece of petal pink card 3 7/8" x 5 5/8" and run through the machine in the embossing folder. adhere to the card front.
Adhere the remaining decorated strip to a piece of pool party card 1 3/4" x 4 1/4". Fix this to the left top of the card front using dimensionals.
Add the remaining pool party sentiment to a piece of pool party card and cut round it as before, fix to the card front at the bottom of the decorated panel but hanging off to the right and bottom.
Tuck some silver leaves in under the decorated strip.
Decorate the inside if required.

There you are 5 cards from one piece of 6" x 6", this will work just as well with a piece of dsp but it is so much fun to make your own, please give it a try. Then you just need to add a bit more card and a few embellishments and you have some very unique cards.
Don't forget to pop over and see what Donna and Victoria have made this week.
Donna Lester
Victoria Littlewood
If you would like to see more of my Blog Posts, sign up to the email alert over in the right hand side bar of the page.
If you would like to join my Team or become one of my Discount Shoppers, you can message me on my Facebook Page at www.facebook.com/craftykarendesigns or via the Contact Me box below this Blog.
If you are interested in taking part in some challenges and having crafty chats with like minded people and a bit of a laugh, pop over to Crafty and Banter on Facebook (link in the side bar). This is a new group that some crafty friends and I are trying to get up and running and we would love your company.
If you are interested in taking part in some challenges and having crafty chats with like minded people and a bit of a laugh, pop over to Crafty and Banter on Facebook (link in the side bar). This is a new group that some crafty friends and I are trying to get up and running and we would love your company.
Happy Crafting,
Karen XXX


")
")
")


Beautiful cards, Karen x
ReplyDeleteThank you xx
DeleteThat is very clever Karen and your cards are gorgeous xx
ReplyDelete