Sunday 30 May 2021

Wedding Favour Boxes - Share it on a Sunday

 Hi Everyone,


Today's theme for Share it on a Sunday is 'Wedding' and I have made some Wedding Favour boxes which will easily hold the traditional sugared almonds or a chocolate and are quick and easy to make.  I've made a couple of versions to show how easily adapted to different colour schemes and designer series papers it is.  The idea came from a project I saw by The Paper Pixie, a US Stampin' Up Demonstrator.  Let me show you how I made mine.

Materials

Basic box

1 piece of card stock 5" x 6 1/2" (I used very vanilla for one and gold foil for the other)
Tear n Tape/Seal +
Simply scored
Bone folder
Detailed Trio Punch

Decoration

Very Vanilla one
Gold embossing powder
Versamark
Heat Tool
Forever Blossoms stamp set
Scrap of pale papaya open weave ribbon
Mini glue dots
DSP version
2 x 1 3/8" x 1 7/8"
2 x 7/8" x 1 7/8"
Velcro dot

Instructions

On the short side, score the card stock at 1 1/2" from either end.

On the long side, score at 1 1/2", 3", 4 1/2", 5 1/2" and make a tick mark at 2 1/4" on both sides, you need to flip it over to do the second one which will be on the inside of the card stock but it doesn't matter.

Fold and burnish the score lines and cut as per the template, then add the diagonal score lines from the tick marks to the corners of the line below as shown.  Round the corners on the piece that will be the lid flap.


For the very vanilla version

Stamp the design on the piece that will be the front of the box with Versamark, sprinkle with embossing powder and set with the heat tool.

For the dsp version

Add the dsp to the front, back, lid and flap.

Both versions

Add tear n tape or Seal + to the side flaps and bring the folds up to the cut edges on the back and the front to make up the box.

You can either tuck the lid flap in or have it on the front and fasten with a velcro dot, whichever you like the best.  For the vanilla one, I have added a small bow to the top with a mini glue dot. The dsp one, I thought I would leave as it was made with gold foil and has gold in the pattern, I thought anything else would be too much.

Once you have the basic shape, you can swap and change these about to make endless versions for all occasions.

I hope that you like my little Wedding favour box and will give it a try.  Please pop over and see what Donna and Victoria have made this week.

Donna Lester

Victoria Littlewood

If you would like to see more of my Blog Posts, sign up on the pop up form and you will get my weekly Newsletter with all the details of my latest projects and news from Stampin' Up!

If you would like to join my Team or become one of my Discount Shoppers, you can message me on my Facebook Page at www.facebook.com/craftykarendesigns or via the Contact Me box below this Blog.

If you are interested in taking part in some challenges and having crafty chats with like minded people and a bit of a laugh, pop over to Crafty and Banter on Facebook (link in the side bar), we would love your company.

Happy crafting,

Karen X


Product List

Saturday 29 May 2021

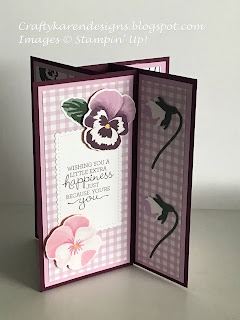
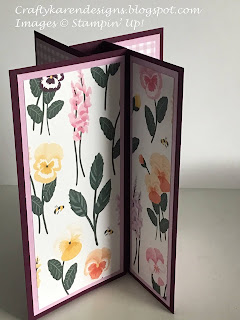
Pansy Petals Pinwheel Tower Card - Ink Stamp Share Blog Hop

 Hi Everyone,


Today, I am hopping with the Ink Stamp Share group and showcasing products from the new Stampin' Up! annul catalogue. I've chosen the Pansy Petals Suite because it's my favourite and my inspiration comes from a card I saw on Mixed Up Crafts with Sam Calcott, check out her YouTube channel and blog, she is a very talented crafter.

Materials

1 piece of blackberry bliss card stock 7" x 6", 3 pieces 3" x 6"
4 pieces of fresh freesia card stock 2 3/4" x 5 3/4", 4 pieces 1 3/4" x 5 3/4"
4 pieces of dsp 2 1/2" x 5 1/2", 4 pieces 1 1/2" x 5 1/2", 3 flowers and leaves from the dsp sheets
2 pieces of basic white approx 2 1/2" x 3 1/3" for the rectangles
Scraps of evening evergreen, fresh freesia and basic white for the die cuts
Blackberry bliss ink
Stampin Cut and Emboss machine
Stitched So Sweetly dies
Pansy dies
Pansy Patch stamp set
Trimmer
Simply scored
Bone folder
Multipurpose adhesive
Dimensionals

Instructions

On the long side, score the largest piece of blackberry bliss at 1", 2", 3" and 4" and fold and burnish all the score lines.  These score lines will fold around to form the square tube in the centre of the card, adhere in place.

Each of the three other blackberry bliss pieces form the other fins and need to be adhered around the central tube (see picture).


Adhere all the mat layers, all the way around and then the dsp layers, leaving equal borders on all sides.

Die cut 2 stitched scalloped rectangles from the basic white card and 2 stems and the buds from the coloured card.  You can die cut the flowers and leaves from the dsp or fussy cut them with your paper snips, whichever you prefer.

Stamp your sentiments on both of the rectangles and then adhere them to opposite sides of the card, one front and one back to write your message.  Then decorate the plainer panels with cut out flowers as shown in the pictures.


I hope that you like my card and will give it a try. Now please pop over and see what the next project is, you are sure to be filled with inspiration.

If you would like to see more of my Blog Posts, sign up to the email alert over in the right hand side bar of the page.

If you would like to join my Team or become one of my Discount Shoppers, you can message me on my Facebook Page at www.facebook.com/craftykarendesigns or via the Contact Me box below this Blog.

If you are interested in taking part in some challenges and having crafty chats with like minded people and a bit of a laugh, pop over to Crafty and Banter on Facebook (link in the side bar), we would love your company.

Happy crafting,

Karen X


Product List

Sweet Symmetry Thank You Card - Stampin' Birds Showcase Blog Hop

 Hi Everyone,


Today I am playing with the Sweet Symmetry designer series paper which is very bright and cheerful and great for all sorts of cards.

Materials

1 piece of just jade card stock 5 7/8" x 8 1/4"
Scraps of bumblebee and basic white card for the sentiment
1 piece of basic white card 3 7/8" x 5 5/8"
1 piece of bumblebee card stock 4" x 5 3/4"
2 pieces of co-ordinating dsp 3 7/8" x 2 7/8"
1 piece of bumblebee ribbon to wrap around the card front and 1 piece to make a bow
Just jade ink
Ornate thanks stamp set
Tailored tag punch
Multipurpose adhesive
Dimensionals
Mini glue dots
Trimer
Simply scored
Bone folder

Instructions

On the long side score the just jade card at 4 1/8" and fold and burnish to make a portrait card.

Adhere the 2 co-ordinating pieces of dsp on to the bumblebee layer butting them together in the centre.

Add a strip of ribbon around the card where the two pieces meet to hide the join. Now adhere this layer to the card front.

Stamp a sentiment on a scrap of white and also on the piece for the inside of the card. Adhere the white to the inside of the card.

Punch out the sentiment with the tag punch and then punch out one in bumblebee and cut it in half and adhere one half to top and bottom of the tag as shown in the picture.  Add the tag to the right hand side of the card over the ribbon using dimensionals.  Add the bow to the left side next to the tag using mini glue dots.

A quick and easy card using some very pretty designer series papers.

Click on the Next button to see what my lovely team mate Victoria has created.


If you would like to see more of my Blog Posts, sign up to the email alert over in the right hand side bar of the page.

If you would like to join my Team or become one of my Discount Shoppers, you can message me on my Facebook Page at www.facebook.com/craftykarendesigns or via the Contact Me box below this Blog.

If you are interested in taking part in some challenges and having crafty chats with like minded people and a bit of a laugh, pop over to Crafty and Banter on Facebook (link in the side bar). This is a new group that some crafty friends and I are trying to get up and running and we would love your company.

Happy crafting,


Karen X


Product List