Wednesday 29 December 2021

Daffodil Daydream Abstract Beauty Card - Crafty Collaborations Blog Hop

 Hi Everyone,


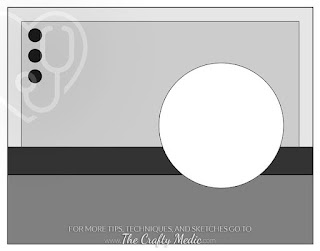
Today I am hopping with the Crafty Collaborations group and it's a Sketch Challenge, I love doing these, they are great to get your crafty mojo going if you don't know what to make. Let me show you how I made it.


Materials

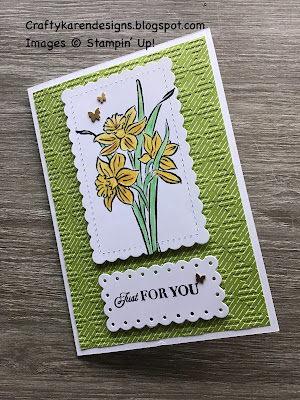
1 piece of just jade card stock 5 7/8" x 8 1/4", strip 1/2" x 5 7/8"
1 piece of dsp (Abstract Beauty) 1 1/2" x 5 7/8"
1 piece of contrasting dsp (Abstract Beauty) 2 1/2" x 5 1/2"
1 piece of basic white card 3 7/8" x 5 5/8", a 2 1/2" circle for stamping
Daffodil Daydream stamp set
Celebrating You stamp set
Memento black ink
Daffodil Delight Stampin'Blends
Old Olive Stampin' Blends
Bermuda Bay Stampin' Blends
Brass Butterflies
Adhesive Backed Hexagons
Layering Circle Dies
Stampin' Cut & Emboss Machine
Trimmer
Simply Scored
Bone Folder
Multipurpose Adhesive
Dimensionals

Instructions

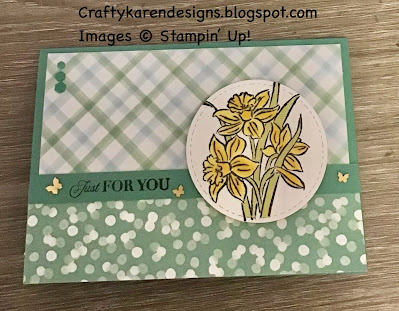
On the long side score the just jade card at 4 1/8" and fold and burnish to make the card base.

Adhere the top piece of dsp to the card front leaving an equal border at the top and sides.

Adhere the strip of dsp across the bottom of the card front covering the bottom of the top piece.

Stamp a sentiment in black ink on the strip of just jade and adhere to the card front covering the join between the two dsps.

Die cut a 2 1/2" circle from basic white and stamp the floral image in black and the colour with Stampin' Blends. Add dimensionals to the back and add to the card front.

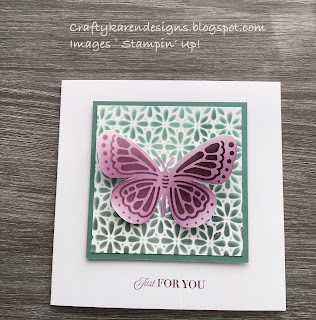
Stamp a sentiment on the remaining piece of basic white and add some butterflies and then clour them with Stampin' Blends and adhere to the inside of the card.

Add some of the brass butterflies to the sentiment strip on the card front and some of the hexagons at the top left and the card is finished. I hope that you like it.

Please pop over and see what everyone else has made too.


If you would like to see more of my Blog Posts, sign up on the pop up form and you will get my weekly Newsletter with all the details of my latest projects and news from Stampin' Up!

If you would like to join my Team or become one of my Discount Shoppers, you can message me on my Facebook Page at www.facebook.com/craftykarendesigns or via the Contact Me box below this Blog.

If you are interested in taking part in some challenges and having crafty chats with like minded people and a bit of a laugh, pop over to Craft and Banter on Facebook (link in the side bar), we would love your company.

Happy crafting,


Karen X


Product List

Monday 27 December 2021

Catching Butterflies - Saleabration Card for a Little Girl

 Hi Everyone,


When I made my first order from the new Mini Catalogue, I was ale to order some of the items from the Saleabration Brochure too. One of the things that I chose was the Catching Butterflies stamp set which I thought would make very cute cards for little girls. I also wanted a chance to practice my colouring - you know how that takes me out of my comfort zone haha.

Materials

1 piece of polished pink card stock 5 7/8" x 8 1/4"
2 pieces of basic white card 3 7/8" x 5 5/8"
Catching Butterflies stamp set
Memento Black ink
Polished Pink Stampin' Blends
Daffodil Delight Stampin' Blends
Bermuda Bay Stampin' Blends
Balmy Blue Stampin' Blends
Crumb Cake Stampin' Blends
Pale Papaya Stampin' Blends
Petal Pink Stampin' Blends
Trimmer
Simply Scored
Bone Folder
Multipurpose Adhesive

Instructions

On the long side score the polished pink card at 4 1/8" and fold and burnish to make the card base.

Stamp the image of the girl on a piece of basic white and add in as many (or as few) butterflies as you like and leave a space to stamp the sentiment in Memento Black ink. Colour it all in using Stampin' Blends (you could use Watercolour Pencils or Stampin Write Markers too), I have used the light crumb cake to scribble in some ground under her feet so she's not floating. Adhere to the card front.

You can also stamp butterflies on the remaining piece of basic white, colour those in too and adhere on the inside of the card.

As you can see this is a really quick and easy card, I just wanted to practice my colouring with somethig new (and FREE).

If you would like to see more of my Blog Posts, sign up on the pop up form and you will get my weekly Newsletter with all the details of my latest projects and news from Stampin' Up!

If you would like to join my Team or become one of my Discount Shoppers, you can message me on my Facebook Page at www.facebook.com/craftykarendesigns or via the Contact Me box below this Blog.

If you are interested in taking part in some challenges and having crafty chats with like minded people and a bit of a laugh, pop over to Craft and Banter on Facebook (link in the side bar), we would love your company.

Happy crafting,


Karen X


!-------- TAMS Start ----------> Product List

Friday 24 December 2021

Daffodil Daydream - Sunshine and Rainbows - Gingham Card

 Hi Everyone,


Today I have made a card using the beautiful new Daffodil Daydream stamp set for the Ink, Stamp, Share Blog Hop where we are showing off some of the lovely new products coming in the Mini Catalogue which goes live on 4th January 2022.  Let me show you what I did.

Materials

1 piece of thick basic white card stock 5 7/8" x 8 /4"
1 piece of basic white 3 7/8" x 5 5/8" for die cutting
1 piece of dsp (Sunshine & Rainbows) 3 7/8" x 5 5/8"
Scalloped Contour dies
Stampin' Cut & Emboss Machine
Gingham Embossing Folder
Daffodil Daydream stamp set
Watercolour Pencils
Blender Pen
Celebrating You stamp set
Memento Black ink
Brushed Brass Butterflies
Multipurpose adhesive
Dimensionals
Trimmer
Simply scored
Bone folder

Instructions

On the long side score the thick basic white at 4 1/8" and fold and burnish to make the card base.

Run the dsp through the Stampin' Cut & Emboss machine in the Gingham Embossing Folder and adhere to the front of the card.

Stamp the daffodil image on a piece of scrap card and colour in with watercolour pencils and a blender pen or Stampin' Blends if you have them. I've used the pencils in daffodil delight, crushed curry and garden green.

Cut out the image using the 3rd smallest rectangle from the Scalloped Contour dies.  Cut out the smallest one too and then stamp the sentiment using memento black ink in the centre of it.

Add both rectangles to the card front so that they line up underneath each other.  Add some of the butterlies and then stamp a sentiment on the inside of the card.

I do hope that you like my first play with this stamp set, it comes with a set of dies as well but I haven't tried those yet, watch this space because I will be using them in a project very soon.

Please pop over and see what everyone else has to show you too.

If you would like to see more of my Blog Posts, sign up on the pop up form and you will get my weekly Newsletter with all the details of my latest projects and news from Stampin' Up!

If you would like to join my Team or become one of my Discount Shoppers, you can message me on my Facebook Page at www.facebook.com/craftykarendesigns or via the Contact Me box below this Blog.

If you are interested in taking part in some challenges and having crafty chats with like minded people and a bit of a laugh, pop over to Craft and Banter on Facebook (link in the side bar), we would love your company.

Happy crafting,


Karen X


Product List

Wednesday 22 December 2021

Butterflies & Flowers Layering Decorative Masks - Creative Colour Challenge #16

 Hi Everyone, 


I've bought the new Layering Decorative Masks from the January - June Mini Catalogue and I thought I would combine playing with them with Victoria's latest Creative Colour Challenge of Just Jade, Blackberry Bliss and Highland Heather.  Blending with brushes is not something I have much experience with but I found it quite easy and for my first try, I don't think it turned out too bad. This is quite simple one and two colours at a time, you can obviously use lots of colours and blend them into each other but I'm not that brave yet, that's for another day!

Materials

1 piece of thick basic white card stock 5 3/4" x 11 1/2"
1 piece of just jade card stock 4" square
1 piece of basic white card 3 3/4" square and a large scrap for the butterfly
Just jade ink
Highland heather ink
Blackberry bliss ink
Butterflies & Flowers Layering Decorative Masks
Blending Brushes
Celebrating You stamp set
Trimmer
Simply Scored
Bone Folder
Paper snips
Multipurpose adhesive
Dimensionals
Washi Tape

Instructions

On the long side score the thick white card at 5 3/4" and fold and burnish to make a square card.

Tape the mask with the flower pattern over the top of the basic white card on some scrap to keep it in place while you blend the colours.

I'm no expert at blending, load the brush with some ink and dab off the excess on the scrap and then start moving in over the edge of the card in a circular motion over the top of the mask.  You can go over it several times to get deeper colour or just once of twice for a lighter colour effect. Obviously, the more ink you load on the brush to start, the darker it will be, always start off on the scrap otherwise you will end up with very dark splodges on your card.  Play about with scraps of paper first to build up confidence. I just used the Just Jade on this piece but hopefully you can see it's ligter at the top and darker towards the bottom.

Then I taped the larger butterfly down to a scrap and went over it in Highland Heather to get the background layer of the butterfly.  Then I moved the mask and taped the detailed butterfly over the image and blended over it again using the Blackberry Bliss to give the pattern on the butterfly.  For my first attempt, I'm really pleased with how this one turned out and I plan to do lots more as I love butterflies and this will make a great topper for cards, boxesand tags.  I then fussy cut the image out with the paper snips.

Adhere the square pattered piece to the just jade mat layer and add to the card base using dimensionals in the centre of the card front.

Then I stamped my sentiment at the bottom, in the centre using Blackberry Bliss ink and the card is finished. You can decorate the inside too if you want to, but I haven't.

I hope that you will give this a try, what would you make for Victoria's Colour Challenge? Why don'y you hop over to her page and join in, you'll be more than welcome. Hope to see you over there soon.

If you would like to see more of my Blog Posts, sign up on the pop up form and you will get my weekly Newsletter with all the details of my latest projects and news from Stampin' Up!

If you would like to join my Team or become one of my Discount Shoppers, you can message me on my Facebook Page at www.facebook.com/craftykarendesigns or via the Contact Me box below this Blog.

If you are interested in taking part in some challenges and having crafty chats with like minded people and a bit of a laugh, pop over to Craft and Banter on Facebook (link in the side bar), we would love your company.

Happy crafting,


Karen X


Product List