Showing posts with label tutorial. Show all posts

Saturday, 12 March 2022

Flowering Fields Reverse Easel Card - Mother's Day

 Hi Everyone,


Today I have made a pretty, fun fold card for Mother's Day using the lovely Flowering Fields dsp and the Tulip and Scalloped Contour dies. Let me show you how I made it.


Materials

1 piece of thick basic white card stock 5 7/8" x 10"
1 piece of highland heather card 4 7/8" x 5 3/4", 2 pieces 2 3/8" x 5 3/4"
1 piece of dsp 4 3/4" x 5 5/8", 2 pieces 2 1/4" x 5 5/8", 1 piece 3" x 4"
1 piece of basic white card stock 3 1/2" x 4 1/2, 1 piece 1 1/4" x 3"
Scraps of rich razzleberry, highland heather and soft succulent for the tulips
Rich Razzleberry ink
Flowering Tulips stamp set
Tulip  dies
Scalloped Contour dies
Stampin' Cut & Emboss machine
Trimmer
Simply scored
Bone folder
Multipurpose adhesive
Dimensionals
Mini glue dots
Iridescent rhinestones

Instructions

On the long side, score the thick white card 2 1/2" and 5" and fold and burnish as though you are making a Z Fold card.

Die cut the second largest stitched rectangle from the basic white card and select an image in the dsp that you want to put on the easel and die cut that with the next size down. I've used the reverse side of the tulip flowers used for the main sections.

Adhere all the highland heather layers to the card base and then add the dsp layers.


Stamp a sentiment on the smaller piece of basic white and die cut with the smallest of the rectangle dies.

Die cut several sets of tulips in rich razzleberry and highland heather as well as some leaves and stems in soft succulent.  Make up the flowers using mini glue dots to hold the pieces in place.


Stamp a sentiment in the top right hand corner of the dsp layer for the easel and then arrange the stems, leaves and flowers underneath it. Adhere this layer to the large rectangle. Then add glue to the back of the top half of this piece and adhere to the easel so that it is central and doesn't overhang the bottom of the card (see picture).

Add dimensionals to the back of the small rectangle and add this to the base of the card to act as a stopper (see picture), add another flower next to this.

Sprinkle some rhinestones and the card is complete.

Please pop over and see what everyone else has been making:


If you would like to see more of my Blog Posts, sign up on the pop up form and you will get my weekly Newsletter with all the details of my latest projects and news from Stampin' Up!

If you would like to join my Team or become one of my Discount Shoppers, you can message me on my Facebook Page at www.facebook.com/craftykarendesigns or via the Contact Me box below this Blog.

If you are interested in taking part in some challenges and having crafty chats with like minded people and a bit of a laugh, pop over to Craft and Banter on Facebook (link in the side bar), we would love your company.

Happy crafting,


Karen X


Product List

Friday, 11 March 2022

Hand Penned Box of Gift Cards - Stamp 'n' Hop Blog Hop

 Hi Everyone,


Today's theme for the blog hop is 'Packaging with Stampin' Up' and I have CASED an idea from Angelina at Intatwyne Designs from a few years ago. I wanted a double width box to put a stack of small gift cards in to have ready for adding to gifts for all occasions. Let me show you how I made it.

Materials

Box

1 piece of misty moonlight card 9 1/8" x 8 1/4", 1 piece 7 15/16" x 4 3/16"
1 piece of dsp 6 3/8" x 3"
Blue adhesive backed gems
Scraps of card for sentiments
Fan Bakers Twine
Mini glue dots
Double Oval Punch
1 piece of thick basic white card 3" x 6" (per card)
1 piece of dsp 2 7/8" square (per card)
Scraps for sentiments
Multipurpose Adhesive
Ink to match
Trimmer
Simply Scored
Bone Folder

Instructions

On the 8 1/4" side score at 7/8" at either end, then turn to 9 1/8" side and score at 7/8", 4 1/8", 5" and 8 1/4".

On the smaller piece on the long side, score at 3 1/4", 4" and 4 3/4" and then turn and score at 1/2" at both sides.

Cut up the tabs as shown in the pictures and then fold and burnish all the score lines


Add adhesive to the inside of all the tabs on the box and fold in the corners by bringing the cut edge and the folded tab edge together. You need to end up with four fixed corners for the bottom of the box and then just the front two for the lid to fold over the top (see picture).


For the insert, glue the two thin sections in the middle together, fold out the ends and then place inside the box on the bottom, you can leave this as a lift out section or adhere it in place.

Adhere the dsp layer to the box lid.

To make the cards, score in the middle at 3" and fold and burnish. Adhere the dsp layer to the front of the card.

I have used the scalloped part of the Double Oval to make my sentiment layers, I punched them out of white card and then stamped the sentiment from Dahlia Days using misty moonlight ink on all of them. I then punched out two in misty moonlight and arranged them on the back of one of the white ones to make a backing layer for the one for the front of the box.

Adhere the sentiment to the front of all the cards and the layered one on the box. I added a twine bow and some gems to the one on the box front.

I have punched a hole in the back of each of the cards and added a piece of twine so that the cards can be added to gifts. I made 8 cards to fit in my box but you could probably get 12 in there if you wanted.

I hope that you like my little gift idea. Please pop over and see what everyone else has been making too.


If you would like to see more of my Blog Posts, sign up on the pop up form and you will get my weekly Newsletter with all the details of my latest projects and news from Stampin' Up!

If you would like to join my Team or become one of my Discount Shoppers, you can message me on my Facebook Page at www.facebook.com/craftykarendesigns or via the Contact Me box below this Blog.

If you are interested in taking part in some challenges and having crafty chats with like minded people and a bit of a laugh, pop over to Craft and Banter on Facebook (link in the side bar), we would love your company.

Happy crafting,


Karen X


Product List

Wednesday, 9 March 2022

In Colours 2020-2022 - Touches of Ink Blog Hop

 Hi Everyone,


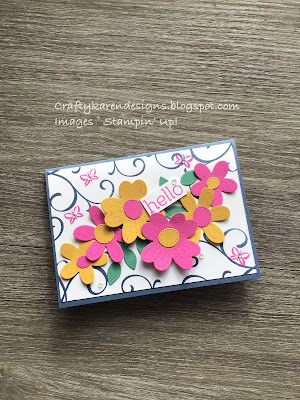
Today I am taking part in the Touches of Ink Blog Hop and I am using the Pierced Bloom dies and the Sentimental Swirls stamp set in 4 of the 5 In Colours (I don't like Cinnamon Cider so never bought that one!). This set of In-Colours will retire when the new Annual Catalogue is launched in May and a new set will replace them. It's sad to see them go as they are so bright and vibrant but I am excited to see what they will be replaced by.

Materials

1 piece of Misty Moonlight card 5 7/8" x  1/4"
2 pieces of basic white card 3 7/8" x 5 5/8"
Scraps of Magenta Madness, Bumblebee and Just Jade card for the die cuts
Misty Moonlight ink
Magenta Madness ink
Sentimental Swirls stamp set
Pierced Bloom dies
Stampin' Cut & Emboss Machine
Trimmer
Simply Scored
Paper Snips
Bone Folder
Multipurpose Adhesive
Dimensionals
Mini Glue Dots
Iridescent Rhinestones

Instructions

On the long side score the misty moonlight card at 4 1/8" and fold and burnish to make the card base.

Randomly stamp the large swirl in misty moonlight on one of the pieces of white card (see picture).

Die cut some of the larger flowers and flower centres from the scraps of magenta madness and bumblebee card and some leaves from the just jade.  I have added magenta centres to bumblebee flowers and vice versa.  Arrange the flowers and leaves across the centre of the card diagonally, some glued down and some on dimensionals to give some variety.

Stamp some magenta butterflies around the flowers and then adhere this piece to the card front.


Stamp more butterflies on the remaining piece of white card and adhere to the inside of the card.  Stamp a sentiment on a scrap of white card and trim with paper snips if required.  Add this in among the flowers using a mini glue dot on one end and a dimensional on the other.

Sprinkle with rhinestones and the card is complete.

Please pop over and see what everyone else has been making this month too.  Angela is up next


Simone Kleine - derdiedasKleine bastelt 

Karen Egan - Crafty Karen Designs    
Angela Köber - Stempelfamilie

Anja Ehmann - Bastelanja

Sonja Kindler - kreativ-mit-sonja 

Gabi Appelt - Bastelbande

Iris Philipps - iriStempelt

Melanie Fischer - MeeFischs Bastelecke 

Lisa Mattes - StempelMOMent

Katja Martins - Stempelpfau 

Liane Gorny - Jungle Cards

Sandra Nitschke - Gelettertundgestempelt

Daniela Klotzsch-Fiehn - Kreativierend

Vickie Littlewood - Vickie Lou Designs

Patricia Lemke Pattis Stempel Tempel

If you would like to see more of my Blog Posts, sign up on the pop up form and you will get my weekly Newsletter with all the details of my latest projects and news from Stampin' Up!

If you would like to join my Team or become one of my Discount Shoppers, you can message me on my Facebook Page at www.facebook.com/craftykarendesigns or via the Contact Me box below this Blog.

If you are interested in taking part in some challenges and having crafty chats with like minded people and a bit of a laugh, pop over to Craft and Banter on Facebook (link in the side bar), we would love your company.

Happy crafting,


Karen X


Product List