Showing posts with label Flowering Fields. Show all posts

Saturday, 19 March 2022

Flowering Fields Spring Card - Stamping With Friends Blog Hop

 Hi Everyone,


Today I am hopping with the lovely Stamping With Friends group and the theme is 'Easter/Spring'.  I've used a sketch challenge for my inspiration as I've not been very well and found it hard to get my mojo going.


Materials

1 piece of highland heather card stock 5 7/8" x 8 1/4" and a 2 1/2" circle
1 piece of rich razzleberry card stock 3 7/8" x 5 5/8" 
4 pieces of dsp 2 1/2" x 15/8" (Flowering Fields)
1 piece of basic white 3 7/8" x 5 5/8" and a 2" circle
Flowering Tulips stamp set
Highland Heather ink
Rich Razzleberry ink
Just Jade ink
Layering circle dies
Stampin' Cut & Emboss Machine
Iridescent Rhinestones
Trimmer
Simply scored
Bone folder
Multipurpose adhesive
Dimensionals

Instructions

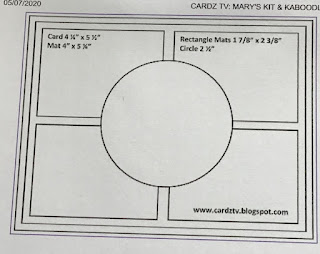
Score the highland heather card on the long side at 4 1/8" and fold and burnish to make the card base.

Add the basic white layer to the inside and decorate if required, I've stamped a tulip.


Add the rich razzleberry layer to the card front leaving a border all the way around.

Arrange the 4 pieces of dsp on the rich razzleberry layer leaving a border all around and between each piece as shown.

Stamp the sentiment on a scrap of basic white and die cut with the smaller circle die (approx 2"), then die cut the next size up in highland heather (approx 2 1/2") and layer the two together.  Arrange in the centre of the card on dimensionals.

Scatter some rhinestones and the card is complete.

Please pop over and see what everyone else has been making too.


If you would like to see more of my Blog Posts, sign up to the email alert over in the right hand side bar of the page.

If you would like to join my Team or become one of my Discount Shoppers, you can message me on my Facebook Page at www.facebook.com/craftykarendesigns or via the Contact Me box below this Blog.

If you are interested in taking part in some challenges and having crafty chats with like minded people and a bit of a laugh, pop over to Crafty and Banter on Facebook (link in the side bar). This is a new group that some crafty friends and I are trying to get up and running and we would love your company.

Happy Crafting,


Karen X

Product List

Saturday, 12 March 2022

Flowering Fields Reverse Easel Card - Mother's Day

 Hi Everyone,


Today I have made a pretty, fun fold card for Mother's Day using the lovely Flowering Fields dsp and the Tulip and Scalloped Contour dies. Let me show you how I made it.


Materials

1 piece of thick basic white card stock 5 7/8" x 10"
1 piece of highland heather card 4 7/8" x 5 3/4", 2 pieces 2 3/8" x 5 3/4"
1 piece of dsp 4 3/4" x 5 5/8", 2 pieces 2 1/4" x 5 5/8", 1 piece 3" x 4"
1 piece of basic white card stock 3 1/2" x 4 1/2, 1 piece 1 1/4" x 3"
Scraps of rich razzleberry, highland heather and soft succulent for the tulips
Rich Razzleberry ink
Flowering Tulips stamp set
Tulip  dies
Scalloped Contour dies
Stampin' Cut & Emboss machine
Trimmer
Simply scored
Bone folder
Multipurpose adhesive
Dimensionals
Mini glue dots
Iridescent rhinestones

Instructions

On the long side, score the thick white card 2 1/2" and 5" and fold and burnish as though you are making a Z Fold card.

Die cut the second largest stitched rectangle from the basic white card and select an image in the dsp that you want to put on the easel and die cut that with the next size down. I've used the reverse side of the tulip flowers used for the main sections.

Adhere all the highland heather layers to the card base and then add the dsp layers.


Stamp a sentiment on the smaller piece of basic white and die cut with the smallest of the rectangle dies.

Die cut several sets of tulips in rich razzleberry and highland heather as well as some leaves and stems in soft succulent.  Make up the flowers using mini glue dots to hold the pieces in place.


Stamp a sentiment in the top right hand corner of the dsp layer for the easel and then arrange the stems, leaves and flowers underneath it. Adhere this layer to the large rectangle. Then add glue to the back of the top half of this piece and adhere to the easel so that it is central and doesn't overhang the bottom of the card (see picture).

Add dimensionals to the back of the small rectangle and add this to the base of the card to act as a stopper (see picture), add another flower next to this.

Sprinkle some rhinestones and the card is complete.

Please pop over and see what everyone else has been making:


If you would like to see more of my Blog Posts, sign up on the pop up form and you will get my weekly Newsletter with all the details of my latest projects and news from Stampin' Up!

If you would like to join my Team or become one of my Discount Shoppers, you can message me on my Facebook Page at www.facebook.com/craftykarendesigns or via the Contact Me box below this Blog.

If you are interested in taking part in some challenges and having crafty chats with like minded people and a bit of a laugh, pop over to Craft and Banter on Facebook (link in the side bar), we would love your company.

Happy crafting,


Karen X


Product List

Thursday, 10 March 2022

Flowering Tulips Bookbinding Card - Stampin' Dreams Blog Hop

 Hi Everyone,


Today I am hopping with the lovely Stampin' Dreams group and the theme is 'Florals' and I have chosen to make a cute fun fold card using the gorgeous Flowering Fields dsp and the Flowering Tulip stamp set and dies. Let me show you how I made it.

Materials

1 piece of pumpkin pie card stock 4 1/8" x 11 1/2"
1 piece of basic white card 3 7/8" x 4 1/2", scrap for the sentiment
1 piece of dsp 3 7/8" x 4 1/2", 1 piece 3/4" x 3 7/8"
Scraps of pumpkin pie and mango melody card for the die cuts
Pumpkin pie ink
Mango Melody ink
Old Olive ink
Memento Black ink
Flowering Tulip stamp set
Tulip dies
Tasteful Label dies
Stampin' Cut & Emboss Machine
Trimmer
Simply Scored
Bone Folder
Multipurpose adhesive
Mini Glue Dots
Simply Elegant Trim
Brushed Brass Butterflies

Instructions

Score the card on the long side at 5 3/4" and 6 3/4", fold in half on the 5 3/4" fold and then fold the other one back on itself to make the 'book' fold.

Adhere the dsp to both sections of the front of the card.

Wrap some of the gold elegant trim around the card at the fold side and tie in a bow and secure with mini glue dots.  

Adhere this thin section to the back of the card by adding glue on the inside between the centre fold and the front fold, this will secure the trim in place.

Stamp a tulip and some leaves in the bottom left hand corner of the basic white piece and adhere to the inside of the card.


Die cut two tulips from the scraps of card and put them together using mini glue dots. Die cut a label from the Tasteful Label dies in white card.

Stamp a sentiment on the label and attach to the card front in the bottom right.  Add the tulips at the side of the sentiment and then add a butterfly too.

I do hope that you like my fun fold card. Please pop over and see what everyone else has made too.

If you would like to see more of my Blog Posts, sign up on the pop up form and you will get my weekly Newsletter with all the details of my latest projects and news from Stampin' Up!

If you would like to join my Team or become one of my Discount Shoppers, you can message me on my Facebook Page at www.facebook.com/craftykarendesigns or via the Contact Me box below this Blog.

If you are interested in taking part in some challenges and having crafty chats with like minded people and a bit of a laugh, pop over to Craft and Banter on Facebook (link in the side bar), we would love your company.

Happy crafting,


Karen X


Product List