Sunday 31 October 2021

Share it on a Sunday - Monochrome Card and Treat Box

 Hi Everyone,


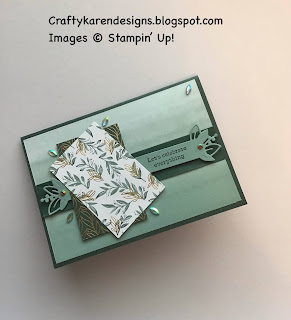
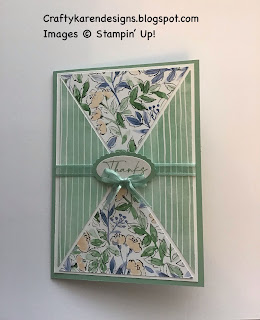
Today's theme is 'Monochrome' and I've made a cherry cobbler and white Christmas card and matching treat box using the Detailed Baubles and Pretty Pillow Box dies and the Perfectly Plaid and Poinsettia Petals stamp sets.

Materials

1 piece of cherry cobbler card 5 7/8" x 8 1/4" (card) use the other half of the sheet of card for the pillow box
2 pieces of basic white 3 7/8" x 5 5/8"
Scraps of cherry cobbler and basic white for the sentiments and die cuts
Embossing folder (I've used a retired snowflake one)
Delicate Bauble dies
Pretty Pillow Box dies
Stampin' Cut & Emboss Machine
Perfectly Plaid stamp set
Poinsettia Petals stamp set
Cherry cobbler ink
Basic rhinestones
Double Oval Punch
Multipurpose adhesive
Dimensionals
Trimmer
Bone folder

Instructions

On the long side score the card stock at 4 1/8" and fold and burnish to make the card base.

Die cut the pillow box and the flowers from the other half of the sheet of A4 cherry cobbler card. Also, die cut the delicate bauble and the bow from a scrap of cherry cobbler and the label and the white flowers from the scrap of basic white card.

Run one piece of the basic white card through the machine in your chosen embossing folder.

Fold the score lines on the pillow box gently and then bring up the half without the fold over lid and fold the curved sides front over back and glue in place. As it is a curved surface, you will need to hold it together for a minute until the glue takes, repeat with the other side.

Stamp a sentiment on the label for the pillow box and add to the box using dimensionals top and bottom, you could use a velcro dot so that it can be opened and closed, but I haven't, I don't expect it to be reused.  Don't forget to add your treat before you close it!!  (Mine contains a chocolate treat.) Adhere the flowers putting a white one on top of a red one and off set it, then add to the label as shown in the picture, add rhinestones as flower centres.

Adhere the embossed layer to the card front and then adhere the die cut bauble with the bow to make it look like it's hanging from the top of the card as shown, trim off the excess string piece.

Stamp a sentiment on a scrap of white and then punch out with the oval punch and layer up on the scalloped cherry cobbler and add to the card front on dimensionals.

Add the remaining white layer to the inside to write your message.

I hope that you like my matching monochrome card and treat box, ideal for a little gift for someone.

Don't forget to pop over and see what Donna and Victoria have made


Donna Lester


Victoria Littlewood

If you would like to see more of my Blog Posts, sign up on the pop up form and you will get my weekly Newsletter with all the details of my latest projects and news from Stampin' Up!

If you would like to join my Team or become one of my Discount Shoppers, you can message me on my Facebook Page at www.facebook.com/craftykarendesigns or via the Contact Me box below this Blog.

If you are interested in taking part in some challenges and having crafty chats with like minded people and a bit of a laugh, pop over to Craft and Banter on Facebook (link in the side bar), we would love your company.

Happy crafting,


Karen X


Product List

Saturday 30 October 2021

Hand-Penned Thank You Card - Stampin' Birds Showcase Blog Hop

Hi Everyone,


I've been scrap busting again and playing with shapes and I've brought out the lovely Hand Penned for my card today and made a slightly bigger card than usual, it's a 5" x 7".

Materials

1 piece of mint macaron card 7" x 10"
2 pieces of basic white card 4 3/4" x 6 3/4"
2 pieces of dsp (busy design) 3 1/4" x 4 3/8", 2 pieces (plainer design) 6 3/8" x 2 1/8"
Scrap of soft succulent ribbon approx 12"
Scraps of mint macaron and basic white card for the sentiment
Mint macaron ink
Hand Penned Petals stamp set
Trimmer
Simply scored
Ruler
Pencil
Double Oval punch
Multipurpose adhesive
Dimensionals
Mini glue dots

Instructions

On the long side, score the card at 5" and fold and burnish to make the card base.

Using the 3 1/4" x 4 3/8" dsp, measure along the long edge and mark the half way point (make sure that you have the paper in the right orientation as the points go in opposite directions, the top one down and the bottom one up).  Cut a diagonal line to each opposite corner from the marked half way point.

Repeat this using the long, thin pieces remembering that they will face in towards each other (see photo).

Adhere the pieces in place on a piece of the basic white leaving a border all around and in between them as shown in the picture.

Wrap a piece of the ribbon around this layer in the centre and fix to the back using sticky tape. Now adhere this mat layer to the card front.

Stamp a sentiment on a scrap of basic white and punch out using the double oval punch and punch the larger size out of the mint macaron card. Layer them up and add to the centre of the card where all the points meet and over the top of the ribbon using dimensionals. Tie a small bow and add to the bottom of the label with a glue dot.

Stamp some of the floral images on the remaining basic white and add to the inside of the card.


I do hope that you like my card, now please pop over and see what the rest of the team have been making this month.


If you would like to see more of my Blog Posts, sign up on the pop up form and you will get my weekly Newsletter with all the details of my latest projects and news from Stampin' Up!

If you would like to join my Team or become one of my Discount Shoppers, you can message me on my Facebook Page at www.facebook.com/craftykarendesigns or via the Contact Me box below this Blog.

If you are interested in taking part in some challenges and having crafty chats with like minded people and a bit of a laugh, pop over to Craft and Banter on Facebook (link in the side bar), we would love your company.

Happy crafting,


Karen X


Product List

Friday 29 October 2021

Trio of Pansy Petals Triple Diamond Point Cards

 Hi Everyone,


Today I am making a trio of cards for three special ladies who are all retiring from work at the same time. They have worked together for many years and been a valuable part of the local community and those of us who use our lovely, little village library are going to miss them. I decided to use the Pansy Petals dsp for these cards, it's one of my favourites and the inspiration comes from Sam Calcott from Mixed Up Craft.

Materials for each card

1 piece of basic white 5 7/8" x 11 3/4" (full length A4), scrap for the sentiment
1 piece of coloured card 5 5/8" x 3 5/8", 3 pieces 1 5/8" square
1 piece of dsp 5 1/2" x 3 1/2"
1 large and two small pansies from the Pansy Petals dsp
Art Gallery stamp set
Floral Gallery dies
Pansy dies
Stampin' Cut and Emboss Machine
Trimmer
Ink to match the coloured card
Simply scored
Bone folder
Multipurpose adhesive
Dimensionals

Instructions

On the long side score the white card at 5 3/4" and fold and burnish to make the card base, then trim off the bottom 1 7/8" of the card front and cut this piece into 3 pieces 1 7/8" square.

Add the coloured card mat and then the dsp mat to the card front.  Add the coloured layer to the squares.

Die cut or fussy cut the flowers.

Arrange the squares in a diamond shape making sure that the outer edge and the bottom line up with the side and bottom of the card, do the two side ones first and then add the middle one over the top.  I have added these with a single dimensional on the top point but you could glue them if you want to.  Arrange the flowers on dimensionals on each of the diamonds.

Stamp the sentiment on a scrap of white card and die cut with the small label from the Floral Gallery dies.

I do hope that these three ladies will like their cards and I hope that you do too.

If you would like to see more of my Blog Posts, sign up on the pop up form and you will get my weekly Newsletter with all the details of my latest projects and news from Stampin' Up!

If you would like to join my Team or become one of my Discount Shoppers, you can message me on my Facebook Page at www.facebook.com/craftykarendesigns or via the Contact Me box below this Blog.

If you are interested in taking part in some challenges and having crafty chats with like minded people and a bit of a laugh, pop over to Craft and Banter on Facebook (link in the side bar), we would love your company.

Happy crafting,


Karen X


Product List

Wednesday 27 October 2021

Eden's Garden - Crafty Collaborations Sketch Challenge

Hi Everyone,


Today I am hopping with the lovely Crafty Collaborations Group, a team of Stampin' Up Demonstrators from all around the world and we are all following this sketch challenge. I love sketch challenges, they are a way to get your crafty mojo going if you can't think of anything to make and also a way of using up scraps and die cuts you may have lying about on your craft desk.

Materials

1 piece of evening evergreen card 5 7/8" x 8 1/4"
1 piece of basic white card 3 7/8" x 5 5/8"
1 piece of dsp (Ever Eden) 3 7/8" x 5 5/8", 2 pieces 2" x 3"
Strip of Ever Eden Cotton paper in evening evergreen 1" x 5 5/8"
Scrap of soft succulent card for the die cut label
Eden dies
Stampin' Cut & Emboss Machine
Eden's Garden stamp set
Garden gems
Evening evergreen ink
Soft succulent ink
Trimmer
Simply Scored
Bone Folder
Dimensionals
Multipurpose adhesive

Instructions

On the long side score the evening evergreen card at 4 1/8" and fold and burnish to make the card base.

Adhere the largest piece of dsp to the card front and then add the strip of cotton paper across the middle (add glue along the centre as you can cover this with the sentiment label, it's like vellum and adhesive shows through).

Die cut the label from the soft succulent card and then stamp the sentiment over to the right hand side of the label in evening evergreen ink.  Cut the left hand end of the label off so that you can tuck both ends under the dsp to make it look longer.

Arrange the first piece of dsp on dimensionals over the cotton paper strip, then add the two halves of the sentiment label on dimensionals and arrange the other piece of dsp at an angle and make sure that you cover the cut ends of the label.  Sprinkle some of the garden gems around the card front and on the sentiment label.

Stamp another sentiment and the large flower image on the basic white card and adhere to the inside of the card.


Please pop over and see what everyone else has made too, you are sure to be inspired and amazed at how different the versions of this sketch challenge will look.


If you would like to see more of my Blog Posts, sign up on the pop up form and you will get my weekly Newsletter with all the details of my latest projects and news from Stampin' Up!

If you would like to join my Team or become one of my Discount Shoppers, you can message me on my Facebook Page at www.facebook.com/craftykarendesigns or via the Contact Me box below this Blog.

If you are interested in taking part in some challenges and having crafty chats with like minded people and a bit of a laugh, pop over to Craft and Banter on Facebook (link in the side bar), we would love your company.

Happy crafting,


Karen X


Product List