Friday 31 March 2023

Fancy Flora Flip Fold Card

 Hi Everyone,


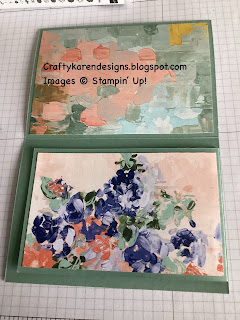
Today I have made a Flip Fold card using the fabulous Fancy Flora designer series papers - I'm on a mission to get it all used up before the new catalogue begins. I did try stamping some of the flowers to go with this but decided that 'less is more' and so just let the dsp do the work.

Materials

1 piece of mint macaron card stock 5 7/8" x 8 1/4", 1 piece 6" x 3 1/2", scrap for the sentiment
1 piece of basic white 3 7/8" x 5 5/8", scrap for the sentiment
2 pieces of dsp 3 7/8" x 5 5/8", 2 pieces 5 1/4" x 3 1/4"
Mint macaron ink
Artistically Inked stamp set
Two Tone Flora stamp set
Trimmer
Simply Scored
Bone folder
Multipurpose adhesive
Dimensionals


Instructions

On the long side score the card at 4 1/8" and fold and burnish to make a landscape card base. On the smaller piece, score at 1/2" and fold and burnish. Adhere this piece in place on the inside of the card to form the flap.

Add the dsp to all the panels


Stamp a sentiment and some leaves on the basic white layer and add to the inside of the card.


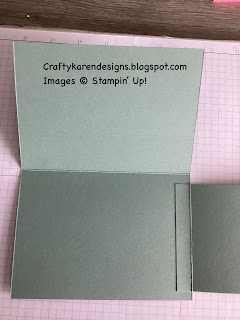
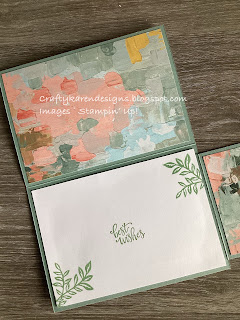
Stamp a sentiment on a scrap of basic white and trim around it, then layer this up on a scrap of mint macaron and add to the card front and the card is complete.

I haven't added anything else, I felt that the dsp said enough so the flowers I stamped I will save for another project.

Pop over and see what Victoria has made too


If you would like to join my Team or become one of my Discount Shoppers, you can message me on my Facebook Page at www.facebook.com/craftykarendesigns or via the Contact Me box below this Blog.

If you are interested in taking part in some challenges and having crafty chats with like minded people and a bit of a laugh, pop over to Craft and Banter on Facebook (link in the side bar). This group is a collaboration with Taffy Crafting (Donna Lester) and Vickieloudesigns (Victoria Littlewood) and we would love you to join us.

Happy Crafting,


Karen X


Product List

Friday 24 March 2023

Country Floral Lane Panel Card

 Hi Everyone,


Today's card is a Panel Fold which is great for showing off designer series papers and getting rid of scraps. You can choose to use all the same, flip both sides or use a completely different pattern on each sections, it's up to you. I've made mine into a simple Thank You card to keep in my stash for when I need one. There is a video tutorial for this on my YouTube channel, lick on the link below to watch it:

Video Tutorial

Materials

1 piece of petal pink card stock 6" x length of A4, scrap for the sentiment
1 piece of basic white 3" x 5 1/2", scrap for the sentiment
2 pieces of dsp 1 1/4" x 5 3/4", 2 pieces 1 3/4" x 5 3/4", 2 pieces 3 1/4" x 5 3/4", 1 piece 4 3/8" x 5 3/4"
Pansy Patch stamp set
Sweet Sorbet ink
In Colour Dots
Trimmer
Simply Scored
Multipurpose adhesive
Dimensionals

Instructions

On the long side score the petal pink card at 1 1/2", 3 1/2", 7" and then flip over and score in the same places, this will enable the card to be folded in either direction. Fold and burnish starting at the 1 1/2" fold with a valley and then a mountain.

Add all the dsp mat layers to the relevant sections.


Stamp a sentiment on the white card and adhere on the inside of the card so that it doesn't show when the card is closed.

Stamp a sentiment on a scrap of white and then punch out and layer up on the petal pink oval. Adhere the the front fold using dimensionals and add some matching coloured dots.

Please pop over and see what Victoria has made this week:


If you would like to join my Team or become one of my Discount Shoppers, you can message me on my Facebook Page at www.facebook.com/craftykarendesigns or via the Contact Me box below this Blog.

If you are interested in taking part in some challenges and having crafty chats with like minded people and a bit of a laugh, pop over to Craft and Banter on Facebook (link in the side bar). This group is a collaboration with Taffy Crafting (Donna Lester) and Vickieloudesigns (Victoria Littlewood) and we would love you to join us.

Happy Crafting,


Karen X


Friday 17 March 2023

Shaded Summer Country Gingham Fun Fold Card - Fun Fold Friday

 Hi Everyone,


Today I have made a very quick, small offset gatefold card which could also be used to hold a gift card. The card could be used for any occasion, just change up the dsp and the sentiments. I wanted to play with the gingham (one of my faves) and the Summer Shadows dies, I think these are really pretty. Let me show you how I made it.

Materials

1 piece of mint macaron card stock 4 1/8" x length of A4, scraps for die cuts
1 piece of basic white card 3 7/8" square, scraps for die cuts
Scraps of so saffron card stock for die cuts
1 piece of dsp 3 7/8" square, 1 piece 3 1/8" x 3 7/8" (1 piece 3 7/8" x 2" if making into a gift card)
Shaded Summer stamp set
Summer Shadows dies
Stylish Shapes dies
Stampin' Cut & Emboss Machine
Black Memento ink
Brushed Brass Butterflies
Opal Round Gems
Trimmer
Simply Scored
Bone Folder
Multipurpose adhesive
Dimensionals

Instructions

On the long side score the mint macaron card at 4" and 8 1/4", fold and burnish to make the card base.

Add the dsp to both flaps of the card.  If making into a gift card, punch a half circle in one long edge to enable you to pull out the gift card, adhere in place on the inside front flap adding glue in a thin line round the 3 edges without the circle and stick in place. You should be able to slide a gift card in there.

Die cut one large flower and a smaller one using both parts of the dies and three sets of leaves. I've used mint macaron base with white detail for the leaves and so saffron base with white detail for the flowers.  Adhere the detailed tops to the die cuts.

Stamp a sentiment on a scrap of white and die cut with the banner die from Stylish Shapes.  Adhere this t the card front using dimensionals.  Then arrange the large flower and two sets of leaves on the card front.  Add the remaining flower and set of leaves to the other front flap.


Stamp a sentiment on the white square and adhere to the inside of the card.

Add some of the opal rounds and some butterflies and the card is complete.


Pop over and see what Donna and Victoria have made too:


Donna Lester


Victoria Littlwood


If you would like to join my Team or become one of my Discount Shoppers, you can message me on my Facebook Page at 
www.facebook.com/craftykarendesigns or via the Contact Me box below this Blog.

If you are interested in taking part in some challenges and having crafty chats with like minded people and a bit of a laugh, pop over to Craft and Banter on Facebook (link in the side bar). This group is a collaboration with Taffy Crafting (Donna Lester) and Vickieloudesigns (Victoria Littlewood) and we would love you to join us.

Happy Crafting,


Karen X


Product List

Wednesday 1 March 2023

Stamp Around UK Video Hop - Spring - Slide & Lock Fun Fold Card

 Hi Everyone,


The theme for this month is 'Spring', my favourite season of the year. I love Spring and all the promise of warmer weather and pretty flowers. Daffodils are my favourite as they remind me of my late Mum, they were here favourites too. I've used the Daffodil Delight stamp set and dies to make a Slide & Lock fun fold card for Mother's Day. I have adapted the measurements of one that I saw Wendy Cranford make, I've made it a bigger 5" x 7" card.  Click on the link below to see my YouTube tutorial:


Video Tutorial

Materials

1 piece of granny apple green card stock 10" x 7", 1 piece 3 1/2" square, 4 pieces 2" square
1 piece of daffodil delight card stock 4 3/4" x 6 3/4", 1 piece 1 3/4" x 6 3/4", 1 piece 2 3/4" x 6 3/4"
1 piece of basic white card stock 4 1/2" x 6 1/2", scraps for stamping
1 piece of dsp 1 1/2" x 6 1/2", 1 piece 2 1/2" x 6 1/2", 1 piece 3 1/4" square
Daffodil Daydream stamp set
Daffodil dies
Stampin' Cut & Emboss Machine
Flowering Tulips stamp set
Memento Black ink
Daffodil Delight Stampin' Blends
Granny Apple Green Stampin' Blends
Polished Pink Stampin' Blends
Fresh Freesia Stampin' Blends
Trimmer
Simply Scored
Bone Folder
Multipurpose Adhesive
Dimensionals

Instructions

On the long side score the granny apple green at 2" and 7" and fold and burnish to make the card base.  Score two of the 2" squares at 1" and fold and burnish those as well.

To make the mechanism, add glue to half of the folded 2" square pieces and line up so that the folds of each piece meet in the centre of one of the other 2" square pieces, then add the other 2" square on top of that to sandwich the two folded pieces in between. It's quite hard to show on a photo so I have stood the mechanism up in this photo below.


Adhere the daffodil delight mat layers and the dsp layers to the card base and the topper and then set to one side while you do the stamping.

Stamp a daffodil and a butterfly on a piece of scrap and die cut them out. I've done a couple of each so that I can stick them together for strength and so you can't see the colouring through it.

Colour in the daffodil and the butterfly with the Stampin' Blends and then glue another one to the back of it.

Stamp a sentiment on the bottom right of the topper and then add the flower and the butterfly with dimensionals.


Stamp another sentiment and some more butterflies on the remaining piece of white, colour in the butterflies and then adhere to the inside of the card.


I do hope that you like my card. Don't forget is you click on the video link above, you will be able to get the links for all the other projects too.

If you would like to join my Team or become one of my Discount Shoppers, you can message me on my Facebook Page at www.facebook.com/craftykarendesigns or via the Contact Me box below this Blog.

If you are interested in taking part in some challenges and having crafty chats with like minded people and a bit of a laugh, pop over to Craft and Banter on Facebook (link in the side bar). This group is a collaboration with Taffy Crafting (Donna Lester) and Vickieloudesigns (Victoria Littlewood) and we would love you to join us.

Happy Crafting,


Karen X


Product List