Friday 30 October 2020

Fun Fold Friday #39 - Feels Like Frost Centre Panel Card

 Hi Everyone,


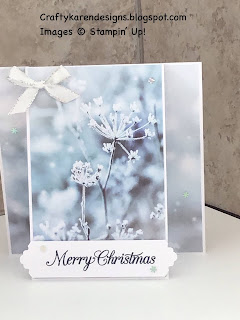
Welcome to my Fun Fold Friday series and this week I have made three versions of the same card using the lovely Feels Like Frost designer series paper. My inspiration came from a project that I saw Donna Grey make on her YouTube channel but I have changed the measurements and made mine a little bigger.  There is a video tutorial over on my YouTube channel, just click on the link below:

https://youtu.be/1rPjnS5xEGA


Materials

1 piece of rococco rose card stock 5 7/8" x 11 3/4" (full length of A4), 1 piece 1" x 4 1/2"
1 piece of whisper white 5 5/8" square, 1 piece 3/4" x 3 3/4"
1 sheet of 6" x 6" feels like frost dsp
Gorgeous Posies stamp set
Rococco rose ink
Silver edged white ribbon for the bow
Lovely Labels Pick a Punch
Snowflake adhesive backed
Multipurpose adhesive
Trimmer
Bone folder
Mini glue dots

Instructions

Score the rococco rose card stock on the long side at 5 7/8", then turn to the short side and cut down at the 1" mark on the right of the card to the middle score line. Repeat this on the left hand side of the card and remove the two 1" strips leaving just the centre panel attached (see picture).

Adhere the whisper white layer to the inside of the card leaving a small border all around the edges.

Cut 2 1" strips off the dsp, I've tried to leave the main focus of the piece for the centre panel, so one one card I took both strips from one side and on another I took one from each side. Trims these panels to 5 1/2" from top to bottom so that when adhered to the card, they will leave a small border. Trim the centre panel so that it is 3 5/8" wide by 5 1/2".

Add the two 1" strips to either side of the whisper white layer and then the larger panel of dsp to the centre panel.

Punch both ends of the strip os rococco rose card and then punch both ends of the whisper white strip. Stamp your sentiment on the whisper white strip and then adhere it to the centre of the rococco rose one and then adhere to the bottom of the centre panel overhanging at either side.

Make a bow with the ribbon and add with mini glue dots to the top left of the centre panel.

Scatter some sequins over the whole card front.

There you are, a quick and easy card but looks fabulous I hope you agree.  Here are pictures of the other cards that I made using the same layout.


If you would like to see more of my Blog Posts, sign up to the email alert over in the right hand side bar of the page.

If you would like to join my Team or become one of my Discount Shoppers, you can message me on my Facebook Page at www.facebook.com/craftykarendesigns or via the Contact Me box below this Blog.

If you are interested in taking part in some challenges and having crafty chats with like minded people and a bit of a laugh, pop over to Crafty and Banter on Facebook (link in the side bar). This is a new group that some crafty friends and I are trying to get up and running and we would love your company.

Happy Crafting,


Karen XXX

Product List

Thursday 29 October 2020

Snowy Trimming the Town

 Hi Everyone,


Today I have been playing with the Trimming the Town designer series paper and some off cuts from the new Curvy dies (available from 3rd November 2020).  I had a couple of curvy pieces left from another project so I decided to turn them into snow drifts for this card. Let me show you what I did.

Materials

1 piece of mossy meadow card stock 5 7/8" x 8 1/4"
1 piece of whisper white 3 7/8" x 5 5/8" and scraps for the snow drifts and the sentiment
1 piece of dsp 3 7/8" x 5 5/8"
1 house cut from the dsp
2" circle of gold foil
Curvy dies
Stampin Cut and Emboss machine
Mossy meadow ink
Itty Bitty Christmas stamp set
Perfectly Plaid stamp set
2" circle punch
1 1/2" circle punch

Instructions

On the long side, score the mossy meadow card at 4 1/8" and fold and burnish to make the landscape card base.

Adhere the dsp layer to the card front leaving a small border all around the edge.

I had two narrow curvy pieces left from another project so I have laid them on top of each other to look like snow drifts, but you could just cut some from the Curvy dies. Adhere them to the bottom of the dsp so that they line up and then add some glue to the house and slip that in between the two layers (see picture).

Stamp a sentiment on a scrap of whisper white and punch out with the 1 1/2" circle punch and add it to a 2" gold circle.  Add this to the card front using dimensionals.

Stamp another sentiment on the remaining piece of whisper white and add it to the inside of the card.

there you go, another quick and easy card, I hope that you like it.

If you would like to see more of my Blog Posts, sign up to the email alert over in the right hand side bar of the page.

If you would like to join my Team or become one of my Discount Shoppers, you can message me on my Facebook Page at www.facebook.com/craftykarendesigns or via the Contact Me box below this Blog.

If you are interested in taking part in some challenges and having crafty chats with like minded people and a bit of a laugh, pop over to Crafty and Banter on Facebook (link in the side bar). This is a new group that some crafty friends and I are trying to get up and running and we would love your company.

Happy Crafting,


Karen XXX


Product List 

Wednesday 28 October 2020

Curvy Christmas Card


Hi Everyone,


Today I have been playing with the Curvy Bundle again, I just love these dies now I've got the hang of them! I've teamed them with some of the Curvy Christmas dsp and added some gold trees using the Pine Tree punch. Let me show you how I made it.

Materials

1 piece of cherry cobbler card stock 5 7/8" x 8 1/4"
1 piece of whisper white 3 7/8" x 5 5/8" and 1 piece approx 3" x 5 5/8"
Scraps of gold foil for the trees
Poinsettia Petals stamp set
Curvy dies
Stampin Cut and Emboss machine
Cherry Cobber ink
Pine Tree Punch
Trimmer
Simply scored
Bone folder
Multipurpose adhesive
Dimensionals

Instructions

Score the cherry cobbler card on the long side at 4 1/8" and fold and burnish to make the card base (landscape).

Adhere the dsp to the card front leaving a small border all around the edge.

Arrange the curvy dies on the strip of whisper white, I have used the same one twice for this card, and die cut.

Stamp a sentiment on the widest part of the curved piece of whisper white and then adhere to the card front.

Punch out two trees from the gold foil and arrange on the card front.

Stamp another sentiment on the remaining piece of whisper white and decorate if you want to and then adhere to the inside of the card.

Another quick and easy card, give it a try.

If you would like to see more of my Blog Posts, sign up to the email alert over in the right hand side bar of the page.

If you would like to join my Team or become one of my Discount Shoppers, you can message me on my Facebook Page at www.facebook.com/craftykarendesigns or via the Contact Me box below this Blog.

If you are interested in taking part in some challenges and having crafty chats with like minded people and a bit of a laugh, pop over to Crafty and Banter on Facebook (link in the side bar). This is a new group that some crafty friends and I are trying to get up and running and we would love your company.

Happy Crafting,


Karen XXX


Product List 

Tuesday 27 October 2020

Peony Garden Sketch Challenge Card

 Hi Everyone,


Those of you who follow me will know that I regularly show you projects that are challenges.  Sometimes it's colours, sometimes a particular product and sometimes it's a sketch.  I do lots of challenges with two of my crafty friends - Taffycrafting (Donna Lester) and Vickieloudesigns (Victoria Littlewood) and we have a regular weekly one called Share it on a Sunday. Well, now Donna has challenged us to do some sketch challenges over the next few weeks to keep our creative mojo going and I'm going to use them as a chance to show you new products as well as some old favourites that I haven't used for a while.  So, here goes with my Challenge 31 of #33, I hope that you like it.


Materials

1 piece of petal pink card stock 5 7/8" x 8 1/4"
1 piece of whisper white 3 7/8" x 5 5/8" and 1 piece 2 3/8" x 3 1/4" and a scrap for the sentiment
1 piece of dsp 3 7/8" x 5 5/8", 1 piece 3 5/8" x 1 3/4", 1 piece 3 5/8" x 3 1/4" and 1 piece 2 5/8" x 3 1/2" (I have used 3 different designs from Peony Garden)
Prized Peony stamp set
Grey granite ink
Posted for you stamp set
Multipurpose adhesive
Dimensionals
Classic Label punch
Trimmer
Simply Scored
Bone folder

Instructions

On the long side score the petal pink card stock at 4 1/8" and fold and burnish to make the card base.

Adhere the largest piece of dsp to the card front leaving a border all around.

Adhere the next two pieces leaving borders between and around them as shown in the picture.

Stamp the large peony on the whisper white mat layer for the front and adhere to the remaining dsp layer.  Add this to the card front using dimensionals.

On the whisper white layer for the inside I have stamped a sentiment and two of the small peonies.  Stamp the sentiment on the scrap and punch out with the classic label punch.

Another simple sketch challenge that will look completely different depending on the stamp sets and dsp that you use, give it a try, its fun.

If you would like to see more of my Blog Posts, sign up to the email alert over in the right hand side bar of the page.

If you would like to join my Team or become one of my Discount Shoppers, you can message me on my Facebook Page at www.facebook.com/craftykarendesigns or via the Contact Me box below this Blog.

If you are interested in taking part in some challenges and having crafty chats with like minded people and a bit of a laugh, pop over to Crafty and Banter on Facebook (link in the side bar). This is a new group that some crafty friends and I are trying to get up and running and we would love your company.

Happy Crafting,


Karen XXX


Product List