Hi Everyone,
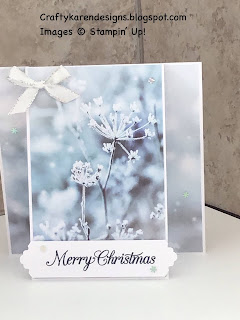
Welcome to my Fun Fold Friday series and this week I have made three versions of the same card using the lovely Feels Like Frost designer series paper. My inspiration came from a project that I saw Donna Grey make on her YouTube channel but I have changed the measurements and made mine a little bigger. There is a video tutorial over on my YouTube channel, just click on the link below:
Materials
1 piece of rococco rose card stock 5 7/8" x 11 3/4" (full length of A4), 1 piece 1" x 4 1/2"
1 piece of whisper white 5 5/8" square, 1 piece 3/4" x 3 3/4"
1 sheet of 6" x 6" feels like frost dsp
Gorgeous Posies stamp set
Rococco rose ink
Silver edged white ribbon for the bow
Lovely Labels Pick a Punch
Snowflake adhesive backed
Multipurpose adhesive
Trimmer
Bone folder
Mini glue dots
Instructions
Score the rococco rose card stock on the long side at 5 7/8", then turn to the short side and cut down at the 1" mark on the right of the card to the middle score line. Repeat this on the left hand side of the card and remove the two 1" strips leaving just the centre panel attached (see picture).
Adhere the whisper white layer to the inside of the card leaving a small border all around the edges.
Cut 2 1" strips off the dsp, I've tried to leave the main focus of the piece for the centre panel, so one one card I took both strips from one side and on another I took one from each side. Trims these panels to 5 1/2" from top to bottom so that when adhered to the card, they will leave a small border. Trim the centre panel so that it is 3 5/8" wide by 5 1/2".
Add the two 1" strips to either side of the whisper white layer and then the larger panel of dsp to the centre panel.
Punch both ends of the strip os rococco rose card and then punch both ends of the whisper white strip. Stamp your sentiment on the whisper white strip and then adhere it to the centre of the rococco rose one and then adhere to the bottom of the centre panel overhanging at either side.
Make a bow with the ribbon and add with mini glue dots to the top left of the centre panel.
Scatter some sequins over the whole card front.
There you are, a quick and easy card but looks fabulous I hope you agree. Here are pictures of the other cards that I made using the same layout.
If you would like to see more of my Blog Posts, sign up to the email alert over in the right hand side bar of the page.
If you would like to join my Team or become one of my Discount Shoppers, you can message me on my Facebook Page at www.facebook.com/craftykarendesigns or via the Contact Me box below this Blog.
If you are interested in taking part in some challenges and having crafty chats with like minded people and a bit of a laugh, pop over to Crafty and Banter on Facebook (link in the side bar). This is a new group that some crafty friends and I are trying to get up and running and we would love your company.
If you are interested in taking part in some challenges and having crafty chats with like minded people and a bit of a laugh, pop over to Crafty and Banter on Facebook (link in the side bar). This is a new group that some crafty friends and I are trying to get up and running and we would love your company.
Happy Crafting,
Karen XXX


Beautiful cards Karen xx
ReplyDeleteThank you x
ReplyDelete