Monday 30 November 2020

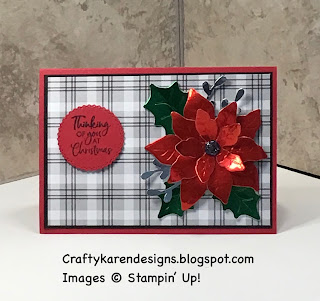
Plaid tidings poinsettia Christmas card

 Hi Everyone,


Today I have made a pretty Christmas card using the lovely Plaid Tidings designer series paper with Poinsettia and Tasteful Labels dies. Let me show you how I made it.

Materials

1 piece of real red card stock 5 7/8" x 8 1/4", scrap for the sentiment
1 piece of basic black card stock 4" x 5 3/4"
1piece of whisper white card stock 3 7/8" x 5 5/8"
1 piece of Plaid Tidings dsp 3 7/8" x 5 5/8"
Scraps of red, silver and green foil for the embellishments
Poinsettia dies
Stampin Cut and Emboss machine
Sprig Punch
Tasteful Labels dies
Memento Black ink
Real red ink
Itty Bitty Christmas stamp set
Black glitter gem (from my stash)
Trimmer
Simply scored
Bone folder
Multipurpose adhesive
Dimensionals

Instructions

On the long side score the real red card at 4 1/8" and fold and burnish to make the card base.

Adhere the basic black and the dsp to the card front leaving equal borders between and around them.

Run the poinsettia flower and leaf dies through the Stampin Cut and Emboss, cut one of each set of petals and three leaves. Die cut the label in real red card.

Punch out two sprigs in silver foil with the Sprig Punch.

Layer the flower together, curl the petals and leaves with the bone folder to give them some dimension, add the leaves and the sprigs to the back and then add to the card front using dimensionals.

Stamp on the label using memento black ink and then add to the card front with dimensionals.

Stamp a sentiment on the whisper white layer using real red ink and then adhere to the inside of the card.

Here are a few other examples I have made with this layout.


I hope that you like my card and will give it a try.

If you would like to see more of my Blog Posts, sign up to the email alert over in the right hand side bar of the page.

If you would like to join my Team or become one of my Discount Shoppers, you can message me on my Facebook Page at www.facebook.com/craftykarendesigns or via the Contact Me box below this Blog.

If you are interested in taking part in some challenges and having crafty chats with like minded people and a bit of a laugh, pop over to Crafty and Banter on Facebook (link in the side bar). This is a new group that some crafty friends and I are trying to get up and running and we would love your company.

Happy Crafting,


Karen XXX


Product List

Sunday 29 November 2020

Share it on a Sunday - Colour Challenge Home Decor Project

 Hi Everyone,


It's Share it on a Sunday and this weeks challenge was a colour one - Pacific Point, Daffodil Delight and Granny Apple Green.  I decided to make a little picture to put on my desk as a bit of encouragement to 'Always Believe' I can do it if I set my mind to it. Let me show you how I made it and don't forget to click on the links below to see what Donna and Victoria have made this week too.


Materials

4" square shadow box frame
1 piece of whisper white 3 7/8" square
Pacific point ink
Daffodil delight ink
Granny apple green ink
Field of Flowers stamp set
Confetti Flowers punch
Brights dsp stack (scraps for the flowers)
Multipurpose adhesive
Trimmer
Take a pick tool

Instructions

Stamp the grass in granny apple green across the bottom of the 4" square whisper white.

Stamp some pacific point flowers across the ends of the grass, I have done two sets.

Punch out some daffodil delight and pacific point flowers with the brights dsp (or card stock) with the confetti flower punch.

Attach the flowers by dabbing tiny amounts of adhesive where you want them to do and I found it easier to pick them up with the Take a Pick tool and place them on top of the glue spots.

Stamp the sentiment above the floral images using the pacific point ink and then add a sprinkling of dragonflies in granny apple green.

Add the picture to the frame and job done, a cute little home decor project for my desk, I hope that you like it.

 If you would like to see more of my Blog Posts, sign up to the email alert over in the right hand side bar of the page.

If you would like to join my Team or become one of my Discount Shoppers, you can message me on my Facebook Page at www.facebook.com/craftykarendesigns or via the Contact Me box below this Blog.

If you are interested in taking part in some challenges and having crafty chats with like minded people and a bit of a laugh, pop over to Crafty and Banter on Facebook (link in the side bar). This is a new group that some crafty friends and I are trying to get up and running and we would love your company.

Don’t forget to pop over and check out what Donna and Victoria have made too.

Donna Lester

Victoria Littlewood

Happy Crafting,


Karen XXX

Product List

Saturday 28 November 2020

Snowflake Splendour Christmas Tree Ornament

 Hi Everyone,


Today I am hopping with the Ink Stamp Share group and the theme is 'Christmas Tree Decoration' and I have made this pretty one using the lovely Snowflake Splendour designer series paper.  I've seen lots of these on Pinterest made out of all sorts of different papers and they look great and it only takes 1 piece of 6 x 6.  The tutorial I found was actually in Russian, so I just followed the pictures and the measurements are in metric which is a learning curve for me, I usually use inches.  It would work in inches too but would be slightly larger I think, it's really easy, let me show you how.

Materials

12 strips of dsp 0.5cm x 15cm
1 piece 6cm square
1 piece 6cm x 1.5cm
2 1" circles (cut with punch)
2 1" card circles in colour to match (cut with punch)
1" circle punch
Trimmer
Multipurpose adhesive
Ruler
Pencil
Small piece of ribbon or twine to hang it on the tree
Bone folder
1/8" hole punch

Instructions

On the 6cm square piece of dsp mark along the top and bottom edge at 0.5cm intervals.


Make a tube by adhering the 1.5cm strip on the underside of the 6cm piece, curl with a bone folder and bring the other side around and adhere in place.


Curl the 0.5cm strips with the bone folder.


Starting at the seam adhere the paper strips all around the top edge placing each one over the top of the previous one at the marks you made with the pencil.


Bring the first one around the tube and adhere at the bottom on the other side of the seam to give it a twist, then follow around the bottom in exactly the same way, bringing each strip around from the top in turn and adhering over the top of the previous one.


It can be a bit fiddly but just take your time.

Adhere the dsp circles on top of the card circles, this will give them a bit of strength.  Punch a hole in the centre of one of them and thread the ribbon through and secure on the underside, I've just knotted mine.  Then adhere this to the top of the decoration and adhere the remaining one to the bottom.


There you are, a quick tree decoration and you can use up all that dsp you have lying about in your craft room. Here is an example with different dsp.

Please click on the link below and pop over to see what my crafty colleagues have made, there is sure to be lots of inspiration from some very talented crafters.


If you would like to see more of my Blog Posts, sign up to the email alert over in the right hand side bar of the page.

If you would like to join my Team or become one of my Discount Shoppers, you can message me on my Facebook Page at www.facebook.com/craftykarendesigns or via the Contact Me box below this Blog.

If you are interested in taking part in some challenges and having crafty chats with like minded people and a bit of a laugh, pop over to Crafty and Banter on Facebook (link in the side bar). This is a new group that some crafty friends and I are trying to get up and running and we would love your company.

Happy Crafting,


Karen XXX


Happy crafting,


Karen XXX


Product List

Friday 27 November 2020

Fun Fold Friday #43 - World of Good Crossover Gatefold Card

 Hi Everyone,


Welcome to my Fun Fold Friday Series and this week I have made a Crossover Gatefold Card using the lovely World of Good designer series paper and this card would be great for a masculine card.  There is a video tutorial over on my YouTube channel, please click on the link below:


Materials

1 piece of basic black card stock 4 1/8" x 11 1/2", 3 pieces 1" x 4", scrap for the sentiment
1 piece of whisper white card stock 3 1/2" x 5 1/8", scrap for the sentiment
1 piece of dsp 3 7/8" x 5 1/2", 2 pieces 2 5/8" x 3 7/8", 3 pieces 3/4" x 3 3/4"
Tasteful Touches stamp set
Memento Black ink
2" circle punch
2 1/4" circle punch
Multipurpose adhesive
Dimensionals
Trimmer
Simply scored
Bone folder

Instructions

On the long side score the basic black card at 2 7/8" from either end, fold and burnish to make the card base.

Adhere the largest piece of dsp to the inside of the card, then add the whisper white layer to the centre of that leaving a small border all around the edges.

Adhere the two pieces of dsp to the front folds making sure that they are level and meet up when the card is closed.

Adhere the strips of dsp to the strips of basic black card.

Arrange the strips on the front of the card with equal spacing between them, adhere the top and bottom ones to the left side flap and the middle one to the right side.

Stamp a sentiment and punch out with the 2" circle punch and then punch out a 2 1/4" circle to mat it on to.  Add dimensionals to the top and bottom of the circle so that it sits on the right hand side of the top and bottom strips.  When closed the middle strip goes through the gap in between the other two strips.

I hope that you like this very simple fun fold and will give it a try.

If you would like to see more of my Blog Posts, sign up to the email alert over in the right hand side bar of the page.

If you would like to join my Team or become one of my Discount Shoppers, you can message me on my Facebook Page at www.facebook.com/craftykarendesigns or via the Contact Me box below this Blog.

If you are interested in taking part in some challenges and having crafty chats with like minded people and a bit of a laugh, pop over to Crafty and Banter on Facebook (link in the side bar). This is a new group that some crafty friends and I are trying to get up and running and we would love your company.

Happy Crafting,


Karen XXX


Product List