Showing posts with label Sunshine & Rainbows. Show all posts

Monday, 28 February 2022

Hello Sunshine & Rainbows - Crafty Collaborations Sketch Challenge

 Hi Everyone,


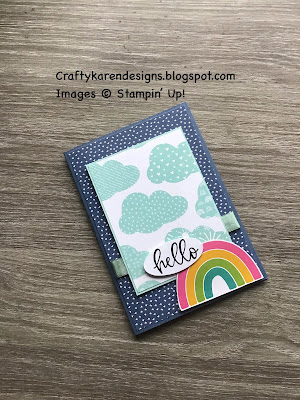
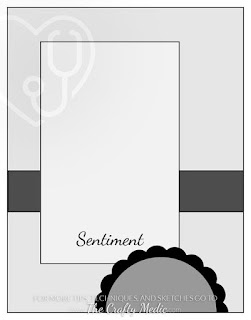
It's a Sketch Challenge today, I love these, great for using up scraps or getting your crafty mojo going and giving you some inspiration. I have taken the opportunity to use the Sunshine and Rainbows dsp and teamed it with the Biggest Wish stamp set. The sketch below is the one we are using this time.


Materials

1 piece of misty moonlight card stock 5 7/8" x 8 1/4"
1 piece of basic white card 3 7/8" x 5 5/8", scrap for the sentiment
1 piece of dsp 3 7/8" x 5 5/8", 1 piece 3" x 4", 1/2" x 3 7/8" strip,  fussy cut rainbow
1 piece of pool party card 3 1/8" x 4 1/8"
Scrap of soft succulent ribbon
Double Oval Punch
Biggest Wish stamp set
Memento Black ink
Paper snips
Trimmer
Bone folder
Dimensionals
Multipurpose adhesive

Instructions

On the long side score the misty moonlight card at 4 1/8" and fold and burnish to make the card base.

Wrap the ribbon around the largest piece of dsp and secure on the back with sticky tape and then add this layer to the card front.

Add the smaller piece of dsp to the pool party mat and add with dimensionals to the card front, over the top of the ribbon.

Fussy cut a rainbow and add to the bottom right of the card with dimensionals.

Stamp a sentiment and punch out with the oval punch and add to the card front on dimensionals.

Add the remaining basic white layer to the inside of the card, I've added a 1/2" strip of dsp along the bottom to decorate the inside.

Why don't you give it a try, you don't have to use the same dsp, use anything you like, see what you come up with.  If you need more inspiration, pop over and see what everyone else has made.

If you would like to see more of my Blog Posts, sign up on the pop up form and you will get my weekly Newsletter with all the details of my latest projects and news from Stampin' Up!

If you would like to join my Team or become one of my Discount Shoppers, you can message me on my Facebook Page at www.facebook.com/craftykarendesigns or via the Contact Me box below this Blog.

If you are interested in taking part in some challenges and having crafty chats with like minded people and a bit of a laugh, pop over to Craft and Banter on Facebook (link in the side bar), we would love your company.

Happy crafting,


Karen X


Product List

Monday, 14 February 2022

Rainbow Birthday Card - Crafty Collaborations - Rainbow Blog Hop

 Hi Everyone,


Today I am hopping with the Crafty Collaborations group and the theme is 'Rainbows'. I decided to use the Sunshine and Rainbows dsp and the Celebrating You stamp set for my card. Let me show you how I made it.

Materials

1 piece of mango melody card stock 5 7/8" x 8 1/4"
1 piece of basic white card 3 7/8" x 5 5/8", 1 piece 3 1/2" x 4 1/2"
1 piece of Sunshine & Rainbows dsp 3 7/8" x 5 5/8", scraps for cutting out rainbows
Celebrating You stamp set
Scalloped Contour dies
Stampin' Cut & Emboss Machine
Memento Black ink
Magenta Madness Stampin' Blends
Daffodil Delight Stampin' Blends
Granny Apple Green Stampin' Blends
Bermuda Bay Stampin' Blends
Trimmer
Simply Scored
Paper Snips
Multipurpose Adhesive
Dimensionals

Instructions

On the long side score the mango melody card at 4 1/8" and fold and burnish to make the card base.

Adhere the dsp to the card front and fussy cut one whole rainbow and two half rainbows from the edge of the dsp sheet. 

Stamp a sentiment on the larger piece of basic white using memento black ink and adhere the two half rainbows to the top and bottom as it in the picture and adhere the whole thing to the inside of the card.


Die cut the second largest rectangle from the dies using the remaining piece of white card.  Stamp the sentiment towards the bottom of the rectangle and then colour in the letters to match the colours in the rainbow. Adhere the full rainbow towards the top of the rectangle and then add this layer to the card front with dimensionals.

Please pop over and see what everyone else has been making too:


If you would like to see more of my Blog Posts, sign up on the pop up form and you will get my weekly Newsletter with all the details of my latest projects and news from Stampin' Up!

If you would like to join my Team or become one of my Discount Shoppers, you can message me on my Facebook Page at www.facebook.com/craftykarendesigns or via the Contact Me box below this Blog.

If you are interested in taking part in some challenges and having crafty chats with like minded people and a bit of a laugh, pop over to Craft and Banter on Facebook (link in the side bar), we would love your company.

Happy crafting,


Karen X

Product List

Saturday, 12 February 2022

Kite Delight Spanner Card - Ink, Stamp, Share Showcase Blog Hop

 Hi Everyone,


Today I am hopping with the Ink, Stamp, Share group and I am showcasing a new fun fold (to me) and the very cute Kite Delight stamp set and Sunshine and Rainbows designer series paper. If you haven't got any of this yet, then  

  • Why not? Its fab  
  • Hurry up it's only available until the end of February
  • It's FREE with a qualifying purchase (£45 spend)

Materials

1 piece of melon mambo card stock 5 7/8" x 8 1/4"
1 piece of basic white 3 7/8" x 5 5/8", 1 piece 3 1/4" x 3 7/8", 2 pieces 1 1/8" x 4", scraps for stamping
2 pieces of dsp 1" x 3 7/8", 2 pieces 1 1/8" x 3 7/8", scraps to cut out clouds and rainbow
1 piece of window sheet 1 1/4" x 5 7/8"
Memento Black ink
Melon Mambo ink
Kite Delight stamp set
Pumpkin Pie ink
Daffodil Delight ink
Blender Pen
Mini glue dots
Dimensionals
Multipurpose adhesive
Paper snips
Trimmer
Bone Folder
Tear and Tape

Instructions

On the long side score the melon mambo at 4 1/8" and fold and burnish to make the card base. Then measure in from the outer side edge 1 1/4" at both sides and cut up to the score line.

Add the smaller dsp strips to the white mats and then adhere to the side panels of the card front.  Stamp a sentiment in melon mambo (I need to reink this, it's a bit patchy) in the centre of the larger white mat and adhere to the inside of the card. Add the remaining dsp strips to either side, this will be hidden when the card is closed.


Fussy cut two clouds and one rainbow from the dsp.

Stamp the sentiment in memento black ink at the top of the remaining white mat and adhere the rainbow and one of the clouds underneath (see picture) and add to the centre panel of the card front.


Stamp a kite and the tails on some scrap basic white and colour in with ink and a blender pen (I have done this rather than use Stampin' Blends because I didn't want to colour to show through on the other side).  Fussy cute the kite and tails.

Add the window sheet to the bottom back edges of the two side panels, so that it 'spans' across the centre panel. I've used tear and tape but you could use glue dots.  You can add a panel of card or dsp to the back of these panels to cover the window sheet edges and the adhesive if you like, I haven't done this.


Adhere the tail to the bottom of the kite and then add the kite to the righthand side panel with dimensionals (make sure you can't see them when you lift the card front up). Add mini glue dots to the bows on the tail to make it stick to the window sheet. Add the remaining cloud to the other panel in the same way and stick the final bow to the cloud.

I love how this turned out, I think it's cute, I hope that you do too.

Please pop over and see what everyone else has been up to as well.


If you would like to see more of my Blog Posts, sign up on the pop up form and you will get my weekly Newsletter with all the details of my latest projects and news from Stampin' Up!

If you would like to join my Team or become one of my Discount Shoppers, you can message me on my Facebook Page at www.facebook.com/craftykarendesigns or via the Contact Me box below this Blog.

If you are interested in taking part in some challenges and having crafty chats with like minded people and a bit of a laugh, pop over to Craft and Banter on Facebook (link in the side bar), we would love your company.

Happy crafting,


Karen X


Product List