Showing posts with label Butterfly & Flowers Layering Masks. Show all posts

Saturday, 9 April 2022

Butterflies & Flowers Layering Masks Card - Stamp 'N' Hop

 Hi Everyone,


I'm hopping with the Stamp 'N' Hop group and the theme is 'Masking' so I have brought out the lovely Butterflies and Flowers Layering Masks to make a pretty card with the soon to retire 2020-2022 In-Colours.

Materials

1 piece of misty moonlight card stock 5 7/8" x 8 1/4"
2 pieces of basic white card 3 7/8" x 5 5/8"
Butterflies & Flowers Layering Masks
Bumblebee ink
Misty moonlight ink
Just jade ink
Magenta Madness ink
Blending Brushes
Brushed Brass Butterflies
Gorgeous Leaves stamp set
Art Gallery stamp set
Trimmer
Simply Scored
Bone folder
Multipurpose adhesive

Instructions

On the long side score the misty moonlight card at 4 1/8" and fold and burnish to make the card base.

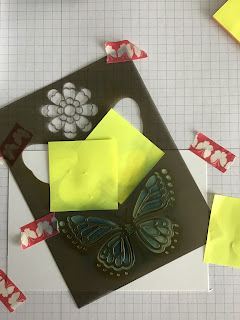
Tape one of the pieces of white card to some scrap paper/grid paper to keep your desk clean. Position the solid butterfly mask wherever you want it to be on the card and add some washi tape to secure it.  Add post it notes or scrap paper over the edges of the card or to cover any of the other stencils so that you dont get any excess ink on your card.
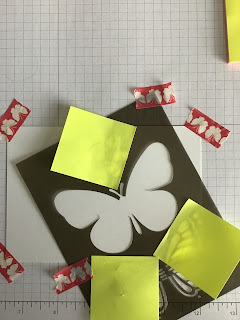
Gently work the blending brush over the butterfly with your chosen colour (bumblebee) then peel this mask off and place the detailed one over the top of your image. Add post it notes all around as before and now work in your second colour (misty moonlight).
Now position the solid flower on the card and mask all around it while you colour with magenta madness, peel off this one and replace with the detailed flower and add misty moonlight.
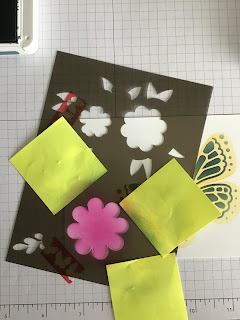
Repeat this process for the second flower using bumblebee and magenta madness.  Now add in some leaves around the edges of the flowers with the just jade, masking off all the flower to try and tuck the leaves in among the petals.
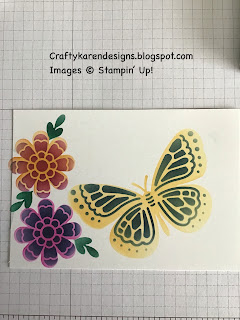

Using the splatter from Gorgeous Leaves in bumblebee, randomly stamp all around the images and add a few to the remaining piece of white for the inside of the card.

Stamp the sentiment in misty moonlight on the card front and inside the card if required.

Adhere to the card base and then add some brushed brass butterflies.

Please click on the links to see what everyone else has made too:


Roll Call

If you would like to see more of my Blog Posts, sign up to the email alert over in the right hand side bar of the page.

If you would like to join my Team or become one of my Discount Shoppers, you can message me on my Facebook Page at www.facebook.com/craftykarendesigns or via the Contact Me box below this Blog.

If you are interested in taking part in some challenges and having crafty chats with like minded people and a bit of a laugh, pop over to Craft and Banter on Facebook (link in the side bar). This is a new group that some crafty friends and I are trying to get up and running and we would love your company.

Happy Crafting,


Karen X


Product List

Thursday, 20 January 2022

Blending With Masks - Technique Squad Blog Hop - Creator's Chooice

 Hi Everyone,


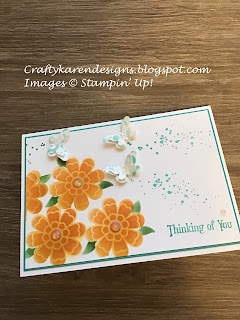
Today I am excited to be hopping with the Technique Squad for the very first time and if you have arrived at my Blog from Donna's page then welcome. I'm hoping that I will be able to pick up lots of tips on techniques old and new. I'm quite new to blending and masks so I thought I would try it out for this hop.  I'm using the new Butterflies & Flowers Layering Decorative Masks and I've teamed them with the lovely Quiet Meadow stamp set. Let me show you how I made this card.

Materials

1 piece of thick basic white card 5 7/8" x 8 1/4"
1 piece of Bermuda Bay card 3 7/8" x 5 5/8"
1 piece of basic white card 3 3/4" x 5 1/2"
Butterflies & Flowers Layering Decorative Masks
Quiet Meadow stamp set
Bumblebee ink
Pumpkin pie ink
Bermuda Bay ink
Garden Green ink
Blending brushes
Daffodil dies 
Washi Tape/post it notes
Irridescent Rhinestones
Multipurpose Adhesive
Trimmer
Bone Folder
Mini Dimensionals

Instructions

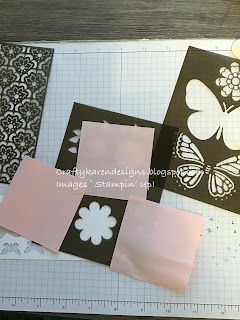
I decided that I wanted an arrangement of flowers in the lower left hand corner so I started with the full flower, placed it in the corner and taped it down and covered all around it with post it notes to prevent the transfer of ink. I used the bumblebee ink for this layer. After completing each flower base, I peeled off the tape and post it pads and then moved them to where I wanted the next flower and repeated until I had 4.  


Then I placed the pattered flower mask over each flower and blended with Pumpkin Pie ink being careful to cover all the surrounding areas again. I repeated this over all of the flowers.

Then I used the Garden Green ink to add the single leaves in and around the flowers in the same way.  It's a bit fiddly but worth it.


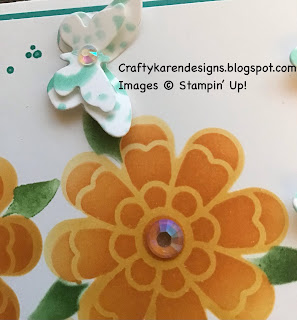
I had made a little smudge on the white card and needed something to cover it with so I took a scrap of basic white card and one of the masks with an all over pattern and blended over that in Bermuda Bay ink and then die cut 3 large and 3 small butterflies from the Daffodil dies. I added the small ones on top of the larger ones with a mini dimensional.


When I placed them on the card front I thought it needed a bit more so I stamped the splodge stamp from Quiet Meadow in Bermuda Bay (stamped off once) to make it look like a trail from the butterflies and then adhered the butterflies over the top.

Stamp the sentiment in the bottom right hand corner.

Adhere the decorated mat to the Bermuda Bay mat and then to the card front.

I've added small iridescent rhinestones to the butterflies and the larger ones to the flowers for some added sparkle.

I do hope that you like my card and will give it a try.

Victoria is next up so please click on the links below to see what everyone else has been making, you are sure to be inspired.


If you would like to see more of my Blog Posts, sign up on the pop up form and you will get my weekly Newsletter with all the details of my latest projects and news from Stampin' Up!

If you would like to join my Team or become one of my Discount Shoppers, you can message me on my Facebook Page at www.facebook.com/craftykarendesigns or via the Contact Me box below this Blog.

If you are interested in taking part in some challenges and having crafty chats with like minded people and a bit of a laugh, pop over to Craft and Banter on Facebook (link in the side bar), we would love your company.

Happy crafting,


Karen X


Product List

Sunday, 2 January 2022

Share it on a Sunday - CASE a Catalogue

 Hi Everyone,


The theme to start us off in 2022 is 'CASE a Catalogue', I have chosen a card from the new Mini Jan-June Catalogue which is launching in 2 days time (4th January 2022). I've used the gorgeous new Butterflies & Flowers Layering Decorative Masks and the Celebrating You stamp set.  Let me show you what I did, the card I CASEd is on page 65:

Materials

1 piece of bermuda bay card stock 5 7/8" x 8 1/4"
3 pieces of basic white card stock 3 7/8" x 5 5/8"
Butterflies & Flowers Layering Decorative Masks
Scalloped Contour dies
Stampin' Cut & Emboss Machine
Celebrating You stamp set
Coastal Cabana ink
Bermuda Bay ink
Flirty Flamingo ink
Melon Mambo ink
Soft Sea Foam ink
Pear Pizzazz ink
Irridescent Rhinestones
Paper Snips
Multipurpose Adhesive
Trimmer
Simply Scored
Bone Folder
Dimensionals

Instructions

Masking and blending pushes me out of my comfort zone a bit and I am trying to practice more which is why I bought these masks.

On the long side score the bermuda bay card at 4 1/8" and fold and burnish to make the card base.

Using one piece of the basic white, tape the mask with the all over pattern over the top of it 


Load up your brush with coastal cabana ink and start going over the mask in a circular motion until the whole thing is covered and the colour is the depth that you want. You can make it darker by going over it several times, I wanted a paler effect.  Gently peel off the mask and give it and your hands a quick clean.  Adhere this layer to the card front.

Then tape the large open flower image over a second piece of basic white card and make sure that you mask off the rest of the piece of card so that you dont accidentally get ink in the wrong places. 

Starting with the flirty flamingo ink, gently go over the whole of the image. Then peel off and lay the other floral image over the top, make sure you line it up and tape it in place. Go over this image using the melon mambo.

Then using the leaves, tape them in place so that they will be wherever you want them around the flowers, I have done some with pear pizzazz and some with soft sea foam. It can be a bit fiddly, so just take your time.

Now using the second largest of the scalloped contour dies, die cut this floral image. Adhere this at an angle on the card front as in the picture.

Stamp a sentiment on a scrap and angle cut one end, adhere this across the floral image and lining up the flat edge with the outside edge of the card.

Sprinkle some of the fabulous irridescent rhinestones about, these are my very favourites, I love them, 2nd pack already on order.

On the remaining piece of basic white, add a small flower to the bottom right corner using the flirty flamingo ink and stamp a sentiment in bermuda bay and adhere to the inside of the card.


I hope that you like my card and will give these masks a try, they are lovely and the more you use them, the better you get haha.

Please pop over and see what Donna and Victoria have chosen to make today:


Donna Lester


Victoria Littlewood

If you would like to see more of my Blog Posts, sign up on the pop up form and you will get my weekly Newsletter with all the details of my latest projects and news from Stampin' Up!

If you would like to join my Team or become one of my Discount Shoppers, you can message me on my Facebook Page at www.facebook.com/craftykarendesigns or via the Contact Me box below this Blog.

If you are interested in taking part in some challenges and having crafty chats with like minded people and a bit of a laugh, pop over to Craft and Banter on Facebook (link in the side bar), we would love your company.

Happy crafting,


Karen X


Product List