
Hi Everyone,
I'm trying to use up the beautiful Ever Eden designer series paper, it's so pretty but will only be around until the end of December which is a shame. I saw a Canadian Demonstrator (Tina Zinck) make this card and I thought it was so pretty, I should CASE it, so I have. Let me show you how I made it.
Materials
1 piece of soft succulent card stock 5 7/8" x 8 1/4", 1 piece 1 1/4" x 3 7/8"
1 piece of basic white card 3 7/8" x 5 5/8", scraps for stamping
1 piece of Ever Eden dsp 3 7/8" x 5 5/8", 1 piece 3" x 3"
Scrap of gold foil for the leaves
Soft succulent ink
Evening Evergreen ink
Eden's Garden stamp set
Eden dies
Stampin' Cut & Emboss machine
Stamperatus
Garden gems
Paper snips
12" of evening evergreen ribbon
Multipurpose adhesive
Dimensionals
Mini glue dots
Trimmer
Simply scored
Bone folder
Sponge dauber
Instructions
On the long side score the soft succulent card at 4 1/8" and fold and burnish to make the card base.
Stamp some leaves down both long sides of the basic white layer and adhere to the inside.
Stamp the sentiment in evening evergreen on a 1/2" strip of basic white and trim as shown in the picture.
Using the Stamperatus (or other stamping platform) stamp the large floral image in soft succulent on a scrap of basic white. I inked this up twice to get a strong image. Then using a sponge dauber and evening evergreen ink, highlight just the berries (you could use a Stampin Write Marker) and stamp again. Fussy cut this image.
Die cut three leaves from the Eden dies using gold foil.
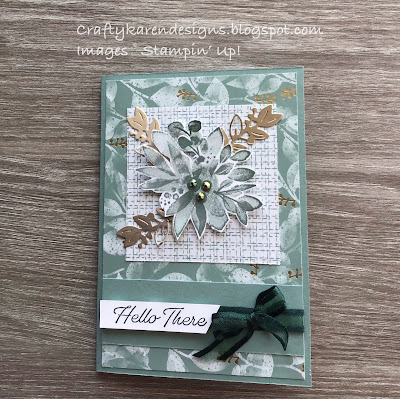
Adhere the large dsp layer to the card front and then add the 3" square towards the top leaving equal borders on 3 sides as shown.
Add the cut out image using dimensionals to the centre of the 3" square and tuck in the gold leaves around it. Add 3 gems to the berries in the centre of the image.
Wrap the ribbon around the centre of the strip of soft succulent leangthwise and secure on the back with sticky tape. Adhere this to the card front as shown. Add the sentiment to the left side of this section and then tie a small bow and add to the sideof the sentiment on top of the ribbon using mini glue dots.
I think this is a really pretty card and the layout is one that could be used again and again with all sorts of different papers and stamp sets, why don't you give it a try.
If you would like to see more of my Blog Posts, sign up on the pop up form and you will get my weekly Newsletter with all the details of my latest projects and news from Stampin' Up!
If you would like to join my Team or become one of my Discount Shoppers, you can message me on my Facebook Page at www.facebook.com/craftykarendesigns or via the Contact Me box below this Blog.
If you are interested in taking part in some challenges and having crafty chats with like minded people and a bit of a laugh, pop over to Craft and Banter on Facebook (link in the side bar), we would love your company.
If you are interested in taking part in some challenges and having crafty chats with like minded people and a bit of a laugh, pop over to Craft and Banter on Facebook (link in the side bar), we would love your company.
Happy crafting,
Karen X


")


 Open Weave Ribbon")


 Specialty Designer Series Paper")
No comments:
Post a Comment