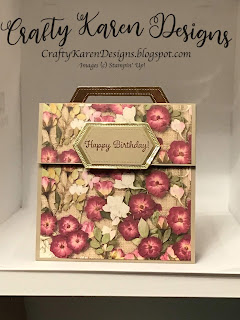
I thought that as part of the #31dayscraftchallenge (Project No 21) that I would update one of my more popular cards, the Handbag card. I originally saw this card over on Mixed Up Crafts by Samantha Clayton and I am grateful for the idea, it's been a winner and I have made it countless times for friends. It can be adapted to any colour, any designer series paper, I've even made it with some leopard and zebra print paper in the past. I hope you like what I've done with it this time.
Materials
1 piece of card stock 12" x 5" (I have used crumb cake)
1 piece of card stock 2 1/2" x 5" - for the flap
4 pieces of designer series paper for the front and back and the inside
Scraps of crumb cake, whisper white and gold foil for the sentiments, handle and decoration
Merry merlot ink
Little Ladybug stamp set (or stamp set of your choice)
Trimmer
Multipurpose adhesive
Dimensionals
Velcro dot
Stitched nested label dies
Die cutting machine
Instructions
Score the 12" x 5" card on the long side at 5" and 7", then flip it over and score at 6". Fold and burnish the score lines to make an M shape (mountain, valley, mountain), this is the base of the bag and how it stands.
Adhere a piece of dsp to the front and two to the inside, leaving a small border all the way around. Leave the back of the card for now.
For the bag flap, score on the short side at 1/2", then fold and burnish. Add red line tape (or glue) to the small fold and line it up so that the larger piece is folded over the front of the card and then stick the smaller flap to the back, this then forms the flap on the handbag. Add the small piece of dsp to the flap on the front of the bag.
Die cut the handle by laying two dies inside each other so they will cut out a frame. Then, fold the frame in half to give you the handbag handle and glue them together.
Line up the handle on the back of the card and adhere (I have used red line tape), then cover the back of the bag with the remaining piece of dsp.
Cut out three labels, two in whisper white and one in gold foil and then a smaller one in crumb cake to nest inside the gold foil one on the front of the card. Adhere one of the whisper white labels to the inside section of the bag and then stamp a sentiment on the other and adhere that to the other inside section. Stamp a sentiment to the crumb cake label and adhere to the centre of the gold foil layer with dimensionals. Add this sentiment layer to the bottom of the front flap of the bag to make the clasp.
Add velcro dots to the underside of the handbag flap and the front of the bag to make the fastening.
There you go, a stylish handbag card for a friend.
Happy crafting,
Karen XX
Product List Adhere a piece of dsp to the front and two to the inside, leaving a small border all the way around. Leave the back of the card for now.
For the bag flap, score on the short side at 1/2", then fold and burnish. Add red line tape (or glue) to the small fold and line it up so that the larger piece is folded over the front of the card and then stick the smaller flap to the back, this then forms the flap on the handbag. Add the small piece of dsp to the flap on the front of the bag.
Die cut the handle by laying two dies inside each other so they will cut out a frame. Then, fold the frame in half to give you the handbag handle and glue them together.
Line up the handle on the back of the card and adhere (I have used red line tape), then cover the back of the bag with the remaining piece of dsp.
Cut out three labels, two in whisper white and one in gold foil and then a smaller one in crumb cake to nest inside the gold foil one on the front of the card. Adhere one of the whisper white labels to the inside section of the bag and then stamp a sentiment on the other and adhere that to the other inside section. Stamp a sentiment to the crumb cake label and adhere to the centre of the gold foil layer with dimensionals. Add this sentiment layer to the bottom of the front flap of the bag to make the clasp.
Add velcro dots to the underside of the handbag flap and the front of the bag to make the fastening.
There you go, a stylish handbag card for a friend.
If you would like to see more of my Blog Posts, sign up to the email alert over in the right hand side bar of the page.
If you would like to join my Team or become one of my Discount Shoppers, you can message me on my Facebook Page at www.facebook.com/craftykarendesigns or via the Contact Me box below this Blog.
Happy crafting,
Karen XX


Just love the handbag card - something different - gorgeous paper too x
ReplyDeleteThank you Jane x
DeleteThis is fabulous, love the papers used, great make hun xx
ReplyDeleteThanks Emma x
DeleteAbsolutely stunning!!! The paper is gorgeous. I love the detail on the clasp and handle - very clever xx
ReplyDelete