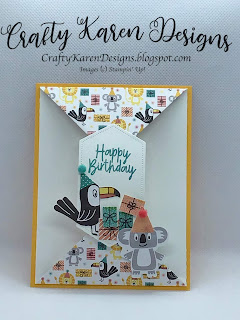
Today I have made another cute card using the Birthday Bonanza Suite, I just love these creatures, they are so bright and cheery, they make me smile. This is Project No 6 in the #31dayscraftchallenge that I am taking part in set by #scrimpingmommy.
Materials
1 piece of Mango Melody card stock 4 1/4" x 5 1/2"
1 piece of Whisper White card stock 4" x 5 1/4"
1 piece of dsp 4" x 6"
Scraps of dsp or stamped images for decoration
Bonanza Dies
Stitched Nested Label Dies
Die cutting machine
Dimensionals
Glue dots
Assorted pompoms
Bonanza Buddies stamp set
Bermuda Bay ink
Trimmer
Multipurpose adhesive
Tear n Tape
Instructions
Cut the piece of dsp in half at 3" to give you two pieces 3" x 4" (the design needs to run left to right across the paper and top to bottom to make this work). Score the dsp on the 3" side at 1" from the top on one piece and from the bottom on the other. Fold and burnish these score lines.
Turn these pieces over and bring the edges to meet the score line on both sides to make a triangle and burnish the folds. You will then have two triangles, one pointing down which will fix to the top of the card, and one pointing up which will fit to the bottom. Fix these flaps in place with tear n tape.
Add a strip of tear n tape to the straight edge just under the fold line as well as at the edge and adhere to the back of the white card stock. Make sure that the white card stock is central and doesn't overhang at either edge before you stick it down, the triangle points will now be in place on the front of the card, burnish the top and bottom of the card to make them lie down flat.
Adhere this layer to the centre of the mango melody card stock, leaving a small border all the way around the edges.
Die cut a stitched nested label that will overlap both flaps on the front of the card (see picture), stamp a sentiment and decorate as you like. I have die cut some images from the dsp and adhered them with mini dimensionals. I've also added one creature to the bottom flap so that the label piece with the sentiment will tuck in to keep the card closed. I've also added a mini pompom to both hats for added decoration.
I hope that you will like this card and give it a try.
If you would like to see more of my Blog Posts, sign up to the email alert over in the right hand side bar of the page.
If you would like to join my Team or become one of my Discount Shoppers, you can message me on my Facebook Page at www.facebook.com/craftykarendesigns or via the Contact Me box below this Blog.
Happy crafting,
Karen XX


No comments:
Post a Comment