
Hi 

Today I am taking part in the Team Scrimpy Blog Hop for the launch of the new Mini Catalogue and Sale-a-Bration event. This is my contribution, please visit my colleagues (links below) and give them some support too. Thanks xxxx
My contribution for the Blog Hop is a tricorn fold using elements of the Painted Poppies Suite and a sentiment from Sending You Thoughts. You will also see a version below that I have made using Birthday Bonanza to show how versatile this style can be. My original inspiration came from a card made by Mixed Up Crafts.
Materials
1 piece of Rich Razzleberry card stock 8" x 6"
2 pieces of Silver Foil 1 3/4" x 5 1/2"
4 pieces of Whisper White card stock 1 3/4" x 5 1/2"
2 pieces of dsp 1 1/2" x 4 7/8"
Sending You Thoughts stamp set
Rich Razzleberry ink
Scraps of Rich Razzleberry, Silver Foil, Whisper White and Mossy Meadow card
Paper snips
2" circle punch
Sprig Punch
Trimmer
Bone Folder
Simply Scored
Metal Ruler
Multipurpose adhesive
Dimensionals
Instructions
On the 8" side, score the card at 2" and 6" then flip over and score at 4".
With a pencil, mark down 2" from the top and up 2" from the bottom on the 2" and 6" scorelines, then score diagonally as in the template below.


Fold the card in half and the fold the other two sections back so you end up with an M shape and burnish well.
Then coax the diagonals carefully until they look like this

Glue the centre sections together like this and put aside to dry while you make the panels.


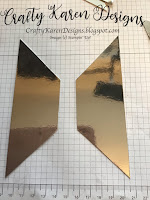
On one side of each of the foil pieces measure 1 3/4" from each end and make a mark, then cut diagonally from that point out to the corner, see picture. Do exactly the same with the 4 whisper white panels and keep the scraps for decoration.

On the dsp panels, measure 1 1/2" from top and bottom and make a mark and cut the diagonals as before. REMEMBER that the pattern on the dsp means that you will need to cut one for the right and one for the left.


Adhere all the mats and layers to the panels and you can use the triangles that you removed from the foil to decorate the top if you want to. Make sure that you put them on the right end otherwise you will end up cutting more (as I did!), so I have got them top and bottom.


To decorate the front, I have cut a circle in Rich Razzleberry and then the swirl from the Silver Foil and stamped a sentiment on a scrap of Whisper White in Rich Razzleberry ink and punched that out with a 2" circle punch. Fussy cut some of the flowers from the dsp and punch out two sprigs in Mossy Meadow and adhere them all to the sentiment layer as shown. Then adhere the whole thing to the front of the card using dimensionals.


I hope that you like my card and will give it a try, here is another example using the Birthday Bonanza Suite of products.

Please hop over to the next Blog on the list and give my colleagues some crafty support.
Karen Egan (You are here)
Tricia Smith
https://smithscraftycreations.com/2020/01/25/january-25-blog-hop/
Karen McClure
https://karamiasu.blogspot.com/2020/01/stamping-up-with-karamia-scrimpys-blog.html?
Victoria Littlewood
https://vickieloudesigns.blogspot.com/2020/01/best-dressed-large-post-it-note-holder.html?
Amanda Charlesworth
https://scrimpingmommy1.blogspot.com/2020/01/team-scrimpy-blog-hop-under-my-umbrella.html?m=1
Donna Lester
https://taffycrafting.blogspot.com/2020/01/best-dressed-fussy-cut-dsp-on-mothers.html?
Thank You XX
Happy Crafting,
Karen XX


")


 Circle Punch")

Absolutely stunning xx great, easy to follow instructions. I will defo be trying to make this.... thanks for the inspiration
ReplyDeleteThank you, I’m really pleased with it xx
DeleteI'm having a go this afternoon. Brilliant card, Karen and so clever xx
ReplyDeleteThank you, love to see what you make xx
DeleteWhat a fabulous card - thank you so much for the step by step and great photos xx
ReplyDeleteThanks Jane xx
DeleteAm amazing card just love it . Great instructions as always. Defo on list of folds to try x x
ReplyDeleteThanks a Lynn xx
DeleteWow! Wow! Wow! Gorgeous card!
ReplyDeleteThank you xx
DeleteGorgeous card Karen, fabulous design xx
ReplyDeleteThanks Emma xx
ReplyDeleteBeautiful x your blogs are easy to follow xxx
ReplyDeleteThanks Tricia xx
DeleteI made several tricorn cards using your instructions but I can't figure out how to fold the card to fit in an envelope.
DeleteFrom what I remember, haven’t done one for a while, you have to push it to one side or the other and then it will fold flat
Delete