Monday, 29 August 2022

Wonderful World - Crafty Collaborations Crafty Challenge - Sketch Challenge

 Hi Everyone,


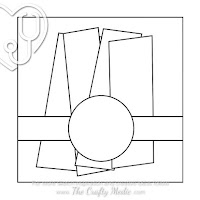
The challenge this month is a Sketch Challenge, one of my favourites. I wanted to have one last play with the Wonderful World bundle before the end of Sale-a-Bration, I'm so sad to say goodbye to this set, it is fabulous and I've really enjoyed creating with it.  I've combined it with sentiments from True Beauty for a really pretty card.

Materials

1 piece of thick basic white 5 3/4" x 11 1/2"
1 piece of dsp 5 5/8" square, 4 pieces 1 1/2" x 5", 1 piece 1" x 5 5/8", scrap for the heart
Scrap of basic white for the heart
Sequins and Gems
Heart Punch Pack
Melon Mambo ink
Blackberry Bliss ink
True Beauty stamp set
Wonderful World bundle
Multipurpose adhesive
Mini Dimensionals
Trimmer
Bone Folder

Instructions

On the long side score the card at 5 3/4" and fold and burnish to make a square card.

Adhere the largest piece of dsp and then arrange the 4 strips as per the sketch above. I picked 4 of the floral image sheets, all in a different colour. Add the 1" strip across the card front, I've added mini dimensionals at each end and added glue in the centre where it goes over the strips.

Stamp a sentiment on a scrap of white and add a sentiment and a flower on the inside of the card. Punch out the sentiment with the straight sided heart and then punch out a scalloped one in dsp. Layer the two together and add with dimensionals over the strip as shown.  Sprinkle a few sequins and the card is complete.


Please pop over and see what everyone else has made for this sketch challenge, you are sure to be inspired.

My latest Class in the Mail is now available to order - click on the link in the side bar for more information.


If you would like to see more of my Blog Posts, follow me on Facebook or sign up for a copy of my Weekly Newsletter (emailed out every Monday morning and link copied to my Facebook Pages).

If you would like to join my Team or become one of my Discount Shoppers, you can message me on my Facebook Page at www.facebook.com/craftykarendesigns or via the Contact Me box below this Blog.

f you are interested in taking part in some challenges and having crafty chats with like minded people and a bit of a laugh, pop over to Crafty and Banter on Facebook (link in the side bar). This is a new group that some crafty friends and I are trying to get up and running and we would love your company.

Happy Crafting,

Karen XXX


Product List

Saturday, 27 August 2022

Simple Christmas Gift Bag - Ink, Stamp Share Blog Hop - Anything New

 Hi Everyone,


I wanted to make some quick gift bags for I have been decorating treat bags using the Christmas to Remember stamp set and the Twinkling Lights dies and the Decorative Circle Punch.

Materials

1 Embossed Treat Bag
Scrap of basic white card
Decorative Circle Punch
Christmas to Remember stamp set
Real Red ink
Twinkling Lights Dies
Stampin' Cut & Emboss Machine
Gold Distressed Foil
Gold Ribbon
Red Rhinestone Basic Jewels
Multipurpose adhesive
Dimensionals
Paper snips

Instructions

Die cut the large snowflake using the Twinkling Lights dies and the distressed gold foil, then cut in half.

Stamp the sentiment using the real red ink and punch out with the Decorative Circle Punch.  Add the two halves of the snowflake to the sentiment as shown in the finished picture.

Cut a piece of gold ribbon and fold in half and stick to the front of the gift bag (I used sticky tape to secure it). Add the sentiment over the top using dimensionals.

Add some red rhinestones and the bag is finished. You can decorate these bags using anything in your stash and they will look great. Ideal for Christmas, birthdays or any special occasion. Give it a try and see what you can come up with.

Please pop over and see what everyone else has been up to.

My latest Class in the Mail is now available to order - click on the link in the side bar for more information.


If you would like to see more of my Blog Posts, follow me on Facebook or sign up for a copy of my Weekly Newsletter (emailed out every Monday morning and link copied to my Facebook Pages).

If you would like to join my Team or become one of my Discount Shoppers, you can message me on my Facebook Page at www.facebook.com/craftykarendesigns or via the Contact Me box below this Blog.

f you are interested in taking part in some challenges and having crafty chats with like minded people and a bit of a laugh, pop over to Crafty and Banter on Facebook (link in the side bar). This is a new group that some crafty friends and I are trying to get up and running and we would love your company.

Happy Crafting,

Karen XXX

Product List

Hues of Happiness Congratulations Card - Birds Showcase Hop

 Hi Everyone,


I made this card to use up some of this fabulous paper and a few flowers that I had lying about on my desk. I often look at sketch challenges and then just pick up what is lying about on my desk and see what I can make with it. There are thousands of sketch challenges on Pinterest and you are sure to find something that gets your crafty mojo going.

Materials

1 piece of granny apple green card stock 5 7/8" x 8 1/4", 1 piece 3 1/2" x 5 1/8", 1 piece 1/2" x 4 7/8"
1 piece of basic white 3 7/8" x 5 5/8"
1 piece of dsp 3 7/8" x 5 5/8", 1 piece 4 7/8" x 3 1/4"
Several die cuts flowers and leaves
Night of navy ink
Happiness Abounds stamp set
Blossoming Happiness dies
Stamp' and Cut Machine
Paper snips
Trimmer
Simply Scored
Bone Folder
Multipurpose adhesive
Dimensionals
Opal Rounds
Take Your Pick Tool

Instructions

On the long side score the granny apple card at 4 1/8" and fold and burnish to make the card base.  Adhere the largest piece of dsp to the card front.

Adhere the remaining dsp to the granny apple green mat and then add the strip across this piece.  Stamp a sentiment in the bottom right corner of this layer.

Arrange the cut flowers and leaves and adhere in place.  Add dimensionals to the back of this layer and add to the card front.

Stamp a sentiment on the white card layer and add to the inside of the card.


Add some opal rounds and the card is complete.

Please click on the button to see what my lovely team mates have been up to, Victoria is up next


If you would like to see more of my Blog Posts, sign up to the email alert over in the right hand side bar of the page.

My latest Class in the Mail is now available to order - click on the link in the side bar for more information.


If you would like to see more of my Blog Posts, follow me on Facebook or sign up for a copy of my Weekly Newsletter (emailed out every Monday morning and link copied to my Facebook Pages).

If you would like to join my Team or become one of my Discount Shoppers, you can message me on my Facebook Page at www.facebook.com/craftykarendesigns or via the Contact Me box below this Blog.

f you are interested in taking part in some challenges and having crafty chats with like minded people and a bit of a laugh, pop over to Crafty and Banter on Facebook (link in the side bar). This is a new group that some crafty friends and I are trying to get up and running and we would love your company.

Happy Crafting,

Karen XXX


Product List