Showing posts with label Christmas to Remember. Show all posts

Monday, 5 December 2022

Quick Gift Card Holders Made From Scraps

 Hi Everyone,


As usual I had lots of scraps of dsp and gold foil lying about on my desk so I have combined them to make some quick gift cards. I'm using the Notecards and Envelopes and you can see from the picture that the dsp mats are different sizes, that's because, that was what was in my scrap pile left over from another project. I've used sentiments from Charming Sentiments as well as Christmas to Remember and the Stylish Shapes and Spruced Up Outline Dies. I just love the way that you can mix and match things from lots of different sets in order to make your project.

Materials

1 notecard (5" x 3 1/2")
1 piece of dsp 3 1/4" x 4 3/4"
Scraps of dsp (to hold the gift card/money), gold foil and basic white
Stampin' Cut & Emboss Machine
Stylish Dies
Spruced Up Outline dies
Charming Sentiment stamp set
Christmas to Remember stamp set
Cherry Cobbler ink
Trimmer
Multipurpose adhesive
Bone Folder

Instructions

Fold and burnish to notecard.

Stamp a sentiment on the inside. Cut a small piece of dsp that is almost as wide as the notecard (approx 3") and use any punch to take a little piece out of the top as shown.  Put a small bead of adhesive around the edge of the two sides and the bottom and adhere in place as shown.


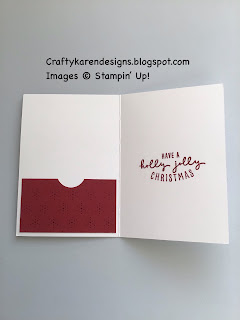
Add the dsp mat to the card front.

Die cut a square and some parcels or a tree from the gold foil and a smaller square from the basic white.

Stamp a sentiment on the white square and add to the gold one and adhere to the card front.

Add the foil parcels or tree underneath. On some of the cards, I have used scraps of dsp to fill the trees instead of gold foil, you can use whatever you like.

You could batch make lots of these in all sorts of colours, it took me about half an hour to make the four of these.  I hope that you like them and will give them a try.

If you would like to see more of my Blog Posts, follow me on Facebook or sign up for a copy of my Weekly Newsletter (emailed out every Monday morning and link copied to my Facebook Pages).

If you would like to join my Team or become one of my Discount Shoppers, you can message me on my Facebook Page at www.facebook.com/craftykarendesigns or via the Contact Me box below this Blog.

f you are interested in taking part in some challenges and having crafty chats with like minded people and a bit of a laugh, pop over to Craft and Banter on Facebook (link in the side bar). This is a new group that some crafty friends and I are trying to get up and running and we would love your company.

Happy Crafting,

Karen x


Product List

Wednesday, 16 November 2022

Christmas Presents Card

 Hi Everyone,


For todays simple card I have used the Spruced Up Outline dies, Framed & Festive and Christmas to Remember stamp sets, a scrap of dsp and some heat embossing to make a cute card to add to my stash.

Materials

1 piece of thick white card 5 7/8" x 8 1/4"
1 piece of Starry Sky card 3 7/8" x 5 5/8"
1 piece of dsp (this is a retired Saleabration one but you could use anything) 2" x 5 5/8"
Scraps of silver foil
Stampin' Cut & Emboss Machine
Spruced Up Outline dies
Framed & Festive stamp set
Christmas to Remember stamp set
Versamark ink
Heat Tool
Metallics Embossing Powders
Trimmer
Simply Scored
Bone Folder
Multipurpose adhesive

Instructions

On the long side score the thick card at 4 1/8" and fold and burnish to make the card base.

Stamp the sentiment on the inside of the card and the bottom edge of the Starry Sky card using Versamark. Sprinkle with silver embossing powder and set with the Heat Tool. The card may warp a little due to the heat, if this happens, put something heavy on top of it for a few minutes.


Adhere the blue card to the card front and add the dsp layer.

Die cut 3 presents from the dies using the silver foil and adhere them in place on the front of the card.

If you would like to see more of my Blog Posts, follow me on Facebook or sign up for a copy of my Weekly Newsletter (emailed out every Monday morning and link copied to my Facebook Pages).

If you would like to join my Team or become one of my Discount Shoppers, you can message me on my Facebook Page at www.facebook.com/craftykarendesigns or via the Contact Me box below this Blog.

f you are interested in taking part in some challenges and having crafty chats with like minded people and a bit of a laugh, pop over to Craft and Banter on Facebook (link in the side bar). This is a new group that some crafty friends and I are trying to get up and running and we would love your company.

Happy Crafting,

Karen


Product List

Tuesday, 25 October 2022

Charming Landscapes Penguin Christmas Card

 Hi Everyone,


I'm still playing with embossing folders, this time I've combined the Charming Landscapes folders with the Penguin Place and Christmas to Remember stamp sets.

Materials

1 piece of real red card stock 5 7/8" x 8 1/4", scrap for the sentiment
1 piece of gold foil 4" x 5 3/4"
1 piece of basic white 3 7/8" x 5 5/8", 1 piece 3 1/8" x 5 5/8", scrap for sentiment
Scraps of basic black, basic white, real red and gold foil
Real Red ink
Memento Black ink
Pumpkin Pie ink
Penguin Place stamp set
Christmas to Remember stamp set
Charming Landscapes embossing folders
Stampin' Cut & Emboss Machine
Penguin Builder Punch
Starlit Punch
Paper snips
Trimmer
Simply Scored
Bone Folder
Multipurpose Adhesive
Dimensionals

Instructions

On the long side score the real red card at 4 1/8" and fold and burnish to make the card base.

Adhere the gold foil layer to the card front.

Run the smaller piece of basic white through the machine in the embossing folder and then adhere to the top of the gold foil on the card front.

Punch out the penguin body using basic black and white. Stamp the eyes, the beak and the feet and then adhere the white section to the black to make the penguin.  Adhere to the card front so he is standing in amongst the snow and the mountains.

Stamp a hat and scarf in real red on a scrap of white and fussy cut with the paper snips, glue the scarf in place and add the hat with a dimensional.


Stamp a sentiment for the front on a scrap and cut round it leaving a small border, adhere this to a scrap of real red and then cut out leaving a border around the white.  Add this to the card front with dimensionals as shown.

Stamp a sentiment on the remaining white layer and add to the inside of the card.


Punch some tiny stars from a scrap of gold foil and add to the embossed layer covering the embossed stars.


I hope you like my cute Christmas card, whay not give it a try.

If you would like to see more of my Blog Posts, follow me on Facebook or sign up for a copy of my Weekly Newsletter (emailed out every Monday morning and link copied to my Facebook Pages).

If you would like to join my Team or become one of my Discount Shoppers, you can message me on my Facebook Page at www.facebook.com/craftykarendesigns or via the Contact Me box below this Blog.

f you are interested in taking part in some challenges and having crafty chats with like minded people and a bit of a laugh, pop over to Crafty and Banter on Facebook (link in the side bar). This is a new group that some crafty friends and I are trying to get up and running and we would love your company.

Happy Crafting,

Karen
Product List