
Hi Everyone,
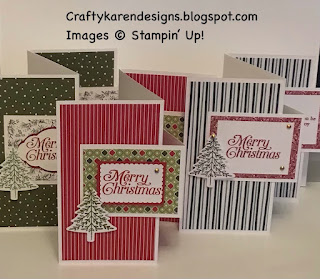
I've been making Christmas cards with my team mate today and we have been CASEing Dawn Griffith who showed this fun fold card recently. She called it a double tri fold pop up card but I think its very much like a double z fold just a bit offset haha. Whatever, you call it, it's a really easy fun fold and it's a great way of using up designer series papers. So let me show you how to make them, I have changed the measurements to make a slightly larger card base.
Materials
1 piece of thick basic white card 5 3/4" x 9 3/4", 1 piece 2 1/2" x 9 3/4"
Scraps of basic white card and real red for stamping and matting
3 pieces of dsp 3" x 5 1/2", 3 pieces 3" x 2 1/4" (Heartwarming Hugs, Tidings of Christmas)
Ink to match (real red, cherry cobbler, evening evergreen, old olive)
Pine Tree Punch
Rectangle Postage Stamp Punch
Perfectly Plaid stamp set
Garden gems
Trimmer
Simply scored
Bone folder
Multipurpose adhesive
Dimensionals
Instructions
On the long side, score both pieces of card at 3 1/4" and 6 1/2", fold and burnish to make z folds.
Adhere the dsp layers to the relevant panels leaving a small border around the edges.
Fold both cards into a Z shape and lay the larger one flat (I used my grid paper so I could judge the size) and then slide the smaller one inside so that the front section is on the front of the card, then folds inside and leave the end hanging out so that the width in total is 4" and that way, the finished card will fit in an envelope. Add glue to the back of the front one (about half way) and stick in place, then lift up and add glue to half of the bottom part of the smaller Z and stick in place.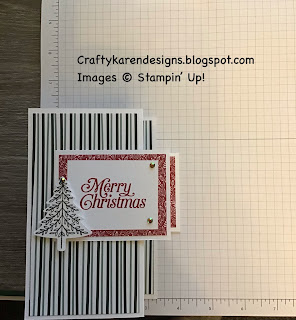

Stamp a sentiment on a scrap of white, in one case I have just cut it with the trimmer and the other one I have punched out using the rectangle stamp punch. I have repeated this with another sentiment on on and not the other (I was trying out styles).
Stamp a tree and punch it out and add to the card front with dimensionals. Add some gems on the tree and the sentiment label and the card is done.

I also did one later using mint macaron card and Whimsy & Wonder dsp with the Heartfelt Wishes stamp set.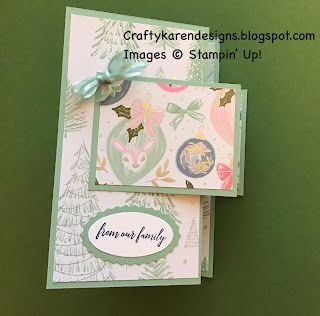

Please follow the hop and see what everyone else has been up to
Roll Call
If you would like to see more of my Blog Posts, sign up on the pop up form and you will get my weekly Newsletter with all the details of my latest projects and news from Stampin' Up!
If you would like to join my Team or become one of my Discount Shoppers, you can message me on my Facebook Page at www.facebook.com/craftykarendesigns or via the Contact Me box below this Blog.
If you are interested in taking part in some challenges and having crafty chats with like minded people and a bit of a laugh, pop over to Craft and Banter on Facebook (link in the side bar), we would love your company.
If you are interested in taking part in some challenges and having crafty chats with like minded people and a bit of a laugh, pop over to Craft and Banter on Facebook (link in the side bar), we would love your company.
Happy crafting,
Karen X


 Designer Series Paper")


 Specialty Designer Series Paper")
")
")


Love this pop-up card!I will have to try some!
ReplyDeleteFabulous Cards Karen x
ReplyDeleteOoh loving all your cards Karen x
ReplyDeleteWonderful fun fold Christmas cards
ReplyDeleteGreat fold and lovely card! I’ll have to try this. ❤️
ReplyDeleteReally nice. I'm going to try them.
ReplyDeleteBeautiful!
ReplyDelete