
HI Everyone,
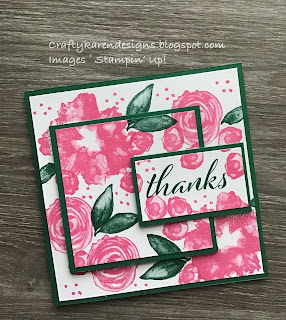
I had my first play with Artistically Inked today - why have I waited so long to buy it? I have no idea, it's lovely. I just wanted to play today and recently saw a card that I liked that had used the triple stamping technique so I thought I would see how that worked out. Originally I was going to use dsp that matched the shaded spruce card stock but then changed my mind which is why this is a slightly unusual colour combination for me.
Materials
1 piece of shaded spruce card stock 5 1/2" x 11", 1 piece 3 3/4" square, 1 piece 2 7/8" x 1 3/4"
2 pieces of basic white card 5 1/2" square, 1 piece 3 1/2" square, 1 piece 2 5/8" x 1 1/2"
Artistically Inked stamp set
Polished pink ink
Shaded spruce ink
Trimmer
Simply Scored
Bone Folder
Multipurpose adhesive
Dimensionals
Washi tape/low tack tape
Instructions
On the long side score the shaded spruce at 5 1/2" and fold and burnish to make the card base.
Arrange one large piece of white and the two small ones on top of each other in a design that you like, doesn't have to be the same as mine. Add a small piece of tape to the underside of the smaller ones to tack them in place whilst you stamp.
The idea is that you stamp on all the layers at once making sure that your stamp overlaps at least one other layer. This can leave a line or evven a gap but don't worry, it will be hidden when you layer up the card in between (see picture above). It's up to you how much or how little you do, I just stamped, no thought to composition really, just wanting to test out the stamps and see what they looked like. The colours that I have used are not normally colours that I would put together but they are listed in the colours for the designer series paper for this set so I thought I would give it a go. When you are happy with your design, carefully peel the layers apart.
Adhere the stamped layers to their relavent mat layers and add the largest one to the card front. Make sure that you line the images up correctly and add the top layers with dimensionals to give them some lift. Your card front should look like a multilayered image now if you have done it right.
Stamp some flowers on the remaining piece of white card and add to the inside of the card.
Why don't you try this technique, its very easy.
If you would like to see more of my Blog Posts, sign up on the pop up form and you will get my weekly Newsletter with all the details of my latest projects and news from Stampin' Up!
If you would like to join my Team or become one of my Discount Shoppers, you can message me on my Facebook Page at www.facebook.com/craftykarendesigns or via the Contact Me box below this Blog.
If you are interested in taking part in some challenges and having crafty chats with like minded people and a bit of a laugh, pop over to Craft and Banter on Facebook (link in the side bar), we would love your company.
If you are interested in taking part in some challenges and having crafty chats with like minded people and a bit of a laugh, pop over to Craft and Banter on Facebook (link in the side bar), we would love your company.
Happy crafting,
Karen X


A really pretty card - love the design xx
ReplyDelete