
Hi Everyone,
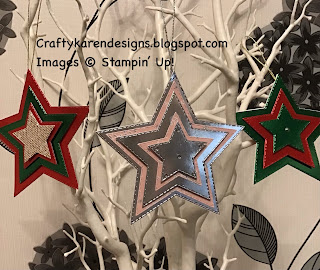
Today I am hopping with the Ink, Stamp, Share group and the theme is 'Tree Decorations'. I have made a really simple, shiny star with lots of layers, it's really easy to make and takes no time at all, just what we need at this time of the year. It's simple enough to get the children involved too. Let me show you how I made them.
Materials
Scraps of foil in colours to match your decor (red, green, silver, gold)
Scraps of Christmas dsp (Whimsy & Wonder)
Stitched star dies (or any that you have, mine are very old)
Stampin' Cut & Emboss machine
Rhinestones
Dimensionals
Elegant Trim
Tear and Tape
Instructions
Die cut lots of stars in all of the sizes that you have in the colours that you want for your tree. I have only done a couple of examples, two in red and green and one using silver and dsp but the combinations are endless.

What I have done with the red/green ones is alternate the layers between the red and green on each side, each layer is the opposite of the one on the reverse. Two largest, 1 red, 1 green etc through the sizes. The set of dies that I have has 7 sizes so I cut each size in both colours.
The largest one has 4 layers on each side finishing with a gold sparkly one. The smaller one just has 3 layers on each side but alternating colours as the other one. On these two, I have used dimensionals on each layer to give lots of dimension.
The third one I have used silver foil and Whimsy and Wonder dsp and there are 5 layers of each side. The dsp layers I have glued and the foil layers I added with dimensionals.
Layer up each side and then on the reverse of one of them using tear and tape, fix the ends of the trim for hanging it on the tree and then add glue to the whole thing and sandwich the layers together. I clipped the top together with a bulldof clip for 5 minutes to make sure the top where the trim comes it is really secure.
Add rhinestones or other embellishments as you like.
Please click on the Next button and see what Kirsty has made and then pop over and see what everyone else has made too, I'm sure there will be loads of great inspiration.

Roll Call
If you would like to see more of my Blog Posts, sign up on the pop up form and you will get my weekly Newsletter with all the details of my latest projects and news from Stampin' Up!
If you would like to join my Team or become one of my Discount Shoppers, you can message me on my Facebook Page at www.facebook.com/craftykarendesigns or via the Contact Me box below this Blog.
If you are interested in taking part in some challenges and having crafty chats with like minded people and a bit of a laugh, pop over to Craft and Banter on Facebook (link in the side bar), we would love your company.
If you are interested in taking part in some challenges and having crafty chats with like minded people and a bit of a laugh, pop over to Craft and Banter on Facebook (link in the side bar), we would love your company.
Happy crafting,
Karen X


 Specialty Designer Series Paper")


Love these! Very pretty.
ReplyDeleteGreat tree decorations :-)
ReplyDeleteThese are very elegant, thanks for sharing
ReplyDeletePretty star ornaments. Love all the layers.
ReplyDeleteThese hanging stars are so pretty Karen x
ReplyDeleteLove these Karen, Thankyou.
ReplyDeleteThese are some really useful and awesome tips! Thanks a lot for sharing :)
ReplyDeletehow to seduce a women
These are gorgeous Karen x
ReplyDeleteGreat use of the stars!
ReplyDeleteThese are beautiful xx
ReplyDeleteLove these Karen, really beautiful x
ReplyDelete