Hi Everyone,
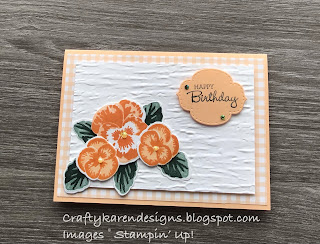
For Share it on a Sunday this week, we are looking at the new Stampin' Up Annual Catalogue which goes live to customers on 4th May 2021. As Demonstrators, we have been able to pre-order some of the lovely things and I chose a suite called Pansy Petals. I love pansies and there is some gingham designer series paper in this set and you guys know I love a bit of gingham so it was a no-brainer for me, I just had to buy it. I can show you what I've made but I can't show you images from the catalogue until it goes live but I'm sure you will love it too.
Materials
1 piece of pale papaya (new In-Colour) card stock 5 7/8" x 8 1/4"
1 piece of dsp (Pansy Petals) 3 7/8" x 5 5/8" and a 1/2" x 5 5/8" strip to decorate the inside
1 piece of basic white card stock 3 7/8" x 5 5/8" and 1 piece 3 3/8" x 5"
Scraps of pale papaya and basic white for stamping
Stitched So Sweetly dies
Stampin Cut and Emboss machine
Pansy Patch stamp set
Pansy dies
Pale papaya ink (new)
Evening evergreen ink (new)
Soft succulent ink (new)
Pumpkin pie ink
Bark 3D Embossing Folder
2021-2023 In-Colour jewels
Multipurpose adhesive
Dimensionals
Trimmer
Simply Scored
Bone folder
Instructions
On the long side score the pale papaya card stock st 4 1/8" and fold and burnish to make the card base.
Adhere the large gingham mat layer to the card front leaving an equal border all around the outside.
Stamp one large and two small pansies and some leaves on the scrap of basic white. It's two step stamping so I have used the paler colours for the base and then the darker colour for the contrast on top. Die cut the flowers and leaves.
Stamp the sentiment in evening evergreen on the scrap of pale papaya and then die cut using the Stitched So Sweetly dies.
Run the smaller piece of basic white through the machine using the Bark 3D embossing folder.
Add the embossed layer with dimensionals to the card front.
Arrange the flowers and leaves in the bottom left hand corner of the embossed layer using dimensionals and multipurpose adhesive. Add the sentiment layer to the top right corner.
Add the In-Colour jewels to the centre of the flowers and on the sentiment.
Stamp another sentiment on the remaining basic white layer and add the strip of dsp along the bottom edge, then adhere to the inside of the card.
I really hope that you like my card and love this new suite as much as I do, you will be seeing lots more using it, I love it.
Please pop over and see what Donna and Victoria have made with their new pre-order items too.
Donna Lester
Victoria Littlewood
If you would like to see more of my Blog Posts, sign up to the email alert over in the right hand side bar of the page.
If you would like to join my Team or become one of my Discount Shoppers, you can message me on my Facebook Page at www.facebook.com/craftykarendesigns or via the Contact Me box below this Blog.
If you are interested in taking part in some challenges and having crafty chats with like minded people and a bit of a laugh, pop over to Crafty and Banter on Facebook (link in the side bar). This is a new group that some crafty friends and I are trying to get up and running and we would love your company.
If you are interested in taking part in some challenges and having crafty chats with like minded people and a bit of a laugh, pop over to Crafty and Banter on Facebook (link in the side bar). This is a new group that some crafty friends and I are trying to get up and running and we would love your company.
Happy Crafting,
Karen X


Very pretty. Have a great week x
ReplyDeleteThanks Jane, you too xx
DeleteReally pretty card xx
ReplyDeleteThank you xx
Delete