
Hi Everyone,
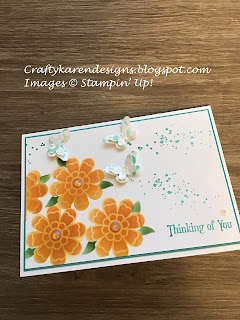

Today I am excited to be hopping with the Technique Squad for the very first time and if you have arrived at my Blog from Donna's page then welcome. I'm hoping that I will be able to pick up lots of tips on techniques old and new. I'm quite new to blending and masks so I thought I would try it out for this hop. I'm using the new Butterflies & Flowers Layering Decorative Masks and I've teamed them with the lovely Quiet Meadow stamp set. Let me show you how I made this card.
Materials
1 piece of thick basic white card 5 7/8" x 8 1/4"
1 piece of Bermuda Bay card 3 7/8" x 5 5/8"
1 piece of basic white card 3 3/4" x 5 1/2"
Butterflies & Flowers Layering Decorative Masks
Quiet Meadow stamp set
Bumblebee ink
Pumpkin pie ink
Bermuda Bay ink
Garden Green ink
Blending brushes
Daffodil dies
Washi Tape/post it notes
Irridescent Rhinestones
Multipurpose Adhesive
Trimmer
Bone Folder
Mini Dimensionals
Instructions
I decided that I wanted an arrangement of flowers in the lower left hand corner so I started with the full flower, placed it in the corner and taped it down and covered all around it with post it notes to prevent the transfer of ink. I used the bumblebee ink for this layer. After completing each flower base, I peeled off the tape and post it pads and then moved them to where I wanted the next flower and repeated until I had 4. 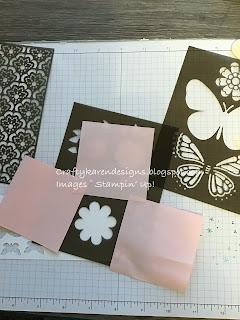
Then I placed the pattered flower mask over each flower and blended with Pumpkin Pie ink being careful to cover all the surrounding areas again. I repeated this over all of the flowers.
Then I used the Garden Green ink to add the single leaves in and around the flowers in the same way. It's a bit fiddly but worth it.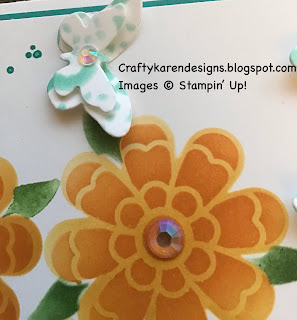
I had made a little smudge on the white card and needed something to cover it with so I took a scrap of basic white card and one of the masks with an all over pattern and blended over that in Bermuda Bay ink and then die cut 3 large and 3 small butterflies from the Daffodil dies. I added the small ones on top of the larger ones with a mini dimensional.
When I placed them on the card front I thought it needed a bit more so I stamped the splodge stamp from Quiet Meadow in Bermuda Bay (stamped off once) to make it look like a trail from the butterflies and then adhered the butterflies over the top.
Stamp the sentiment in the bottom right hand corner.
Adhere the decorated mat to the Bermuda Bay mat and then to the card front.
I've added small iridescent rhinestones to the butterflies and the larger ones to the flowers for some added sparkle.
I do hope that you like my card and will give it a try.
Victoria is next up so please click on the links below to see what everyone else has been making, you are sure to be inspired.

If you would like to see more of my Blog Posts, sign up on the pop up form and you will get my weekly Newsletter with all the details of my latest projects and news from Stampin' Up!
If you would like to join my Team or become one of my Discount Shoppers, you can message me on my Facebook Page at www.facebook.com/craftykarendesigns or via the Contact Me box below this Blog.
If you are interested in taking part in some challenges and having crafty chats with like minded people and a bit of a laugh, pop over to Craft and Banter on Facebook (link in the side bar), we would love your company.
If you are interested in taking part in some challenges and having crafty chats with like minded people and a bit of a laugh, pop over to Craft and Banter on Facebook (link in the side bar), we would love your company.
Happy crafting,
Karen X


Karen,
ReplyDeleteI love how the card turned out. I have the masks and forget to use them -thanks for reminding me.
Clever save for the smudge! Love how the card turned out
ReplyDeleteA very pretty card - have a great weekend x
ReplyDeleteGreat use of the new masks! So cute!
ReplyDelete