
Hi Everyone,

Materials
1 piece of Just Jade card stock 5 7/8" x full length of A4 (11 3/4"),1 piece 1" by the full length of A4 and 1 piece approx 3 5/8" x 2 1/2"
1 piece of whisper white 4" x 5 3/4" and a piece for the sentiment approx 3 1/8" x 2"
2 pieces of dsp 3 1/4" x 5 3/4", 2 pieces 1 1/2" x 5 3/4" and 1 piece 2 3/8" x 5 3/4" (you can use any combination, 5 different, all the same, whatever you like)
Just jade ink
Basic rhinestones
Happiest of Birthdays stamp set
Trimmer
Simply scored
Die cutting machine
Stitched so sweetly dies
Multipurpose adhesive
Dimensionals
Instructions
On the long side score the just jade card at 2 1/2", 5 7/8" and 10" then fold and burnish all the score lines - see picture - one folds back on itself to make one flap and the other folds in, they will all lie on top of each other as shown.
Stamp the largest sentiment from the set on the whisper white layer with just jade ink and then add to the inside of the card.
Adhere all the dsp layers to the folds inside and out as shown.
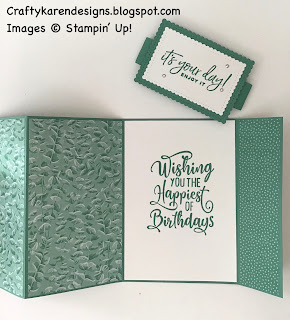


Die cut the smaller rectangle from the whisper white and the larger one from the just jade (to fit the sizes given above in the recipe). Stamp the other sentiment on the whisper white layer and then adhere to the just jade layer.
Wrap the belly band piece loosely around the card and leaving a bit overlapping, cut off the excess. Add glue to the inside of the top piece and fix together, make sure that the belly band can slide up and down the card. To fix the sentiment layer to the belly band, add three dimensionals to the belly band and then centre the sentiment over the top and press down. Add a few of the rhinestones to give it a bit of bling.
Here are a couple of close ups of the misty moonlight one that I made too:


There you go, a quick and simple fun fold card, I hope that you like it and will give it a try.
If you would like to see more of my Blog Posts, sign up to the email alert over in the right hand side bar of the page.
If you would like to join my Team or become one of my Discount Shoppers, you can message me on my Facebook Page at www.facebook.com/craftykarendesigns or via the Contact Me box below this Blog.
If you are interested in taking part in some challenges and having crafty chats with like minded people and a bit of a laugh, pop over to Crafty and Banter on Facebook (link in the side bar). This is a new group that some crafty friends and I are trying to get up and running and we would love your company.
If you are interested in taking part in some challenges and having crafty chats with like minded people and a bit of a laugh, pop over to Crafty and Banter on Facebook (link in the side bar). This is a new group that some crafty friends and I are trying to get up and running and we would love your company.
Happy Crafting,
Karen XXX


 Designer Series Paper")
")


Fabulous makes Karen xx
ReplyDeleteThanks Emma x
ReplyDelete