
Hi Everyone,
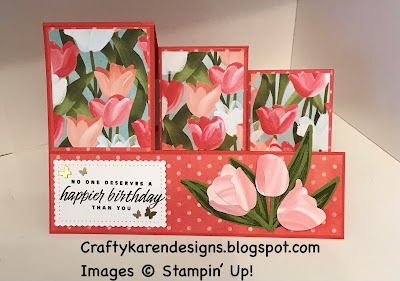

Today I am hopping with the Stamping With Friends group and we are making 'Fun Fold Birthday Cards'. Now if, you have followed me for a while, you know that I just love a fun fold, I even did a weekly series of them a year or so ago so have a look in the archive on this page if you would like to see more. For this one, I have made a stepper card using the fabulous Flowering Fields designer series paper and the Flowering Tulips stamp set and dies. Let me show you how I made it.
Materials
1 piece of poppy parade card stock 7" x 10" for the card base
1 piece of Flowering Fields dsp 2 3/8" x 2 7/8", 2 pieces 2 1/8" x 2 7/8", 1 piece 1 7/8" x 6 7/8", 1 piece 2 1/2" x 6 1/4"
Contrasting dsp - 1 piece 2 1/4" x 2 3/4", 2 pieces 2" x 2 3/4", 1 piece 1 3/4" x 6 3/4"
Scraps of Simply Marbleous dsp, old olive and white card for the decoration
1 piece of basic white 2 1/4" x 6"
Memento Black ink
Old Olive ink
Tulip dies
Flowering Tulip stamp set
Stampin' Cut and Emboss machine
Stitched So Sweetly dies
Trimmer
Simply scored
Bone folder
Multipurpose adhesive
Dimensionals
Brushed Brass Butterflies
Mini Glue Dots
Instructions
Put the poppy parade card stock in the scoreboard with the short side at the top and make a pencil mark at 2 1/2" and 4 3/4" at both ends. Join the pencil lines with a ruler.
Turn on to the long side and score at 3" and 6" just to the first drawn pencil line, then at 8" to the second pencil line.
Then score between the two pencil marks at 4" and 7" (I use a ruler to mark the spot and then hover my stylus to the starting point and then score). Then score from the second pencil line to the bottom of the card at 5".
Put the card in the trimmer with the short side to the top and on the 2 1/2" pencil line, cut from 4" to 8", then move it over to the 4 3/4" pencil line and cut from 3" to 8". This will give you two slits in the card base (see template).

Fold and burnish the score lines to make the steps of the card, pinch them first to start them off and then they should just fold in the correct way, see picture.
Add the background dsp panels and then add the floral panels over the top on all the steps and the background dsp along the bottom.
Die cut the pieces for three flowers, 4 leaves and 2 stems. I have used the Simply Marbleous dsp in Flirty Flamingo for the tulips and old olive for the leaves and stems. Put the flowers together using mini glue dots between the layers to give some definition. Add the flowers to the card front using a dimensional on the back of each so that you can slide the leaves in and around them. I have then trimmed the stems and added those over the top of the leaves.
Stamp the image on the leaves once you have die cut them, I find this much easier. Stamp the sentiment on the basic white and then die cut using the Stitched So Sweetly dies.
Add the sentiment to the left of the card front with dimensionals and add some of the butterflies.
On the inside, add the dsp layer and then the white layer over mthe top to write your message.
I do hope that you like my card and will give it a try.
Please pop over and see what everyone else has made too.
Roll Call
Tricia Butts
Betty Bickford
Sue Vine
Mo Rootes (UK)
Lorraine Tierney
Vickie Littlewood
Candi Suriano
Robbie Susan Chandler-Florida, USA
Carol Brown
Diane Evans
Kristie Wilson
Melva Peters
Kelly Taranto
If you would like to see more of my Blog Posts, sign up to the email alert over in the right hand side bar of the page.
If you would like to join my Team or become one of my Discount Shoppers, you can message me on my Facebook Page at www.facebook.com/craftykarendesigns or via the Contact Me box below this Blog.
If you are interested in taking part in some challenges and having crafty chats with like minded people and a bit of a laugh, pop over to Crafty and Banter on Facebook (link in the side bar). This is a new group that some crafty friends and I are trying to get up and running and we would love your company.
If you are interested in taking part in some challenges and having crafty chats with like minded people and a bit of a laugh, pop over to Crafty and Banter on Facebook (link in the side bar). This is a new group that some crafty friends and I are trying to get up and running and we would love your company.
Happy Crafting,
Karen X


 Designer Series Paper")
")


 Designer Series Paper")


Love, love, love this card. Thanks for sharing!
ReplyDeleteSo lovely, think Spring! So inspiring
ReplyDeleteReally pretty card! Love the step cards.
ReplyDeleteLove this fold Karen x
ReplyDeleteGreat fun fold Karen x
ReplyDeleteLoving this fun fold.
ReplyDeleteWOW! Now this is a "fancy" fold! Love it.
ReplyDeleteI absolutely love this! Xx
ReplyDeleteWhat a unique fold! Love it!
ReplyDeleteThank you for all the lovely comments xx
ReplyDelete