Showing posts with label Simply Marbleous. Show all posts

Wednesday, 23 February 2022

Simply Marbleous Desk Set - Great Teacher Gifts

 Hi Everyone,


A friend called and asked me to make her some little gifts for her son's teachers, so I thought I would make some desk sets with a notepad, post it pad and a pen. Great for teacher gifts or for colleagues at work or just to keep on your craft desk and very easy to make, let me show you how.


Materials

1 piece of bumblebee card stock 9 1/2" x 3 3/4", 1 piece 5 3/4" x 3"
1 piece of dsp 3 5/8" x 1 7/8", 1 piece 3 1/4" x 6", 1 piece 3" x 6"
Scrap of basic white
Multipurpose adhesive
Memento black ink
Flowing Flowers stamp set
Trimmer
Simply Scored
Bone Folder
Paper snips
Tear and Tape

Instructions

On the long side of the larger piece score at 1/2", 1 1/2", 2 1/2", 6", fold and burnish the score lines in a concertina way for the stand at one end.

For the smaller piece of card to make the pocket, score at 1/2" and 1" on 3 sides, then with the none scored side at the top, trim away the two end squares on right and left and then the bottom one of the two remaining small squares at either end to make the tab. Fold and burnish the score lines.

For the stand, add tear and tape to the bottom of the back piece and fix to the concertina panel so it will stand up, see picture above.

Fold in the side and bottom pieces on the pocket and secure the bottom tabs in place, then adhere to the front so it is level with the bottom fold, see picture.

Add dsp the front pocket piece. Stamp a sentiment to the scrap of basic white and adhere to the pocket.

Lay the notebook face down on the wrong side of the dsp with about 1/8" of dsp showing below it and then fold the dsp over the top of the notebook and pinch the creases and then adhere to the back of the notebook.

Repeat this with the post it pad.

Add both to the inside of the pocket and add a little pen or pencil and you have a pretty, useful desk accessory. Why don't you give it a try?


If you would like to see more of my Blog Posts, sign up on the pop up form and you will get my weekly Newsletter with all the details of my latest projects and news from Stampin' Up!

If you would like to join my Team or become one of my Discount Shoppers, you can message me on my Facebook Page at www.facebook.com/craftykarendesigns or via the Contact Me box below this Blog.

If you are interested in taking part in some challenges and having crafty chats with like minded people and a bit of a laugh, pop over to Craft and Banter on Facebook (link in the side bar), we would love your company.

Happy crafting,


Karen X


Product List

Sunday, 20 February 2022

Heart Punch Flower Card - Share it on a Sunday

 Hi Everyone,


For Share it on a Sunday this week, we are playing with punches. I saw this idea on Pinterest and thought it was really pretty so I've had a go using the Simply Marbleous dsp for the flower and Abstract Beauty for the background. The flower is made using the Heart Punch, let me show you how I made it.

Materials

1 piece of coastal cabana card stock 5 7/8" x 8 1/4", scrap for the sentiment
1 piece of basic white card 3 7/8" x 5 5/8", scrap for the sentiment
1 piece of Abstract Beauty dsp 3 5/8" x 5 3/8"
3 sheets of Simply Marbleous 6" x 6" dsp
Heart Pack Punch
Trimmer
Blue Adhesive Backed Gems
Multipurpose adhesive
Dimensionals
Bone Folder

Instructions

On the long side score the coastal cabana card at 4 1/8" and fold and burnish to make the card base.

Punch out as many hearts as you can from 3 sheets of the dsp, I've used the straight edged heart punch for this. Fold each heart in half down the centre.  Arrange the petals in a circular design on the top (just a dry fit for now to make sure you have the positioning correct). 


They sit inside each other as shown. When you are happy start to adhere them in place on the dsp mat layer (my mat layer started out a little larger than the measurement given above but it wasn't quite centre when I finished so I chopped a little bit off).  Keep going until you have completed the circle and you have a pretty flower, then adhere this mat layer to the card front.

Stamp a sentiment on the remaining piece of basic white and add to the inside of the card.  Stamp a sentiment on the scrap of white and then adhere to the scrap of coastal cabana and trim around the edges to leave a small border.  Add this to the card front below the flower using dimensionals.  Add some of the blue gems for a bit of added sparkle.

I hope that you like my card and will give it a try, don't forget to pop over and see what Donna and Victoria have made too.


Donna Lester

Victoria Littlewood


If you would like to see more of my Blog Posts, sign up on the pop up form and you will get my weekly Newsletter with all the details of my latest projects and news from Stampin' Up!

If you would like to join my Team or become one of my Discount Shoppers, you can message me on my Facebook Page at www.facebook.com/craftykarendesigns or via the Contact Me box below this Blog.

If you are interested in taking part in some challenges and having crafty chats with like minded people and a bit of a laugh, pop over to Craft and Banter on Facebook (link in the side bar), we would love your company.

Happy crafting,


Karen X


Product List

Saturday, 19 February 2022

Flowering Fields Stepper Card - Stamping With Friends Blog Hop

 Hi Everyone,


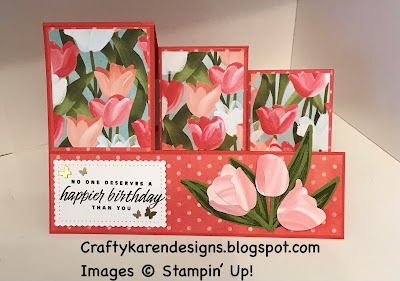
Today I am hopping with the Stamping With Friends group and we are making 'Fun Fold Birthday Cards'. Now if, you have followed me for a while, you know that I just love a fun fold, I even did a weekly series of them a year or so ago so have a look in the archive on this page if you would like to see more.  For this one, I have made a stepper card using the fabulous Flowering Fields designer series paper and the Flowering Tulips stamp set and dies. Let me show you how I made it.

Materials

1 piece of poppy parade card stock 7" x 10" for the card base
1 piece of Flowering Fields dsp  2 3/8" x 2 7/8", 2 pieces 2 1/8" x 2 7/8", 1 piece 1 7/8" x 6 7/8", 1 piece 2 1/2" x 6 1/4"
Contrasting dsp  - 1 piece 2 1/4" x 2 3/4", 2 pieces 2" x 2 3/4", 1 piece 1 3/4" x 6 3/4"
Scraps of Simply Marbleous dsp, old olive and white card for the decoration
1 piece of basic white 2 1/4" x 6"
Memento Black ink
Old Olive ink
Tulip dies
Flowering Tulip stamp set
Stampin' Cut and Emboss machine
Stitched So Sweetly dies
Trimmer
Simply scored
Bone folder
Multipurpose adhesive
Dimensionals
Brushed Brass Butterflies
Mini Glue Dots

Instructions

Put the poppy parade card stock in the scoreboard with the short side at the top and make a pencil mark at 2 1/2" and 4 3/4" at both ends.  Join the pencil lines with a ruler.

Turn on to the long side and score at 3" and 6" just to the first drawn pencil line, then at 8" to the second pencil line.

Then score between the two pencil marks at 4" and 7" (I use a ruler to mark the spot and then hover my stylus to the starting point and then score).  Then score from the second pencil line to the bottom of the card at 5".

Put the card in the trimmer with the short side to the top and on the 2 1/2" pencil line, cut from 4" to 8", then move it over to the 4 3/4" pencil line and cut from 3" to 8".  This will give you two slits in the card base (see template).


Fold and burnish the score lines to make the steps of the card, pinch them first to start them off and then they should just fold in the correct way, see picture.

Add the background dsp panels and then add the floral panels over the top on all the steps and the background dsp along the bottom.


Die cut the pieces for three flowers, 4 leaves and 2 stems. I have used the Simply Marbleous dsp in Flirty Flamingo for the tulips and old olive for the leaves and stems. Put the flowers together using mini glue dots between the layers to give some definition. Add the flowers to the card front using a dimensional on the back of each so that you can slide the leaves in and around them. I have then trimmed the stems and added those over the top of the leaves.

Stamp the image on the leaves once you have die cut them, I find this much easier. Stamp the sentiment on the basic white and then die cut using the Stitched So Sweetly dies.

Add the sentiment to the left of the card front with dimensionals and add some of the butterflies.

On the inside, add the dsp layer and then the white layer over mthe top to write your message.

I do hope that you like my card and will give it a try.

Please pop over and see what everyone else has made too.


If you would like to see more of my Blog Posts, sign up to the email alert over in the right hand side bar of the page.

If you would like to join my Team or become one of my Discount Shoppers, you can message me on my Facebook Page at www.facebook.com/craftykarendesigns or via the Contact Me box below this Blog.

If you are interested in taking part in some challenges and having crafty chats with like minded people and a bit of a laugh, pop over to Crafty and Banter on Facebook (link in the side bar). This is a new group that some crafty friends and I are trying to get up and running and we would love your company.

Happy Crafting,


Karen X


Product List