
Hi Everyone,

It's Share it on a Sunday and this weeks theme is a 'Christmas Gift Box', this one could be used as a bauble on the tree, filled with sweets and treats, teacher gifts, little stocking fillers etc (approx 4 3/4" high). I first saw this one on thepaperpixie.com on YouTube, check her out if you want to make any boxes and bags, she makes some very quirky things and lots of tiny treat boxes and bags. Don't forget to click on the links below to see what Donna and Victoria have made this week too. Let me show you how I made this one:
Materials
1 piece of balmy blue card stock 10 1/2" x 7 1/2"
8 pieces of Feels Like Frost dsp 1 1/8" x 2 3/8"
1 piece of whisper white scrap for the tag
1 piece of balmy blue glimmer paper 2 1/4" x 4 1/2" (optional for the triangle pieces)
12" piece of ribbon
Balmy blue ink
Itty Bitty Christmas stamp set
Rectangle Postage Stamp punch
Small hole punch
Stampin Seal
Tear and Tape
Trimmer
Simply scored
Bone folder
Mini glue dots
Instructions
On the long side, score the balmy blue card stock at 1 1/4", 2 1/2", 3 3/4", 5", 6 1/4", 7 1/2", 8 3/4" and 10".
On the short side score at 1 1/4", 3 3/4" and 6 1/4".
Turn back to the long side and score at 1 7/8", 4 3/8", 6 7/8" and 9 3/8" just to the first horizontal score line. Then flip and repeat along the other long side to match.

Make diagonal scores from the centre panel points on 2nd, 4th, 6th and 8th columns as shown in the template to each of the sides of the panel to form triangles. Repeat along the bottom section so that when you look at it, there is a diamond shape in each of the four panels.
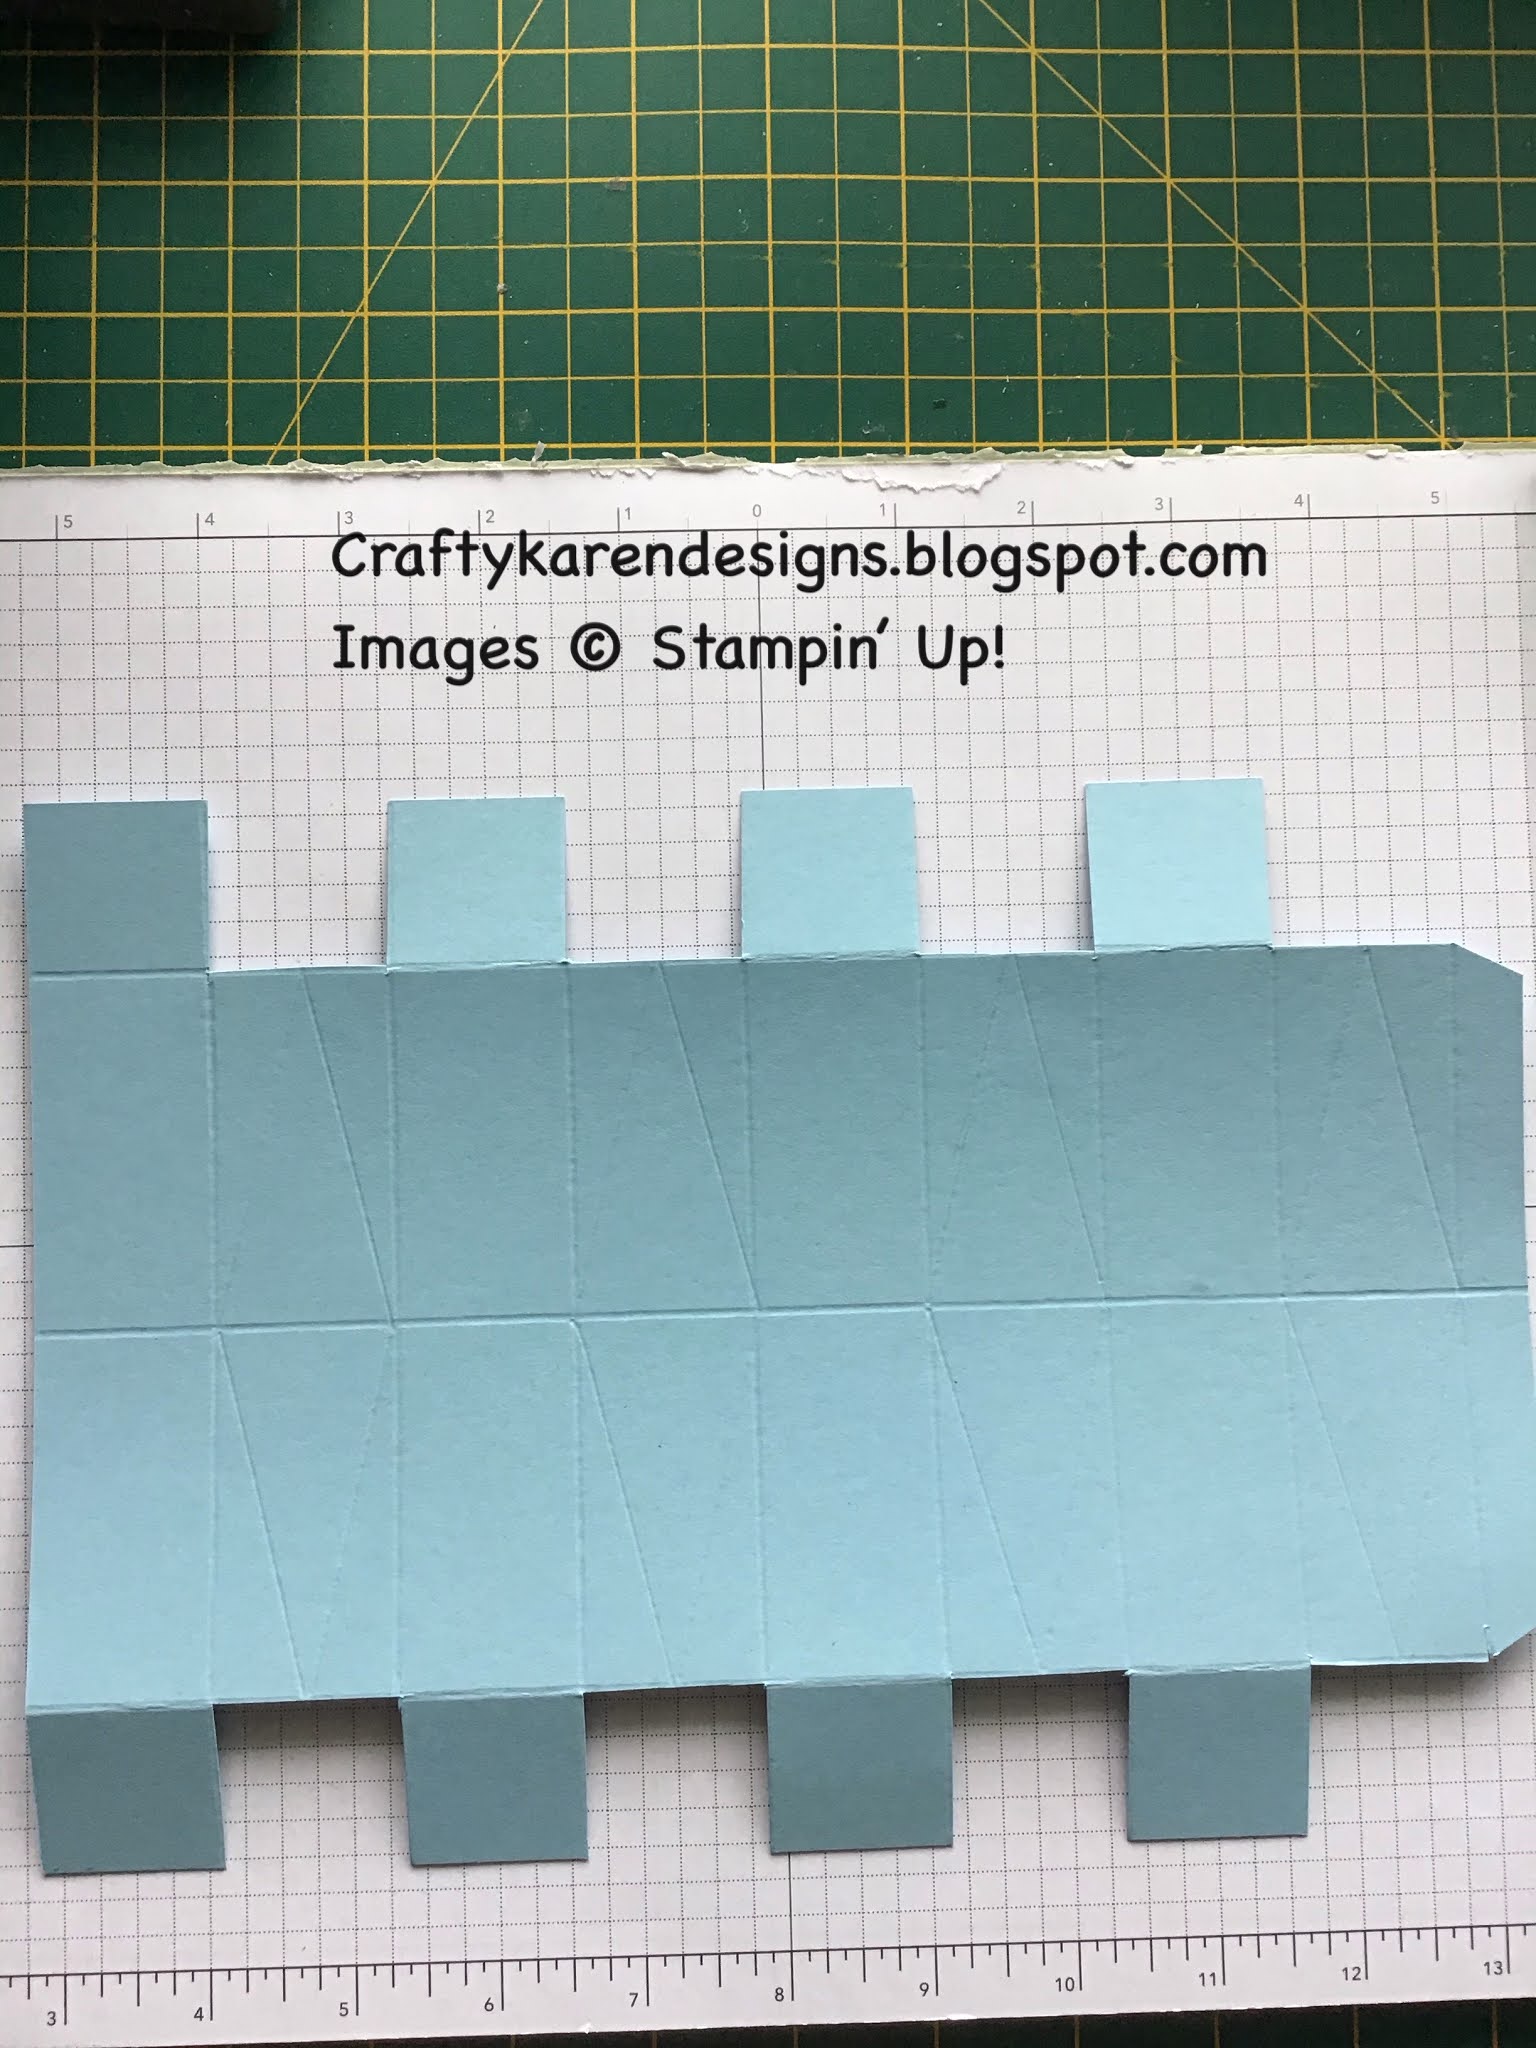
Fold and burnish all the straight score lines first and then mould the diagonal ones with your fingers to start them off.
Cut up all of the tabs along the top and the bottom and remove the skinny rectangles top and bottom too (see picture) and then notch the long tab top and bottom
Then remove each of the tabs that has a score line running through the middle of it (see picture).
Add the rectangles of dsp to the panels, if you are using the foil dsp I would recommend that you use Stampin Seal or similar as adhesive rather than wet glue, sometimes the line of glue can show through on foil paper like this.

If you want to add the triangles, take your piece of glimmer paper and on the reverse make a mark at 1", 2", 3" and 4" along the top then turn it 180 degrees and repeat, the marks should then be offset. Join up the marks as in the picture and then cut out the triangles.

Add the glimmer triangles to the triangle panels leaving a small border around.
Using one of the small square tabs that you cut from the top or the bottom, make a score line across it at 5/8" to give the centre point of the piece and punch a hole. Use this as a guide to punch the holes in the remaining tabs at the top of the box.

Add tear and tape to the long thin tab and fold the two sides together to make the tube shape.
Add tear and tape to the inside of three of the bottom tabs and remove the backing tape. Carefully bring the sides of the box together at the bottom and fold the first side tab with tape over the untaped one and seal, then bring the other two together in the same way, folding one over the other to seal the bottom. Take your time and make sure they are square. This will have sealed the base of the box.

Fold the ribbon in half and tie a knot in the end, starting on the inside of one of the tabs, feed the loop through the holes and pull the top together and closed as you did with the bottom. Pull the loop through the last one and this can now be used to hang it up. I added a mini glue dot under the last tab just to keep it closed and stop anything falling out.

Stamp a sentiment on the scrap of whisper white card and punch out with the postage stamp punch. Punch a small hole in one corner and thread the ribbon loop through it and push the tag down onto the top of the box.
There you are, an unusual Christmas Gift Box, give it a try.
If you would like to see more of my Blog Posts, sign up to the email alert over in the right hand side bar of the page.
If you would like to join my Team or become one of my Discount Shoppers, you can message me on my Facebook Page at www.facebook.com/craftykarendesigns or via the Contact Me box below this Blog.
If you are interested in taking part in some challenges and having crafty chats with like minded people and a bit of a laugh, pop over to Crafty and Banter on Facebook (link in the side bar). This is a new group that some crafty friends and I are trying to get up and running and we would love your company.
If you are interested in taking part in some challenges and having crafty chats with like minded people and a bit of a laugh, pop over to Crafty and Banter on Facebook (link in the side bar). This is a new group that some crafty friends and I are trying to get up and running and we would love your company.
Donna Lester
Victoria Littlewood
Happy Crafting,
Karen XXX


 Designer Series Paper")
")
 Polka Dot Tulle Ribbon")


A really gorgeous box - love the shape xx
ReplyDeleteThanks Jane x
ReplyDelete