

Today I have a great project for batch making cards and making your designer series paper go much further. Just by careful cutting, I have managed to make 14 cards from just one sheet of the beautiful Brightly Gleaming dsp. Check out the video tutorial on my YouTube channel, click on the link below:
Materials
1 sheet of 12” x 12” designer series paper (Brightly Gleaming)
7 sheets of thick very vanilla card stock
Copper foil card stock
Scraps of contrasting card stock for mats (I’ve used night of navy, mossy meadow and pretty peacock)
Scraps of very vanilla for stamping
Stamp set for sentiments (I’ve used several, pictures below in the product list)
Night of navy ink
Pretty peacock ink
Mossy meadow ink
Punches and die cuts for sentiments (pictures in product list below)
Trimmer
Simply scored
Bone folder
Multipurpose adhesive
Dimensionals
Instructions
The cutting plan is on this template but as you will see from the video, I didn’t use the pieces in exactly the way that I had planned. I adapted a couple of the sections as I was working through. Here is how to cut the 12 x 12:

Cut 1 - cut a 2” horizontal strip, then cut this strip into 4 x 2" and 1 x 4"
Cut 2 - cut a 2" vertical strip down left hand side of remaining paper and then cut this strip into 2 x 2" and 1 x 5 5/8" (tiny bit left)
Cut 3 - cut a 2 1/2" strip from left hand side, then cut this into 1 x 4 1/4" and 1 x 5 5/8" (tiny bit left). These two pieces then need to be divided - the 4 1/4" x 2 1/2" cut diagonally corner to corner to make two triangles and the other piece split vertically in half at 1 1/4".
Cut 4 - Cut a 3" strip from the left hand side and then split into 1 x 4" and 2 x 3". Then split the 4" x 3" in half at 1 1/2".
Cut 5 - Final strip is 4 1/2", cut this at 2", 2 x 1/2", 1 x 3" and 1 x 3 3/4". The two larger pieces then cut on the diagonal, corner to corner to make triangles.
All of the card bases are cut at 5 7/8" x 8 1/4", scored at 4 1/8", fold and burnish.
There are three contrasting colours in this designer series paper, mossy meadow, night of navy and pretty peacock so I decided to do 4 of each colour originally but actually ended up with 6 pretty peacock ones due to changing up the design that I had originally thought of. You will see what I mean as I go through, for each card I will give you the dimensions of the layers and the colours and stamp sets, punches, dies that I have used.
Card 1
Night of navy ink and mat layer (2 1/8" x 5 3/4")
Dsp 2" x 5 5/8"
Itty Bitty Christmas stamp set

Card 2
Old olive ink (I don't have mossy meadow) and mossy meadow mat layers 1 3/8" x 5 3/4" x 2
Dsp 1 1/4" X 5 5/8" X 2
Mossy Meadow sentiment mat and very vanilla stamping layer die cut with Tasteful Label dies
Perfectly Plaid stamp set

Card 3
Pretty Peacock ink and mat layers 3 x 2 1/8" square
DSP 3 x 2" square
Gift Wrapped stamp set

Card 4
Night of navy ink and mat layers, cut a piece 2 3/4" x 4 1/2" and then cut diagonally to match the dsp
DSP 2 1/2" x 4 1/4", then cut diagonally, make sure that the dsp and card layers match (its a really easy mistake to make, ask me how I know??)
Scraps of very vanilla and night of navy card punched out with 2" and 2 1/4" circle punches
Itty Bitty Christmas and Festive post stamp sets

Card 5
Mossy meadow mat layers 1 x 3 1/4" square and 1 x 2 1/8" x 1 1/2"
Old olive ink
Copper foil 3 7/8" x 5 5/8" and I've used the Winter Snow Embossing Folder
Rectangular Postage Stamp punch for the sentiment layer
Perfectly Plaid stamp set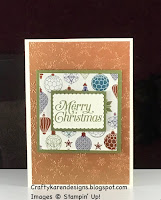

Card 6
My original design as per the template was to use 1 large square and 2 small squares on this card but it didn't look right, the squares were too big. (This is where the extra pieces came from for card 13 and 14).
Pretty peacock ink and mat layers 1 x 3 1/4" square and 1 2 1/4" x 1 1/8"
DSP 3" square
Very vanilla 2" x 1" for the sentiment
Copper foil 3 7/8" x 5 5/8" and I've used the Winter Snow Embossing Folder
Arrange a Wreath stamp set

Card 7
Night of navy ink and mat layer 1 3/4" x 4 1/4"
DSP 1 1/2" x 4"
Itty Bitty Christmas stamp set

Card 8
Mossy meadow mat layers 1 3/4" x 4 1/4" and 2 1/4" square
Old Olive ink
DSP 1 1/2" x 4" and 2" square
Perfectly Plaid and Gift Wrapped stamp sets

Card 9
On the two pieces that are labelled 9 on the template, I have drawn some circles, my original idea was to punch out circles or Christmas trees or bows or something but I decided that wouldn't work for this dsp, so I left them as two rectangles. One I have used for this card, the other for Card 10.
Night of navy ink and mat layer 2 1/4" x 4 1/4", scrap for the sentiment which I have fussy cut after adding the sentiment layer.
DSP 2" x 4"
Copper foil 3 7/8" x 5 5/8" and I've used the Winter Snow Embossing Folder
Very vanilla scrap
Classic Label punch
Itty Bitty Christmas stamp set

Card 10
Pretty peacock ink and mat layer 3 7/8" x 5 5/8" (I've stamped stars all over this layer using pretty peacock ink and a stamp from Gift Wrapped stamp set).
Copper foil mats 4 3/4" x 2 1/2" and 2 7/8" x 5/8"
DSP 4 1/2" x 2"
Very vanilla scrap for the sentiment

Card 11
Mossy meadow mat layer 4 3/4" x 3 1/4" cut diagonally corner to corner
DSP 4 1/2" x 3" cut diagonally corner to corner, make sure it matches the card layer
Old olive ink
Perfectly Plaid stamp set

Card 12
Pretty peacock ink and mat layer 4 3/4" x 4" cut diagonally corner to corner
DSP 4 1/2" x 3 3/4" cut diagonally corner to corner
Poinsettia Petals stamp set

Card 13
Using one of the 2" squares from 6 on the template
DSP 2" square
Pretty peacock ink and mat layers 2 1/4" square and 2 3/4" square
Copper foil mat layer 2 1/2" square
Itty Bitty Christmas stamp set

Card 14
Using one of the 2" squares from 6 on the template
Pretty peacock ink and mat layers 2 1/4" square and 2 3/4" x 4"
Very vanilla mat 2 1/2" x 3 1/2"
Copper foil 3 7/8" x 5 5/8" (I haven't embossed this one)
Itty Bitty Christmas stamp set

On the template you will see that I cut 2 x 1/2" x 4 1/2" strips and I had these left over, I couldn't think of anything useful to do with them but maybe you can
I do hope that you will give this a try, you don't have to follow my layouts, try your own, its fun and makes your designer series paper go a long way.
If you would like to see more of my Blog Posts, sign up to the email alert over in the right hand side bar of the page.
If you would like to join my Team or become one of my Discount Shoppers, you can message me on my Facebook Page at www.facebook.com/craftykarendesigns or via the Contact Me box below this Blog.
If you are interested in taking part in some challenges and having crafty chats with like minded people and a bit of a laugh, pop over to Crafty and Banter on Facebook (link in the side bar). This is a new group that some crafty friends and I are trying to get up and running and we would love your company.
If you are interested in taking part in some challenges and having crafty chats with like minded people and a bit of a laugh, pop over to Crafty and Banter on Facebook (link in the side bar). This is a new group that some crafty friends and I are trying to get up and running and we would love your company.
Happy Crafting,
Karen XXX


 Circle Punch")
 Circle Punch")


")
")
")

")
")

Wow! what a fabulous way to batch make - gorgeous cards Karen x
ReplyDeleteThank you xx
DeleteThank you for sharing, they are lovely
ReplyDeleteThank you x
DeleteVery nice cards Karen. Thank you for the cutting diagram that is very helpful.
ReplyDeleteThank you x
DeleteThank you so much for sharing the template, designs and instructions! This will be very helpful as I have volunteered to make Christmas cards for the nursing homes and care facilities in our town. I need to make a lot of cards so this concept is perfect for me. Merry Christmas!
ReplyDeleteThank you, glad to be of help, good luck xx
ReplyDeleteThis comment has been removed by a blog administrator.
ReplyDeleteThis is nice set of cards & One Sheet Wonder. I can't imagine how much time this took to create & share. Thank you for your time & effort.
ReplyDelete