
Hi Everyone,

Today I have made a pretty fun fold thank you card and combined several sets - Blackberry Beauty designer series paper, Flowers of Friendship bundle, Intricate Leaves dies to illustrate how well Stampin' Up sets can coordinate with each other. Let me show you how I made it.
Materials
1 piece of blackberry bliss card stock 5 7/8" x 10", 1 piece 3" x 7"
2 pieces of basic white card 3 7.8" x 5 5/8", 2 pieces 2 3/4" x 3 1/4"
1 piece of dsp 3 7/8" x 5 5/8", 1 piece 1 3/8" x 5 5/8"
Scraps of basic white and gold foil
Watercolour Pencils
Blender Pen
Flowers of Friendship stamp set
Flowers and leaves punch
Intricate Leaves dies
Trimmer
Simply Scored
Bone Folder
Gold Shimmer Ribbon
Dimensionals
Multipurpose adhesive
Tear and Tape
Instructions
On the long side score the blackberry bliss at 4 1/8" and 8 1/2", fold and burnish to make the card base. When you fold it, if the larger flap catches on the inside, just trim off a sliver so that the card will close properly (I must have mismeasured mine slightly, so I cut off less than 1/8" to make it work).
Stamp the floral images on the two large pieces of basic white for the inside of the card and colour in the images using watercolour pencils, then go over them with Blender Pen. Adhere these pieces to the inside of the card.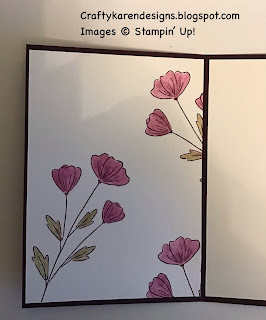

Adhere the two dsp layers to the card front flaps.
Fold the smaller piece of blackberry bliss card in half at 3 1/2" and burnish.. Stamp sentiments on both smaller pieces of white and adhere one on the inside. Line up this small card so that the fold is level with the other fold on the smaller flap on the front and adhere in place (see picture). 
Add a strip of tear and tape in the centre of the small card front and around the back of the large card, take off the backing paper and adhere the ribbon around the card so that it will tie together on the left of the card front (see picture). Then adhere the remaining stamped white layer to the top covering the ribbon on the smaller card. (hope this makes sense).
Stamp and colour a selection of the individual flowers and colour them with the watercolour pencils and then go over them with the Blender Pen and punch them out. Arrange them on the small card front, some glued and some of dimensionals.
Die cut some small leaves from the gold foil and tuck them in around the flowers.
Tie a bow with the ribbon at the left of the card pulling tight enough to keep the card closed.
If you would like to see more of my Blog Posts, sign up on the pop up form and you will get my weekly Newsletter with all the details of my latest projects and news from Stampin' Up!
If you would like to join my Team or become one of my Discount Shoppers, you can message me on my Facebook Page at www.facebook.com/craftykarendesigns or via the Contact Me box below this Blog.
If you are interested in taking part in some challenges and having crafty chats with like minded people and a bit of a laugh, pop over to Craft and Banter on Facebook (link in the side bar), we would love your company.
If you are interested in taking part in some challenges and having crafty chats with like minded people and a bit of a laugh, pop over to Craft and Banter on Facebook (link in the side bar), we would love your company.
Happy crafting,
Karen X


 Specialty Designer Series Paper")
 Shimmer Ribbon")
")


A gorgeous card Karen, love the colour and design x
ReplyDeleteThanks Jane xx
ReplyDelete