

Welcome to Fun Fold Friday and this week I have made a Tepee card. There are lots of these about on YouTube and Pinterest too but I'd never tried one before and was surprised it was so simple. Let me show you how I made this one. Check out the video tutorial on my YouTube channel by clicking the link below:
https://youtu.be/Y-lKpskNZ1U
Materials
3 pieces of card stock 4 1/2" square
1 piece of dsp 4 1/4" square and 1 piece 1 1/2" square (Forever Greenery)
1 piece of whisper white card 4 1/4" square
Scraps of bumblebee, shaded spruce, pear pizzazz, whisper white and silver foil card
Velcro dot
Forever Fern stamp set
Forever Flourishing dies
Daisy Lane stamp set
Crushed Curry ink
Shaded spruce ink
Pear pizzazz ink
Medium Daisy Punch
Daisy Punch
Lovely labels pick a punch
Multipurpose adhesive
Dimensionals
Paper trimmer
Die cutting machine
Product List 1 piece of dsp 4 1/4" square and 1 piece 1 1/2" square (Forever Greenery)
1 piece of whisper white card 4 1/4" square
Scraps of bumblebee, shaded spruce, pear pizzazz, whisper white and silver foil card
Velcro dot
Forever Fern stamp set
Forever Flourishing dies
Daisy Lane stamp set
Crushed Curry ink
Shaded spruce ink
Pear pizzazz ink
Medium Daisy Punch
Daisy Punch
Lovely labels pick a punch
Multipurpose adhesive
Dimensionals
Paper trimmer
Die cutting machine
Instructions
Score all three pieces of square card stock on the diagonal either in your trimmer or on your score board and fold and burnish all the scorelines.
Cut the dsp squares and the whisper white square on the diagonal.
Lay one square on your table with the diagonal score running top to bottom. The other two squares will be tucked behind this square (see picture) and glued in place. Be careful to get the cut edge of the diagonal piece right up to the score line of the piece tucked behind it. When you have done that, your card should look like this


Flip the card over and lay down the dsp and whisper white layers.
Fold the card into its shape and add a Velcro dot inside the back flap to adhere them both together. Open this Velcro dot to fold the card flat to go int he envelope for posting.
Open the card out and lay flat on the table. In order to make sure it fits in the envelope, make sure the decoration only goes over the right hand whisper white section and doesn't fall outside the straight left hand edge.
I have stamped and die cut various leaf images from coloured and silver foil card to arrange around the daisy or the sentiment, whichever you are adding to the centre.
Stamp out two medium daisies and two large daisies using crushed curry (I haven't received my new in colour inks at the time of filming) and punch them out. Adhere all four together and fluff up the petals to give more dimension.
Add the daisy to the centre of the right hand side of the card with dimensionals and then arrange the leaves around it as you like.
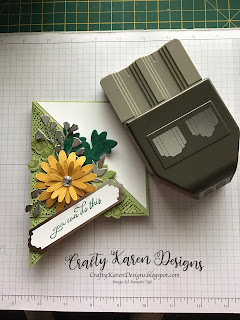

For the sentiment, cut a 3/4" strip of whisper white and a 1" strip of silver foil and punch both ends making sure that the strips are the right length to go across the front, depending on where you arrange it. I did mine by eye. Add the sentiment to the card front using dimensionals.
I hope that you like this card and will give it a try. This is a slightly larger one made with 5" squares


If you would like to see more of my Blog Posts, sign up to the email alert over in the right hand side bar of the page.
If you would like to join my Team or become one of my Discount Shoppers, you can message me on my Facebook Page at www.facebook.com/craftykarendesigns or via the Contact Me box below this Blog.
Happy Crafting,


")


Brilliant Karen beautiful cards and great you tube video thanks so much for sharing x
ReplyDeleteThanks Natalie xx
ReplyDelete