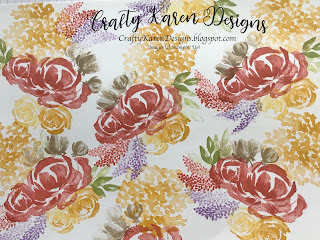
I'm really enjoying just stamping at the moment, I've been massively inspired by Ruth Trice of Artful Stamping. It's very therapeutic and there's no right or wrong. Even if you don't like the finished product as a whole, it looks completely different when you start to chop it up. I've stamped a design using Beautiful Friendship and then made 3 cards and 2 notebooks out of the one sheet. Let me show you what I did.
Materials
1 sheet of A4 whisper white card1 sheet of A4 pear pizzazz card (cut in half to make 2 card bases)
1/2 sheet of A4 crumb cake card (to make another card base), 1 piece of 6 1/2" x 3 1/16" (for the post it pad)
1 piece of terracotta tile card 3 1/4" x 3 3/4" for the front of the note book
Beautiful Friendship stamp set
Terracotta tile ink
Pear Pizzazz ink
Crumb cake ink
Highland heather ink
Crushed curry ink
Trimmer
Multipurpose adhesive
Instructions
Make your design by stamping the largest image in the darkest colour first. I started in the centre and twisted the stamp left and right and stamped again to the right and left of that. I also stamped around the edges to that there were little bits showing as if this page had been cut from something longer.
Then I stamped the next largest image in the crushed curry and the smaller flowers in the same colour around the initial image.
Then came the crumb cake which I used for the buds and I stamped once and then stamped again next to it.
Then I chose the smaller spiky flower and stamped twice in terracotta tile and twice in highland heather, just fitting these in around the main image.
Finally, some leaves in pear pizzazz stamped up to third generation to give paler images that fade into the background.
I decided that was enough and then cut the sheet up into 4 pieces and made 3 cards (I had to trim these a bit to make the card fronts). With the last piece, I cut it in half and decided to make a post it pad cover and a notebook cover with that.
Post it Pad - with the 6 1/2" piece of crumb cake, fold it around the post it pad, pinching at the top corners, then lay the card down and burnish those pinched points to make the fold over the top of the pad, Add adhesive to inside of the fold and the piece that will form the back cover and glue the pad in place. Trim one of the pieces of stamped card down to 2 7/8" square and adhere to the front.
Notebook cover - I had a small notebook measuring 3" x 4" so cut a piece of terracotta tile card to fit the front and then trimmed down the remaining piece of stamped card to fit, leaving a small border all around.
I'm going to keep the notebook on my desk and give the post it pad and matching card to a friend and I've still got two cards left for when I need them. I've left them without a sentiment until I decide who to send them to.
Have a go, its really fun and the worst that can happen is that you waste a piece of A4 card if you really don't like it, but I bet you will - give it a go.
Happy stamping,
Karen XX


So glad your'e enjoying stamping, you are coming on leaps and bounds!. Fabulous projects too - stay well xx
ReplyDeleteThanks Jane, I was a dsp girl before, now I love stamping haha. You stay well too xx
ReplyDelete