
Hi Everyone,

Every now and again, I challenge myself to see how many cards I can make out of a piece of 6" x 6" designer series paper. Sometimes it can be quite difficult but I found this masculine one using the Well Suited dsp quite easy and I thought that I would share it with you. There is also a video tutorial, please click on the link below:
Materials
6 card bases (5 7/8" x 8 1/4"), I've used basic black, basic grey and pacific point
1 piece of 6" x 6" Well Suited dsp (cut as per template below)
Scraps of basic black, basic grey, whisper white and pacific point card stock for the mats
8 pieces of whisper white 3 7/8" x 5 5/8"
Pacific point ink
Memento black ink
Basic grey ink
Many mates stamp set
Happiest of birthdays stamp set
2" circle punch
2 1/4" circle punch
Triple banner punch
Blender pen
Multipurpose adhesive
Dimensionals
Trimmer
Simply scored
Bone folder
Instructions
This is the template that I used to cut out the designer series paper, sorry about the shadow.


- Make the first cut at 3" - 1 x 3" square
- Then cut the remaining strip at 2" - 1 x 2" x 3"
- Cut the 1" strip into 3 - 3 x 1" square
- Put the remaining 3" x 6" strip into the trimmer and cut at 2", then turn and cut at 2" - 1 2" square
- 1 x 2" x 4"
- 1" x 6"
Take all the card bases and score at 4 1/8" on the long side and fold and burnish.
Card 1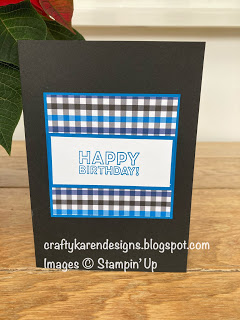

Black portrait card base, 3" square of dsp.
Cut a piece of pacific point card at 3 1/8" square and add the dsp leaving a small border all round the edges.
Cut another piece of pacific point at 3" x 1 3/8".
Stamp the sentiment on a piece of whisper white 2 7/8" x 1 1/8" in pacific point ink and then adhere this to the mat. Then arrange in the centre of the dsp layer using dimensionals and add the dsp mat to the centre of the card front.
Add a piece of whisper white to the inside to write your message.
Card 2

Black landscape card base, 3 x 1" squares of dsp.
Add a whisper white layer to the inside of the card.
On another whisper white layer, stamp the sentiment top right using pacific point ink.
Cute a piece of pacific point card 1 1/4" x 5 5/8" and arrange the 3 squares along it leaving equal borders all around them. Then add this strip to the stamped layer and adhere to the card front leaving a border.
Card 3

Grey portrait card base, 2" x 3" dsp.
Cut a basic black mat layer 2 1/8" x 3 1/8" and adhere the dsp layer. Add dimensionals to the back and arrange on the card front towards the top on the left.
Punch out a 2 1/4" black circle and a 2" whisper white circle. Stamp the sentiment on the white circle with memento black ink. I have then coloured in the word 'DAY!' using the pacific point ink and a blender pen. Glue the white circle to the centre of the black one and addto the card front with dimensionals towards the bottom right and overlapping the bottom of the dsp rectangle.
Add a whisper white layer to the inside.
Card 4

Grey landscape card base, 2" square of dsp.
Add a whisper white layer to the card front and also to the inside of the card.
Cut a pacific point mat for the dsp at 2 1/8" square, add the dsp and adhere to the left of the card front towards the bottom.
Cut a strip of pacific point approx 1 1/2" x 3 1/2" and punch a banner at one end.
Cut a strip of whisper white approx 1" x 3 1/4" and punch a banner at one end.
Stamp the sentiment on the whisper white banner and then adhere it to the pacific point one. Add to the card front using dimensionals so that it overlaps the square of dsp.
Card 5

Pacific point landscape base, 2" x 4" dsp
Cut a piece of whisper white 2 1/8" x 4 1/8" and a piece of basic grey 2 1/4" x 4 1/4" and then layer the dsp to the white and then both of these to the grey. Adhere to the top left of the card front.
Punch out a basic grey 2 1/4" circle and a 2" whisper white circle. Stamp a sentiment on the whisper white layer using pacific point ink and then layer the two together and add to the bottom right of the card front using dimensionals.
Add a whisper white layer to the inside of the card.
Card 6

Pacific point landscape card base, 1" x 6" dsp
Add the dsp strip to the card front about 1/3 of the way from the bottom and trim off the excess.
Punch out a 2 1/4" grey circle and a 2" white one. Stamp the sentiment on the white one using pacific point ink and adhere the two together. Add to the card front using dimensionals at the right end of the dsp strip.
Add a whisper white layer to the inside of the card.
There you are - 6 simple masculine cards from just 1 piece of 6" x 6" designer series paper, why don't you have a go and see what you come up with too.
If you would like to see more of my Blog Posts, sign up to the email alert over in the right hand side bar of the page.
If you would like to join my Team or become one of my Discount Shoppers, you can message me on my Facebook Page at www.facebook.com/craftykarendesigns or via the Contact Me box below this Blog.
If you are interested in taking part in some challenges and having crafty chats with like minded people and a bit of a laugh, pop over to Crafty and Banter on Facebook (link in the side bar). This is a new group that some crafty friends and I are trying to get up and running and we would love your company.
If you are interested in taking part in some challenges and having crafty chats with like minded people and a bit of a laugh, pop over to Crafty and Banter on Facebook (link in the side bar). This is a new group that some crafty friends and I are trying to get up and running and we would love your company.
Free Tutorial Bundle
I have joined together with a group of Stampin' Up! Demonstrators from around the world to compile a selection of 38 tutorials to give to my customers. The Tutorial Bundle comes as a PDF file complete with pictures and instructions for all of the projects. You can get this great resource FREE with any order over £10.

Happy Crafting,
Karen XXX


 Designer Series Paper")
")
")
 Circle Punch")
 Circle Punch")


No comments:
Post a Comment