
Hi Everyone,


Today, I am hopping with the Ink Stamp Share group and showcasing products from the new Stampin' Up! annul catalogue. I've chosen the Pansy Petals Suite because it's my favourite and my inspiration comes from a card I saw on Mixed Up Crafts with Sam Calcott, check out her YouTube channel and blog, she is a very talented crafter.
Materials
1 piece of blackberry bliss card stock 7" x 6", 3 pieces 3" x 6"
4 pieces of fresh freesia card stock 2 3/4" x 5 3/4", 4 pieces 1 3/4" x 5 3/4"
4 pieces of dsp 2 1/2" x 5 1/2", 4 pieces 1 1/2" x 5 1/2", 3 flowers and leaves from the dsp sheets
2 pieces of basic white approx 2 1/2" x 3 1/3" for the rectangles
Scraps of evening evergreen, fresh freesia and basic white for the die cuts
Blackberry bliss ink
Stampin Cut and Emboss machine
Stitched So Sweetly dies
Pansy dies
Pansy Patch stamp set
Trimmer
Simply scored
Bone folder
Multipurpose adhesive
Dimensionals
Instructions
On the long side, score the largest piece of blackberry bliss at 1", 2", 3" and 4" and fold and burnish all the score lines. These score lines will fold around to form the square tube in the centre of the card, adhere in place.
Each of the three other blackberry bliss pieces form the other fins and need to be adhered around the central tube (see picture).

Adhere all the mat layers, all the way around and then the dsp layers, leaving equal borders on all sides.
Die cut 2 stitched scalloped rectangles from the basic white card and 2 stems and the buds from the coloured card. You can die cut the flowers and leaves from the dsp or fussy cut them with your paper snips, whichever you prefer.
Stamp your sentiments on both of the rectangles and then adhere them to opposite sides of the card, one front and one back to write your message. Then decorate the plainer panels with cut out flowers as shown in the pictures.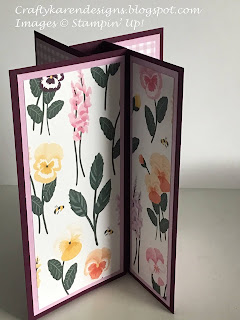


I hope that you like my card and will give it a try. Now please pop over and see what the next project is, you are sure to be filled with inspiration.

Roll Call
If you would like to see more of my Blog Posts, sign up to the email alert over in the right hand side bar of the page.
If you would like to join my Team or become one of my Discount Shoppers, you can message me on my Facebook Page at www.facebook.com/craftykarendesigns or via the Contact Me box below this Blog.
If you are interested in taking part in some challenges and having crafty chats with like minded people and a bit of a laugh, pop over to Crafty and Banter on Facebook (link in the side bar), we would love your company.
If you are interested in taking part in some challenges and having crafty chats with like minded people and a bit of a laugh, pop over to Crafty and Banter on Facebook (link in the side bar), we would love your company.
Happy crafting,
Karen X


 Designer Series Paper")
")


Stampin' Up! Demonstrator29 May 2021 at 14:05
Ooo! That's a cool fun fold - will have to give this one a go.
ReplyDeleteThank you x
DeleteSuch a clever fold!
ReplyDeleteThank you x
DeleteNever saw this fold before. Looks like fun, especially with the pansy decorating.
ReplyDeleteThank you x
DeleteSuch a great fun fold. Great card
ReplyDeleteLove this amazing fun fold Karen, lovely card x
ReplyDeleteThank you x
DeleteA really pretty card with an unusual fold x
ReplyDeleteThank you x
DeleteWhat a great fun fold Karen, looking forward to trying this.x
ReplyDeleteThank you x
DeleteWow! Great fun fold! Does it fold flat for mailing?
ReplyDeleteThank you, yes it does x
DeleteOh my Goodness!!! this is such a pretty card and the fold is just wonderful - I will be casing this one for certain sure :-)
ReplyDeleteThank you x
DeleteI am going to name you the fancy fold queen, what a beauty this one is! I have used the design to make my husband's birthday card and he loved it too. Thank you for sharing x
ReplyDeleteAww thanks Jo. Wish I could claim it as my design, I love it, made a masculine version today for my brother in law x
DeleteLove your beautiful card, Karen. I will be making this for a friend's birthday. Thanks for all your tips. Enjoy your day!
ReplyDelete