Showing posts with label masculine. Show all posts

Tuesday, 17 January 2023

Regency Park Alphabest Masculine Birthday Card

 Hi Everyone,


I always struggle to make masculine cards but todays card is made using the Alphabest stamp set and punch and the Regency Park designer series paper which is new in the Mini Catalogue.  I was inspired by some Christmas bunting I saw a few weeks ago and that gave me the idea to make some birthday bunting with this punch.

Materials

1 piece of balmy blue card stock 5 7/8" x 8 1/4", 1 piece 3 7/8" x 5 5/8"
1 piece of Regency Park dsp 3 7/8" x 5 5/8"
1 piece of basic white card 3 7/8" x 5 5/8", scraps for the lettering
Starry Sky ink
The Alphabest stamp set
Alphabest Punch
2022-2024 In Colour Twine (Starry Sky)
Mini Dimensionals
Trimmer
Simply Scored
Bone Folder
Multipurpose Adhesive
Hole Punch (not Stampin' Up)

Instructions

On the long side score the balmy blue card at 4 1/8" and fold and burnish to make the card base.

Adhere the dsp to the balmy blue mat layer (I wanted a bit of added strength with stringing the letters across this piece).

Using the Alphabest stamp set, I stamped the outlines for all the letters and then added the letters afterwards. Punch out the letters and punch a small hole in the top of them to add them to the string.  I also punch out some stars to add to each end too.

Thread the letters on to the twine, it doesn't matter about the spacing at this stage, decide where you want them and secure each end of the twine on the back with some sticky tape.

Add a mini dimensional to each tag and secure in place along the twine, keeping them as evenly spaced as you can.

Adhere this mat layer to the card front.

Stamp a message on the remaining piece of basic white, I added some stars and the recipients name, adhere to the inside of the card and it's complete.


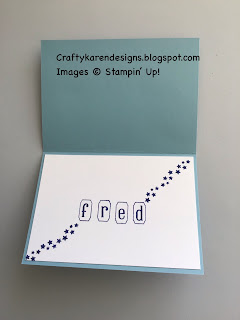
I hope that you like my simple idea for a masculine birthday card.

If you would like to see more of my Blog Posts, follow me on Facebook or sign up for a copy of my Weekly Newsletter (emailed out every Monday morning and link copied to my Facebook Pages).

If you would like to join my Team or become one of my Discount Shoppers, you can message me on my Facebook Page at www.facebook.com/craftykarendesigns or via the Contact Me box below this Blog.

f you are interested in taking part in some challenges and having crafty chats with like minded people and a bit of a laugh, pop over to Craft and Banter on Facebook (link in the side bar). This is a new group that some crafty friends and I are trying to get up and running and we would love your company.

Happy Crafting,

Karen

Product List

Saturday, 4 June 2022

Sun Prints Triple Fold Card - Stamping With Friends Blog Hop

 Hi Everyone,


I've made a Triple Fold card for the Stamping With Friends Blog Hop and the theme was 'Masculine', I really struggle with making more masculine cards because I just love flowers and bright pretty colours and that doesn't suit everyone.  So, this time I have used Night of Navy card stock and the Sun Prints dsp (just leaves so I think I can get away with it haha). Let me show you how I made it.

Materials

1 piece of night of navy card stock 5 7/8" x 11 3/4", 1 piece 1 1/2"  x 11"
2 pieces of dsp 1 3/4" x 5 5/8", 2 pieces 2 3/8" x 5 5/8", 1 piece 4" x 5 5/8", 1 piece 2 5/8" x 5 5/8"
1 piece of basic white 2 5/8" x 5 5/8", scrap for the sentiment
Night of Navy ink
Charming Sentiments Bundle
Trimmer
Simply Scored
Bone Folder
Multipurpose adhesive


Instructions

On the long side, score the night of navy card at 4 1/4", 7" and 9 3/4" and fold and burnish starting with the centre of the card (valley, mountain, valley).

I have used 3 different dsp patterns but you can do it however you like. Starting from the front section, add the layers 1 each on both side of first and second folds, 1 to the outside, the inside layer with be the basic white layer to write a message, then the largest piece at the back (see pictures).


Stamp a sentiment on the basic white layer and add to the inside of the card.

Stamp a sentiment on the scrap of white and die cut with the corresponding die.

Loosely wrap the strip around the centre of the card to make the belly band and adhere the layers together at the back.  Adhere the sentiment to the front in the centre and the card is complete, I hope that you like it.


Please pop over and see what everyone else has made too.

If you would like to see more of my Blog Posts, sign up to the email alert over in the right hand side bar of the page.

New - Class in the Mail - Happiness Abounds


I am very excited to be offering my first Class in the Mail using the fabulous Happiness Abounds Bundle and the Hues of Happiness designer series paper, click on the link in the side bar to get details.

If you would like to join my Team or become one of my Discount Shoppers, you can message me on my Facebook Page at www.facebook.com/craftykarendesigns or via the Contact Me box below this Blog.

If you are interested in taking part in some challenges and having crafty chats with like minded people and a bit of a laugh, pop over to Craft and Banter on Facebook (link in the side bar). This group is a collaboration with Taffy Crafting (Donna Lester) and Vickieloudesigns (Victoria Littlewood) and we would love you to join us.

Happy Crafting,


Karen X


Product List

Wednesday, 1 June 2022

What?? No Flowers?? - Stamp Around UK Video Hop

 Hi Everyone,


The theme for this month is 'Anything but Flowers' - WHAT????? haha, all my stamp sets are floral so I had yo rely on the dsp to do the talking this time. I've used the Texture Chic and the fabulous Beautiful Shapes dies and the Framed Occasions for the sentiment. There is a video tutorial over on my YouTube Channel, link below:

Video Tutorial


Materials

1 piece of evening evergreen card stock 5 7/8" x 8 1/4"
1 piece of basic white 3 7/8" x 5 5/8" and scraps for die cutting shapes
1 piece of dsp 3 7/8" x 5 5/8" and scraps for cutting shapes
Scrap of gold foil
Evening Evergreen ink
Framed Occasions stamp set
Beautiful Shapes dies
Stampin' Cut and Emboss Machine
Trimmer
Simply Scored
Bone Folder
Multipurpose adhesive
Dimensionals

Instructions

On the long side score the card at 4 1/8" and fold and burnish to make the card base.

Adhere the dsp mat to the card front.

Die cut 3 small hexagons from dsp, 4 of the next size up in basic white and 1 from next size up in gold foil.

Layer up the dsp ones on the white mats, stamp the sentiment and layer that one on the gold foil and arrange them on the card front.  Add them using dimensionals.

Stamp a sentiment on the remaining white card and add to the inside of the card.


I hope that you like my card and will give it a try. Check out the video tutorial for more details.

If you would like to see more of my Blog Posts, sign up to the email alert over in the right hand side bar of the page.

If you would like to join my Team or become one of my Discount Shoppers, you can message me on my Facebook Page at www.facebook.com/craftykarendesigns or via the Contact Me box below this Blog.

If you are interested in taking part in some challenges and having crafty chats with like minded people and a bit of a laugh, pop over to Craft and Banter on Facebook (link in the side bar). This group is a collaboration with Taffy Crafting (Donna Lester) and Vickieloudesigns (Victoria Littlewood) and we would love you to join us.

Happy Crafting,


Karen X


Product List

Sunday, 16 January 2022

Share it on a Sunday - Masculine

 Hi Everyone,


The theme this week is 'Masculine' and I find this very hard to do. I've made a very simple card using the Driving By stamp set (which is FREE with a qualifying order during Saleabration) and some of the Hey Sports designer series paper from the Mini Catalogue.

Materials

1 piece of thick basic white card stock 5 7/8" x 8 1/4"
1 piece of basic white card 3" x 4"
1 piece of dsp 3 7/8" x 5 5/8"
Driving By stamp set
Stampin' Cut & Emboss Machine
Stitched So Sweetly dies
Real Red Stampin' Blends
Smoky Slate Stampin' Blends
Balmy Blue Stampin' Blends
Granny Apple Green Stampin'Blends
Daffodil Delight Stampin' Blends
Memento Black ink
Multipurpose adhesive
Dimensionals
Trimmer
Bone Folder

Instructions

On the long side score the thick white card at 4 1/8" and fold and burnish to make the card base.

Adhere the dsp to the card front.

Stamp the car and the sentiment on the basic white card and then die cut with the 2nd largest rectangle from the die set.

Colour the image with the Stampin' Blends and then adhere this mat layer to the card front with dimensionals..

Please pop over and see what Donna and Victoria have made today.


Donna Lester

Victoria Littlewood

If you would like to see more of my Blog Posts, sign up on the pop up form and you will get my weekly Newsletter with all the details of my latest projects and news from Stampin' Up!

If you would like to join my Team or become one of my Discount Shoppers, you can message me on my Facebook Page at www.facebook.com/craftykarendesigns or via the Contact Me box below this Blog.

If you are interested in taking part in some challenges and having crafty chats with like minded people and a bit of a laugh, pop over to Craft and Banter on Facebook (link in the side bar), we would love your company.

Happy crafting,


Karen X


Product List