Showing posts with label Regency Park. Show all posts

Saturday, 4 February 2023

Regency Park Pop Up Birthday Card - Stamping With Friends Blog Hop

 Hi Everyone,


The theme is 'Pop Up' and I've brought out the lovely Regency Park designer series papers again, I just love them. I've teamed them with the Framed Florets dies and stamp set for a really pretty card for my friend.

Materials

1 piece of night of navy card stock 5 7/8" x 8 1/4", scraps for die cuts
3 pieces of dsp 3 7/8" x 5 5/8", scraps to die cut flowers and leaves
1 piece of basic white card 3" x 4 1/4", scraps for the stamping and die cuts
Scraps of shaded spruce for the leaves
Bough Punch
Petal Park stamp set
Petal Park Builder Punch
Framed Florets dies
Stampin' Cut & Emboss Machine
Paper snips
Night of navy ink
Balmy blue ink
Sweet sorbet ink
Petal pink ink
Fine sparkle adhesive backed gems
Trimmer
Simply scored
Bone Folder
Multipurpose adhesive
Stampin dimensionals

Instructions

On the long side score the night of navy card at 4 1/8" and fold and burnish to make the card base.

Adhere the dsp layers to the front and both sections of the inside.

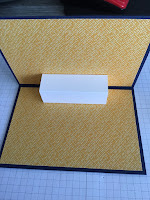
On the long side score the basic white at 1/4", 1 1/4", 2 1/4", 3 1/4" fold and burnish, this forms the stand for the pop up to be adhered to.

Run some adhesive along the outside of the 1/4" tab, fold down on the 1 1/4" tab and bring the other end over to meet it to form a tube. Adhere this in place in the centre of the card, attaching to both sections of the inside of the card.


Die cut three of the framed ovals in basic white and 3 in night of navy so that you can use the white centres inside the navy frames, set the others aside for another card.

Stamp sentiments on all three white ovals using night of navy ink.

Stamp some flowers using the darker colour for the outline and then the paler colours for the infill. Punch these flowers out. Punch some leaves using the Bough Punch and the Petal Park  Builder Punch.


Fussy cut some additional flowers and leaves from the dsp for decorating the ovals.

Arrange the stamped flowers and punched out leaves on the tube, add some with adhesive and the smaller ones with mini dimensionals to give some depth to the display.

Adhere one navy oval behind the floral display and one on the base of the card below the display and then add the white ovals inside them.  Decorate with some of the fussy cut items.

Add the remaining oval to the front of the card with the remaining sentiment oval and decorate with some of the flowers and add some gems.


The finished card can be displayed standing as normal or open to show off the pop up flowers on the side.

Please pop over and see what everyone else has been making, I'm sure that you will be inspired, I always am.

If you would like to see more of my Blog Posts, sign up to my Weekly Newsletter.

If you would like to join my Team or become one of my Discount Shoppers, you can message me on my Facebook Page at www.facebook.com/craftykarendesigns or via the Contact Me box below this Blog.

If you are interested in taking part in some challenges and having crafty chats with like minded people and a bit of a laugh, pop over to Craft and Banter on Facebook (link in the side bar). This group is a collaboration with Taffy Crafting (Donna Lester) and Vickieloudesigns (Victoria Littlewood) and we would love you to join us.

Happy Crafting,


Karen X


Product List

Tuesday, 17 January 2023

Regency Park Alphabest Masculine Birthday Card

 Hi Everyone,


I always struggle to make masculine cards but todays card is made using the Alphabest stamp set and punch and the Regency Park designer series paper which is new in the Mini Catalogue.  I was inspired by some Christmas bunting I saw a few weeks ago and that gave me the idea to make some birthday bunting with this punch.

Materials

1 piece of balmy blue card stock 5 7/8" x 8 1/4", 1 piece 3 7/8" x 5 5/8"
1 piece of Regency Park dsp 3 7/8" x 5 5/8"
1 piece of basic white card 3 7/8" x 5 5/8", scraps for the lettering
Starry Sky ink
The Alphabest stamp set
Alphabest Punch
2022-2024 In Colour Twine (Starry Sky)
Mini Dimensionals
Trimmer
Simply Scored
Bone Folder
Multipurpose Adhesive
Hole Punch (not Stampin' Up)

Instructions

On the long side score the balmy blue card at 4 1/8" and fold and burnish to make the card base.

Adhere the dsp to the balmy blue mat layer (I wanted a bit of added strength with stringing the letters across this piece).

Using the Alphabest stamp set, I stamped the outlines for all the letters and then added the letters afterwards. Punch out the letters and punch a small hole in the top of them to add them to the string.  I also punch out some stars to add to each end too.

Thread the letters on to the twine, it doesn't matter about the spacing at this stage, decide where you want them and secure each end of the twine on the back with some sticky tape.

Add a mini dimensional to each tag and secure in place along the twine, keeping them as evenly spaced as you can.

Adhere this mat layer to the card front.

Stamp a message on the remaining piece of basic white, I added some stars and the recipients name, adhere to the inside of the card and it's complete.


I hope that you like my simple idea for a masculine birthday card.

If you would like to see more of my Blog Posts, follow me on Facebook or sign up for a copy of my Weekly Newsletter (emailed out every Monday morning and link copied to my Facebook Pages).

If you would like to join my Team or become one of my Discount Shoppers, you can message me on my Facebook Page at www.facebook.com/craftykarendesigns or via the Contact Me box below this Blog.

f you are interested in taking part in some challenges and having crafty chats with like minded people and a bit of a laugh, pop over to Craft and Banter on Facebook (link in the side bar). This is a new group that some crafty friends and I are trying to get up and running and we would love your company.

Happy Crafting,

Karen

Product List

Friday, 6 January 2023

Regency Park Bookbinder Card

 Hi Everyone,


I thought I would use some of the Regency Park designer series paper today for my fun fold card. I like to make bookbinder fun folds, I think they are great for showing off several papers from a set and using small amounts. I've teamed it with the Bottled Happiness stamp set and the Stylish Shapes dies. I hope you like it.

Materials

1 piece of Balmy Blue card stock 4 1/8" x 11 1/2", scrap for the sentiment
2 pieces of dsp 4 1/2" x 3 7/8", 1 piece 3/4" x 3 7/8"
1 piece of basic white 3" square, scrap for the sentiment
Stampin Cut & Emboss Machine
Stylish Shapes dies
Trimmer
Simply Scored
Bone Folder
Multipurpose adhesive
Dimensionals
Night of navy ink
Bottled Happiness stamp set
Starry Sky Ribbon
Mini Glue Dots

Instructions

On the long side score the balmy blue card at 4 3/4" and 5 3/4", fold in half on the 5 3/4" score line and then fold the 4 3/4" one back on itself to book the book opening. Adhere the 1" sections together to form the spine of the book as shown.


Adhere the dsp to the front and inside sections of the card.

Stamp a sentiment on the 3" square piece of white and adhere on the inside of the card.


Stamp a sentiment on the scrap of white and then die cut with the smaller square die and then die cut the next size up in balmy blue. Layer the two together ad add to the centre of the opening flap of the card.

Make a small bow with the glittery ribbon and add to the sentiment with glue dots.

Another quick and easy card showing off the dsp.

Pop over and see what Donna and Victoria have made this week too.


Donna Lester

Victoria Littlewood


If you would like to see more of my Blog Posts, sign up to my Weekly Newsletter.

If you would like to join my Team or become one of my Discount Shoppers, you can message me on my Facebook Page at 

If you are interested in taking part in some challenges and having crafty chats with like minded people and a bit of a laugh, pop over to Craft and Banter on Facebook (link in the side bar). This group is a collaboration with Taffy Crafting (Donna Lester) and Vickieloudesigns (Victoria Littlewood) and we would love you to join us.

Happy Crafting,


Karen X

Product List