Showing posts with label Beautiful Shapes dies. Show all posts

Saturday, 17 September 2022

Stamping With Friends Blog Hop - Bloggers' Choice - Annual Catalogue

 Hi Everyone,


For this Blog Hop I decided to pull out the Framed Occasions stamp set and the Beautiful Shapes dies and I have CASEd a card from page 33 of the Annual Catalogue and changed the colours to Coastal Cabana, Bermuda Bay and Shaded Spruce.

Materials

1 piece of coastal cabana card stock 5 7/8" x 8 1/4"
1 piece of bermuda bay card stock 4" x 5 3/4", scrap for the sentiment
2 pieces of basic white card stock 3 7/8" x 5 5/8", scrap for the sentiment
Framed Occasions stamp set
Beautiful Shapes dies
Stampin' Cut & Emboss Machine
Bermuda Bay ink
Shaded Spruce ink
Sequins and Gems
Silver Trim
Trimmer
Simply Scored
Bone Folder
Multipurpose adhesive
Dimensionals
Mini Glue Dots

Instructions

On the long side score the coastal cabana card at 4 1/8" and fold and burnish to make the card base.

Add the bermuda bay mat to the card front.

Die cut 2 hexagons for the sentiment, one in white, the larger one in bermuda bay.

Stamp the design on 1 piece of basic white, I have used full strength and then done a second stamp before reinking in a pattern across the card.  I then added leaves with the shaded spruce.

Stamp the sentiment on the smaller hexagon using shaded spruce and also stamp another sentiment and some leaves on the remaining piece of white for the inside of the card. Adhere it in place.

Layer up the hexagons and add to the card front using dimensionals.  Sprinkle some of the sequins on the card front, tie a bow with the silver twine and then add to the side of the sentiment with a glue dot.

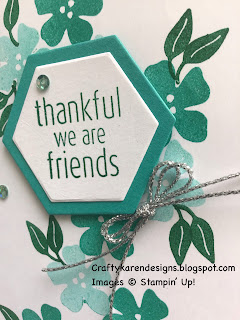
It's a good idea to CASE ideas from the catalogue every now and again, the catalogues are full of great ideas.  Please click on the links below to see which items that have inspired my lovely colleagues.


My latest Class in the Mail is now available to order - click on the link in the side bar for more information.


If you would like to see more of my Blog Posts, follow me on Facebook or sign up for a copy of my Weekly Newsletter (emailed out every Monday morning and link copied to my Facebook Pages).

If you would like to join my Team or become one of my Discount Shoppers, you can message me on my Facebook Page at www.facebook.com/craftykarendesigns or via the Contact Me box below this Blog.

f you are interested in taking part in some challenges and having crafty chats with like minded people and a bit of a laugh, pop over to Crafty and Banter on Facebook (link in the side bar). This is a new group that some crafty friends and I are trying to get up and running and we would love your company.

Happy Crafting,

Karen X


Product List

Wednesday, 1 June 2022

What?? No Flowers?? - Stamp Around UK Video Hop

 Hi Everyone,


The theme for this month is 'Anything but Flowers' - WHAT????? haha, all my stamp sets are floral so I had yo rely on the dsp to do the talking this time. I've used the Texture Chic and the fabulous Beautiful Shapes dies and the Framed Occasions for the sentiment. There is a video tutorial over on my YouTube Channel, link below:

Video Tutorial


Materials

1 piece of evening evergreen card stock 5 7/8" x 8 1/4"
1 piece of basic white 3 7/8" x 5 5/8" and scraps for die cutting shapes
1 piece of dsp 3 7/8" x 5 5/8" and scraps for cutting shapes
Scrap of gold foil
Evening Evergreen ink
Framed Occasions stamp set
Beautiful Shapes dies
Stampin' Cut and Emboss Machine
Trimmer
Simply Scored
Bone Folder
Multipurpose adhesive
Dimensionals

Instructions

On the long side score the card at 4 1/8" and fold and burnish to make the card base.

Adhere the dsp mat to the card front.

Die cut 3 small hexagons from dsp, 4 of the next size up in basic white and 1 from next size up in gold foil.

Layer up the dsp ones on the white mats, stamp the sentiment and layer that one on the gold foil and arrange them on the card front.  Add them using dimensionals.

Stamp a sentiment on the remaining white card and add to the inside of the card.


I hope that you like my card and will give it a try. Check out the video tutorial for more details.

If you would like to see more of my Blog Posts, sign up to the email alert over in the right hand side bar of the page.

If you would like to join my Team or become one of my Discount Shoppers, you can message me on my Facebook Page at www.facebook.com/craftykarendesigns or via the Contact Me box below this Blog.

If you are interested in taking part in some challenges and having crafty chats with like minded people and a bit of a laugh, pop over to Craft and Banter on Facebook (link in the side bar). This group is a collaboration with Taffy Crafting (Donna Lester) and Vickieloudesigns (Victoria Littlewood) and we would love you to join us.

Happy Crafting,


Karen X


Product List

Monday, 23 May 2022

Perfectly Pencilled Quilting - Crafty Collaborations Blog Hop

 Hi Everyone,


Today I am hopping with the Crafty Collaborations group and the theme is 'Quilting'. I love to see quilts, I am always in awe of the talent of the crafters who make them.  I have made several small pieces of 'quilting' myself using the English Paper Piecing method and made pretty flowers using hexagons. So, when this theme came up, I knew that I would be heading for the Beautiful Shapes dies and I have used the Perfectly Pencilled and In Colour dsp and the Gingham Embossing Folder to make my square card. Let me show you how I made it.

Materials

1 piece of Tahitian Tide card stock 5 7/8" x 11 3/4", scraps for the sentiment
2 pieces of basic white card 5 5/8" square, scraps for the sentiment and to back the die cuts
Scraps of perfectly pencilled dsp
Scraps of In Colour dsp in Tahitian Tide
Tahitian Tide ink
Framed Occasions stamp set
Flowers & Leaves Punch
In Colour Bakers Twine
In Colour Matt Decorative Dots
Gingham Embossing Folder
Beautiful Shapes dies
Stampin' Cut & Emboss Machine
Trimmer
Paper snips
Bone Folder
Multipurpose adhesive
Dimensionals
Mini Glue Dots

Instructions

On the long side score the Tahitian Tide card at 5 7/8" and fold and burnish to make a square card.

Run one of the square pieces of white through the machine in the embossing folder. The card is wider than the folder so you will have to run it through twice but it's quite easy to line it up. Adhere to the card front.

Die cut 6 of the small hexagons from the perfectly pencilled dsp and 1 from the in colour dsp. Lay these out on a scrap of white card to make the flower shape and stick them down, then fussy cut around them to cut out the entire flower shape.  Add dimensionals to the back and add to the card front.

Stamp a sentiment on a scrap of white card and die cut with the 2nd smallest hexagon and then add a coloured layer to the back using the next size larger hexagon.  Add to the card front using dimensionals in the lower right corner.

Tie a bow with two strands of the twine and add to the sentiment with a mini glue dot.

Add the remaining piece of white to the inside of the card. I stamped a couple of flowers from the Framed Occasions stamp set but I smudged them so I punched out some of the larger flowers from the Flowers & Leaves punch in Tahitian Tide card and dsp and then stuck them over the smudged stamping and then put a matching one in the opposite corner.

Add some of the matt dots to the card front and the card is complete.

Please pop over and see what everyone else has made too, you are sure to be inspired, I always am.

If you would like to see more of my Blog Posts, sign up to the email alert over in the right hand side bar of the page.

If you would like to join my Team or become one of my Discount Shoppers, you can message me on my Facebook Page at www.facebook.com/craftykarendesigns or via the Contact Me box below this Blog.

If you are interested in taking part in some challenges and having crafty chats with like minded people and a bit of a laugh, pop over to Craft and Banter on Facebook (link in the side bar). This is a new group that some crafty friends and I are trying to get up and running and we would love your company.

Happy Crafting,


Karen X


Product List