Hi Everyone,
I am hopping with the Ink Stamp Share Group again and we are showcasing things that we are currently working on. I've been inspired by Mixed Up Crafts again to make this tiered panel fun fold card. As soon as I saw it I thought it would be great with the Bloom Where You Are Planted dsp and some pierced bloom die cuts I had lying about on my craft table. I hope that you like what I came up with.
Materials
1 piece of 8" x 6" thick white card stock for the main card
1 piece of basic white card stock 5" x 4 7/8", 5" x 3 7/8", 5" x 2 7/8", 5" x 2" for the tiers.
1 piece of dsp 3 3/4" x 4 5/8", 3 3/4" x 3 5/8", 3 3/4" x 2 5/8" for the tiers
2 pieces of dsp 3 3/4" x 5 3/4" for both sides of the back panel, 2 pieces 1 3/4" x 5 3/4" for the side panels
1 piece of basic white 3" x 4 1/4" for the scalloped rectangle on the back to write the message and a scrap for the sentiment
Bloom Where You Are Planted dsp
Pierced Bloom dies
Stampin Cut and Emboss machine
Stitched so sweetly dies
Paper snips
Multipurpose adhesive
Dimensionals
Instructions
On the long side, score the thick white card at 2" and 6", fold and burnish to make the stand.
Score all of the tier pieces of basic white along the 5" side at 1/2" and 4 1/2" and fold and burnish.
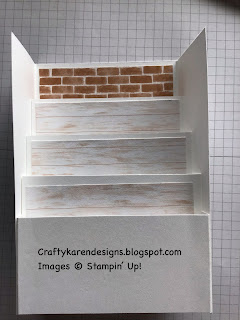
Add the dsp layer to the inside back panel before starting to add the tiers. Add glue to the side pieces of each tier, one at a time and butting them up to the score line on one side, adhere in place, open out the card and then adhere the other side in the same way. When it's dry, add the dsp to the front of that tier and then repeat until you get to the smallest tier at the front. When you add the smallest one, make sure that it it level with the edge of the sides to complete the stand. This one doesn't have a dsp layer.
I used a wood effect dsp from the Bloom Where You Are Planted for two tiers and the trailing plant design for the middle one. The back panel is the brick effect one and I have used this on the back and sides too.
Before you add dsp to the side panels, cut across from the front of the bottom tier to the top of the panel at the back - see picture. Measure up 2" on one side of the panel dsp and cut a diagonal line across to the top so that it fits on the side panel, repeat for the other side by laying the other piece of dsp right sides together to the trimmed one before cutting so that the cut is in the right direction.
Now for the fun bit, I don't have the dies for this set so I fussy cut multiple plant pots and leaves from the dsp and added some of the pierced bloom die cuts that I already had to make plants. Arrange them on the tiers either with glue or dimensionals as you like.
Stamp a sentiment and then die cut it with the label from the Floral Gallery dies. Die cut a large scalloped rectangle for the reverse of the card to write the message.
I hope that you like my card and will give it a try. Please click on the links below to see what everyone else has been working on this month.
Roll Call
If you would like to see more of my Blog Posts, sign up on the pop up form and you will get my weekly Newsletter with all the details of my latest projects and news from Stampin' Up!
If you would like to join my Team or become one of my Discount Shoppers, you can message me on my Facebook Page at www.facebook.com/craftykarendesigns or via the Contact Me box below this Blog.
If you are interested in taking part in some challenges and having crafty chats with like minded people and a bit of a laugh, pop over to Craft and Banter on Facebook (link in the side bar), we would love your company.
If you are interested in taking part in some challenges and having crafty chats with like minded people and a bit of a laugh, pop over to Craft and Banter on Facebook (link in the side bar), we would love your company.
I've collaborated with Stampin' Up! Demonstrators from all over the world to put together a Fancy Fold Cards Tutorial Bundle containing 30 different projects. We are offering this bundle FREE with any purchase from our online stores. If you would like a copy of this fantastic bundle, place an order using the current Hostess Code (see the details in the side bar of my blog) and I will forward you the PDF Tutorial.
Product List 


What a fun card love it
ReplyDeleteWow! Absolutely love this
ReplyDeleteWhat a fabulous card! so inspired.x
ReplyDeleteThank you for the tutorial, I would love to try it.
ReplyDeleteSuch a great design and fun fold, very clever ideas
ReplyDeleteCan't wait to try this card Karen x
ReplyDeleteThank you everyone for your lovely comments x
ReplyDeleteWhat a fun card, love it Karen :-)
ReplyDeleteAnother great fun fold and great card Karen x
ReplyDeleteThis is a great, fun card Karen!
ReplyDeleteAny video tutorials
ReplyDeleteLook up my inspiration Mixed Up Craft
DeleteThis is a beautiful card. Does this card actually fold up to fit in our medium envelopes?
ReplyDeleteIt folds flat to approx 6 x 6
Delete