
Hi Everyone,

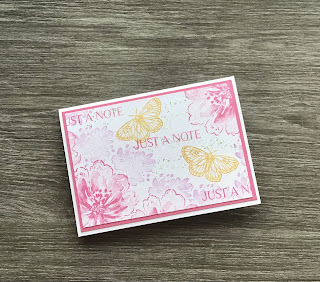
This month's theme was chosen by the lovely Janice Thompson - 'Sunshine, Flowers & Insects' and the sunshine part had me scratching my head for a while. I had to resort to a lovely 'sunshine' colour from Tea Boutique and then teamed it with Hues of Happiness and Shaded Summer for the sentiment and I took the butterfly from the Butterfly Brilliance stamp set. It just goes to show how you can mix and match all sorts of papers and stamp sets to get the result that you want. I hope that you like it.
Materials
1 piece of thick white card stock 5 7/8" x 8 1/4"
1 piece of Tea Boutique dsp 3 7/8" x 5 5/8"
1 piece of basic white card stock 3 1/4" x 4 1/4", scrap for the sentiment and butterfly
1 piece of Hues of Happiness dsp 3" x 4"
Starry Sky ink
Tahitian Tide ink
Starry Sky ribbon
Double Oval punch
Shaded Summer stamp set
Butterfly Brilliance stamp set
Paper Snips
Blue Adhesive Backed Gems
Trimmer
Multipurpose Adhesive
Dimensionals
Mini Glue Dots
Instructions
On the long side score the thick white card at 4 1/8" and fold and burnish to make the card base.
Adhere the Tea Boutique dsp to the card front.
Add the floral dsp to the white mat layer and wrap a piece of the ribbon around it and secure on the back with some tape. Add this to the card front using dimensionals.
Stamp one of the small butterflies on a scrap of white using Tahitian Tide ink and then fussy cut the image. Stamp a sentiment on a scrap of white using the starry sky ink and punch out with the scalloped oval.
Add the sentiment over the top of the ribbon to keep it in place using dimensionals. Add the butterfly to the card front and bend up the wings slightly. Add the blue adhesive backed gems down the body of the butterfly and one to the sentiment. Tie a bow with the ribbon and add to the sentiment.
I hope that you like my interpretation of the theme, please pop over and see what everyone else has made.
If you would like to see more of my Blog Posts, sign up to the email alert over in the right hand side bar of the page.
If you would like to join my Team or become one of my Discount Shoppers, you can message me on my Facebook Page at www.facebook.com/craftykarendesigns or via the Contact Me box below this Blog.
If you are interested in taking part in some challenges and having crafty chats with like minded people and a bit of a laugh, pop over to Craft and Banter on Facebook (link in the side bar). This is a new group that some crafty friends and I are trying to get up and running and we would love your company.
If you are interested in taking part in some challenges and having crafty chats with like minded people and a bit of a laugh, pop over to Craft and Banter on Facebook (link in the side bar). This is a new group that some crafty friends and I are trying to get up and running and we would love your company.
Happy Crafting,
Karen X


 Designer Series Paper")
 Designer Series Paper")


 Metallic Woven Ribbon")


")