Showing posts with label scraps. Show all posts

Thursday, 21 April 2022

Quick Scrapbusting Ideas Using Up Your Designer Series Papers

 Hi Everyone,


I'm sure that like me, you always have lots of scraps of designer series papers that you wonder what to do with. Here are some ideas for really quick cards that you could use to batch make cards to use up your stash.

All layouts

1 piece of coloured card stock 5 7/8" x 8 1/4"
1 piece of basic white 3 7/8" x 5 5/8" for the inside
Trimmer
Simply Scored
Bone Folder
Multipurpose adhesive
Dimensionals

Card 1

scrap of basic white for the sentiment
1 piece of gold foil 3 7/8" x 5 5/8", 1 piece3" x 4" for the mat layer
1 piece of dsp 5 3/8" x 3 5/8", 1 piece 2 1/2" x 3 1/2" for the mat layer
Soft succulent ink
Art Gallery stamp set
Stitched So Sweetly dies
Stampin' Cut & Emboss Machine


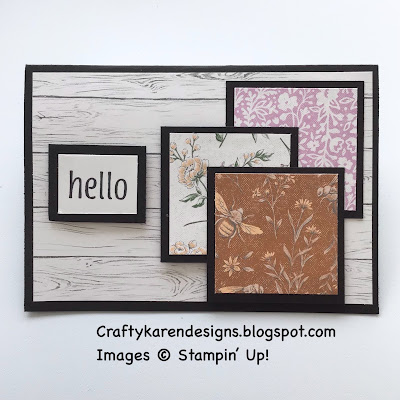
Card 2

1 piece of dsp 3 7/8" x 5 5/8", 3 pieces 2" square
3 pieces of coloured card 2 1/4" square for the mat layers, scrap 1/4" bigger all round than sentiment layer
Artistically Inked stamp set
Memento Black ink
Scrap of basic white for the sentiment

Card 3

1 piece of dsp 3 7/8" x 5 5/8", 1 piece 2 1/8" x 5 5/8"
2 strips of gold foil 1/2" x 5 5/8" which go on the back of the smaller strip of dsp, scrap for the sentiment mat which is 3/4" x 3 1/4"
Strip of 1/2" x 3" for the sentiment
Artistically Inked stamp set


You can add embellishments and ribbons as you like, this is just the basic layout to start you off.  Use up whatever you have, any colour, any dsp, any stamp set, it's up to you.
Crumb Cake ink.

I haven't given detailed instructions for these cards, I think you can see easily enough from the photographs how they go together but if you have any queries, just email me.

If you would like to see more of my Blog Posts, sign up to the email alert over in the right hand side bar of the page.

If you would like to join my Team or become one of my Discount Shoppers, you can message me on my Facebook Page at www.facebook.com/craftykarendesigns or via the Contact Me box below this Blog.

If you are interested in taking part in some challenges and having crafty chats with like minded people and a bit of a laugh, pop over to Craft and Banter on Facebook (link in the side bar). This is a new group that some crafty friends and I are trying to get up and running and we would love your company.

Happy Crafting,


Karen X


Product List

Thursday, 14 April 2022

In Bloom Birthday Card - Stampin' Dreams - Scraps

Hi Everyone,


I'm hopping today with the Stampin' Dreams group and the theme is 'Scraps'. I had a lot of bits of coloured card and wanted to play with the Pierced Blooms dies as they are retiring soon. I love making cards with these dies, they are so pretty, I'm really going to miss them but I'm sure there will be something equally gorgeous coming in the new catalogue that I will love just as much.

Materials

1 piece of bermuda bay card stock 5 7/8" x 8 1/4"
2 pieces of basic white card 3 7/8" x 5 5/8"
Scraps of bermuda bay, polished pink, daffodil delight, granny apple green to make the flowers
Polished Pink ink
In Bloom stamp set
Pierced Bloom dies
Stampin' Cut & Emboss Machine
Trimmer
Simply Scored
Bone Folder
Take Your Pick Tool
Brushed Brass Butterflies
Iridescent Rhinestones
Blue adhesive backed gems
Multipurpose adhesive
Dimensionals

Instructions

On the long side score the bermuda bay card at 4 1/8" and fold and burnish to make the card base.

Die cut a selection of flowers and leaves with the dies.  Arrange the flowers on a piece of white card and when you are happy with the arrangement, adhere them in place, I have used multipurpose adhesive and dimensionals to give some dimension to the card front.

Stamp a sentiment in the bottom right hand corner of the white card in polished pink ink and then adhere this layer to the card front. If you are worried about stamping, you should do this before you arrange the flowers (I was lucky and it worked out fine).

I've used a combination of iridescent rhinestones and blue adhesive backed gems for flower centres on some of the flowers and then added 3 butterflies (I love these).

Stamp another sentiment on the remaining piece of card and add to the inside of the card.

Card done! A quick and easy card to make with a handful of scraps.

Please pop over and see what everyone else has made, you are sure to be inspired.


If you would like to see more of my Blog Posts, sign up to the email alert over in the right hand side bar of the page.

If you would like to join my Team or become one of my Discount Shoppers, you can message me on my Facebook Page at www.facebook.com/craftykarendesigns or via the Contact Me box below this Blog.

If you are interested in taking part in some challenges and having crafty chats with like minded people and a bit of a laugh, pop over to Craft and Banter on Facebook (link in the side bar). This is a new group that some crafty friends and I are trying to get up and running and we would love your company.

Happy Crafting,


Karen X


Product List

Thursday, 9 December 2021

Penguin Place, Gingerbread & Peppermint Christmas Card

 Hi Everyone,


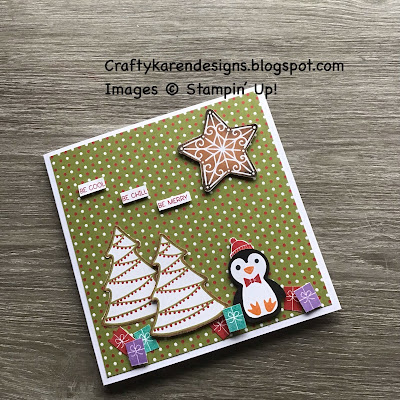
I'm hopping today with the Stampin' Dreams group and the theme is 'Christmas' so I thought I would see what scraps I had left on my desk and use them up to make a cute Christmas card. I've used the Gingerbread & Peppermint designer series paper and added a cute penguin from the Penguin Place stamp set. Let me show you how I made it:

Materials

1 piece of thick basic white card stock 5 3/4" x 11 1/2"
1 piece of dsp 5 1/2" square, 1/2" x 5 3/4" strip, scraps
Scraps of basic white and basic black for stamping and punching out
Scraps of Gingerbread & Peppermint dsp, I have fussy cut two tree cookies and a star
Penguin Place stamp set
Penguin Builder Punch
Paper snips
Real red ink
Highland heather ink
Bermuda Bay ink
Pumpkin pie ink
Memento black ink
Trimmer
Simply Scored
Bone folder
Multipurpose adhesive
Dimensionals

Instructions

On the long side, score the thick white card at 5 3/4" and fold and burnish to make a square card.

Adhere the large piece of dsp to the card front.

Fussy cut two iced trees, 1 cookie and 6 peppermints.

Stamp 7 packages in different colours and fussy cut them out as well as 1 bobble hat for the penguin.

Adhere one tree to the card front and lay the other one over the top with dimensionals at the bottom left. Add the cookie star at the top right with dimensionals.

Punch out the black and white body pieces for the penguin. Stamp the eyes in black, the bow tie in real red and the feet and the beak with pumpkin pie.

Adhere the hat to the back of the head, add the white body layer on top of the black and fix to the card front with dimensionals at the side of the trees. Arrange the parcels around him and the trees using dimensionals and multipurpose adhesive.

Stamp the sentiment and cut it out in 3 sections, add a strip of dimensional to the back and arrange on the card front above the trees.

Stamp a sentiment on the inside of the card, adhere the dsp strip and the peppermints.


I hope that you like my quick card using up my scraps, please pop over and see what everyone else has been making too.

If you would like to see more of my Blog Posts, sign up on the pop up form and you will get my weekly Newsletter with all the details of my latest projects and news from Stampin' Up!

If you would like to join my Team or become one of my Discount Shoppers, you can message me on my Facebook Page at www.facebook.com/craftykarendesigns or via the Contact Me box below this Blog.

If you are interested in taking part in some challenges and having crafty chats with like minded people and a bit of a laugh, pop over to Craft and Banter on Facebook (link in the side bar), we would love your company.

Happy crafting,


Karen X

Product List