Showing posts with label Christmas Card. Show all posts

Sunday, 21 August 2022

Spruced Up - Share it on a Sunday - CASE the Catalogue

 Hi Everyone,


This week we are CASEing the Catalogue and I have chosen to use the Spruced Up Bundle in the July-December Mini Catalogue (page 13). I love this set and I think the parcel stamp and the die cuts will be useful all year - great for birthdays too. I've changed up the colours but otherwise it is a straight Copy & Share Everywhere (CASE).

Materials

1 piece of parakeet party card stock 5 7/8" x 8 1/4", scrap for parcel
Scraps of distressed gold foil, white, sweet sorbet and orchid oasis for die cuts and sentiment
1 piece of basic white card 3 7/8" x 5 5/8"
1 piece of Splendid Day dsp 3 7/8" x 5 5/8"
Scraps of 2022-2024 In Colour DSP Stack for the parcels
Small piece of In Colour Bakers Twine (sweet sorbet)
Starry Sky ink
Adhesive Backed Sequins & Gems
Stampin' Cut & Emboss Machine
Spruced Up Bundle
Starlit Punch
Paper snips
Multipurpose adhesive
Trimmer
Bone Folder
Mini Glue Dots

Instructions

On the long side score the parakeet party card at 4 1/8" and fold and burnish to make the card base.

Adhere the dsp layer to the card front.

Stamp a tree on a scrap of white card.

Die cut strings of lightbulbs in distressed gold (I did 8), die cut three parcels and the tree. Cut small squares of dsp to stick on the underside of the parcels and trim around them with paper snips.

Dry fit the die cut elements on the card front to see where you want everything and then adhere the strings of lights at a diagonal across the card front. Add the tree and the parcels as shown in the picture.  Punch out a star with the Starlit Punch and add to the top of the tree.

Stamp the word on a scrap of white and trim around it, add dimensionals to the back.

Make a bow with the twin and add underneath where the word is going and adhere with a glue dot, add the word over the top as shown.

Stamp Christmas on the remaining basic white and add the leftover string of lights and then adhere to the inside of the card and you are almost finished. Just sprinkle some sequins to finish off.


Please pop over and see what Donna and Victoria have made too.


Donna Lester

Victoria Littlewood

If you would like to see more of my Blog Posts, sign up to my Weekly Newsletter.

New Class in the Mail


Click on the link in the side bar for more details.


If you would like to join my Team or become one of my Discount Shoppers, you can message me on my Facebook Page at 

If you are interested in taking part in some challenges and having crafty chats with like minded people and a bit of a laugh, pop over to Craft and Banter on Facebook (link in the side bar). This group is a collaboration with Taffy Crafting (Donna Lester) and Vickieloudesigns (Victoria Littlewood) and we would love you to join us.

Happy Crafting,


Karen X

Product List

Tuesday, 14 December 2021

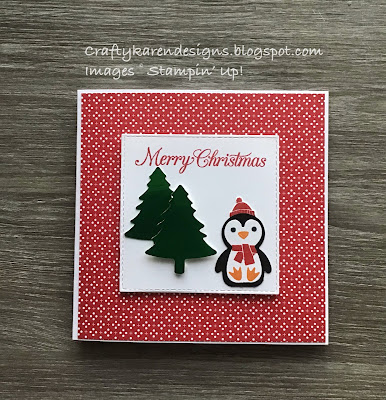
Penguin Place - Poinsettia Petals - Heartwarming Hugs Christmas Card

 Hi Everyone,


Today I'm making Christmas cards with the very cute Penguin Place bundle and using up the last bits of my designer series papers. Let me show you how I made this card.

Materials

1 piece of thick basic white card 5 7/8" x 11 3/4"
1 piece of Heartwarming Hugs dsp 5 5/8" square
1 piece of basic white 3 1/2" square
Scraps of green foil, black and basic white card stock
Poinsettia Petals stamp set
Plaid Tidings stamp set
Penguin Place stamp set
Penguin Builder Punch
Stitched Square dies
Stampin' Cut and Emboss Machine
Pine Tree Punch
Real red ink
Pumpkin pie ink
Old olive ink
Memento black ink
Paper snips
Trimmer
Simply scored
Bone folder
Multipurpose adhesive
Dimensionals

Instructions

On the long side score the thick white card at 5 7/8" and fold and burnish to make the card base.

Stamp a sentiment on the inside of the card and add some trees (see picture).


Adhere the dsp layer to the card front.

Die cut a 3 1/2" square (or cut one out with trimmer). Stamp the sentiment across the top section in real red ink.  Punch out two trees from the green foil and add to the square mat as shown in the picture, I have added the front one on dimensionals.

Punch out the body of the penguin from the scraps of black and white card and layer them up together.  Stamp the eyes, beak and feet and then add a scarf. Stamp the hat on a scrap of card and fussy cut and then add to the top of the penguins head (I left a small piece of white card under the brim of the hat and used that to glue the hat on the back so it looks like its sitting on his head).

Add dimensionals to the back of the square and adhere to the centre of the card front.

I hope that you like my card, I think it's really cute.

If you would like to see more of my Blog Posts, sign up on the pop up form and you will get my weekly Newsletter with all the details of my latest projects and news from Stampin' Up!

If you would like to join my Team or become one of my Discount Shoppers, you can message me on my Facebook Page at www.facebook.com/craftykarendesigns or via the Contact Me box below this Blog.

If you are interested in taking part in some challenges and having crafty chats with like minded people and a bit of a laugh, pop over to Craft and Banter on Facebook (link in the side bar), we would love your company.

Happy crafting,


Karen X


Product List

Friday, 10 December 2021

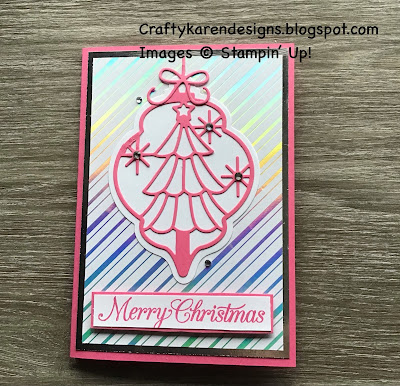
Delicate Baubles Whimsy & Wonder Christmas Card - Stamp N Hop Blog Hop

 Hi Everyone,


Today I am hopping with the Stamp N Hop group and we are doing 'Christmas'. I'm using up my last scraps of this beautiful Whimsy & Wonder designer series paper and have teamed it with a polished pink delicate bauble, I think it's really pretty. Let me show you how I made it.

Materials

1 piece of polished pink card stck 5 7/8" x 8 1/4", scraps for the die cut and sentiment layer
1 piece of basic white card 3 7/8" x 5 5/8", scraps for the die cut and sentiment
1 piece of silver foil 3 7/8" x 5 5/8"
1 piece of dsp 3 5/8" x 5 3/8"
Polished pink ink
Stampin' Cut & Emboss Machine
Delicate Baubles dies
Poinsettia Petals stamp set
Basic rhinestones
Trimmer
Simply scored
Bone folder
Multipurpose adhesive
Dimensionals

Instructions

On the long side score the polished pink at 4 1/8" and fold and burnish to make the card base.

Stamp a sentiment on the large piece of basic white and adhere to the inside of the card. Stamp a sentiment for the front on a strip of basic white and trim around it.

Adhere the silver foil and the dsp layer to the card front.

Die cut a solid bauble in basic white and an intricate one in polished pink, also die cut the bow.  Push all the pieces out of the pink die cut and carefully adhere to the solid white one. Adhere the bow to the top and trim off the excess string.  Adhere the bauble to the top centre of the card front.

Adhere the sentiment to a strip of polished pink card and trim around leaving a very small border of the pink showing.  Add to the card front with dimensionals underneath the bauble. Add some rhinestones for added bling.

This is a very simple card to make that looks really effective.

Please pop over and see what everyone else has been making


December Blog ‘N Hop Roll Call


1.       Karen Egan UK - https://craftykarendesigns.blogspot.com/2021/12/delicate-baubles-whimsy-wonder.html

2.       Gez Carpenter UK - https://www.nigezza.co.uk/2021/12/stamp-n-hop-december-blog-hop-all.html

3.      Terry Montgomery - https://terryficcards.blogspot.com/2021/12/stampin-hop-december-blog-hop-most.html

4.      Annette Elias - https://dekijkkast.blogspot.com/2021/12/zelfgemaakte-kerstornamenten-leuk-en.html

5.      Jill Chapman - https://www.paperdaisycrafting.co.uk/2021/12/stamp-n-hop-december-blog-hop-all.html

6.      Cheryl Taylor - https://cheryldiana.co.uk/christmas-gift-tags

7.      Victoria Littlewood - https://vickieloudesigns.blogspot.com/2021/12/snowman-season-merry-christmas-reverse.html

8.      Liz Yuille UK - https://oldstablescrafts.co.uk/?p=15436

9.      Mo Rootes UK - https://www.crafty-rootes.com/?p=7925

If you would like to see more of my Blog Posts, sign up on the pop up form and you will get my weekly Newsletter with all the details of my latest projects and news from Stampin' Up!


If you would like to join my Team or become one of my Discount Shoppers, you can message me on my Facebook Page at www.facebook.com/craftykarendesigns or via the Contact Me box below this Blog.

If you are interested in taking part in some challenges and having crafty chats with like minded people and a bit of a laugh, pop over to Craft and Banter on Facebook (link in the side bar), we would love your company.

Happy crafting,


Karen X


Product List