Showing posts with label Forever Fern. Show all posts

Monday, 2 May 2022

Forever Fern - Creative Colour Challenge #35 - Stampin' Birds Challenge

 Hi Everyone,


For the month of May, Stampin' Birds are challenging each other to try and keep our crafty mojo on its collective toes. We have committed to doing three challenges per week and the first one is our lovely Victoria's Creative Colour Challenge #34 - Shaded Spruce, Crumb Cake and Mint Macaron - not colours I would have put together but not as challenging as it could have been hahahaha!!

I've made a card using the Forever Fern stamp set and the Forever Flourishing dies, I hope that you like it. Let me show you how I made it.

Materials

1 piece of crumb cake card stock 5 7/8" x 8 1/4"
2 pieces of basic white card stock 3 7/8" x 5 5/8"
1 piece of shaded spruce card stock 1" x 5 5/8"
Scraps of mint macaron and shaded spruce for the die cuts
Gilded Gems
Brushed Brass Butterflies
Crumb Cake ink
Shaded Spruce ink
Mint Macaron ink
Forever Fern stamp set
Forever Flourishing dies
Stampin' Cut & Emboss Machine
Double Oval punch
Multipurpose adhesive
Dimensionals
Trimmer
Bone Folder

Instructions

On the long side score the crumb cake card at 4 1/8" and fold and burnish to make the card base.

Randomly stamp leaves across the centre of one piece of basic white making sure that all the stems meet in a line across that can be covered by the strip of shaded spruce.  

Adhere the strip of shaded spruce across this stamped piece and trim off any excess.  Adhere this to the card front.

Die cut an assortment of leaves using shaded spruce and mint macaron card.

Stamp a sentiment and then punch out with the larger oval.  Tuck the leaves on the back of this oval using dimensionals and then add some glue and adhere to the centre of the strip on the card front.

Stamp some leaves on the remaining piece of basic white and adhere to the inside of the card.


Add some gilded gems and brass butterflies to the card front and the card is complete.

I do hope that you like my card. Why don't you give one of Victoria's challenges a go too? Her Creative Challenge Blog Page is https://creativecolourchallenges.blogspot.com

If you would like to see more of my Blog Posts, sign up to the email alert over in the right hand side bar of the page.

If you would like to join my Team or become one of my Discount Shoppers, you can message me on my Facebook Page at www.facebook.com/craftykarendesigns or via the Contact Me box below this Blog.

If you are interested in taking part in some challenges and having crafty chats with like minded people and a bit of a laugh, pop over to Craft and Banter on Facebook (link in the side bar). This is a new group that some crafty friends and I are trying to get up and running and we would love your company.

Happy Crafting,


Karen X


Product List

Friday, 4 March 2022

Artfully Composed Flip Front Card

 Hi Everyone,


Today I have made another fun fold card - a flip front card using the gorgeous Artfully Composed designer paper and the Forever Fern stamp set and dies.  I am highlighting Just Jade which is one of the 2020 - 2022 In Colours which will retire when the new annual catalogue is launched.


Materials

1 piece of just jade card stock 5 7/8" x 4 1/8", 1 piece 3" x 8 1/4", scraps for die cuts and sentiment
2 pieces of basic white card 2 7/8" x 4", scrap for the sentiment
1 piece of Artfully Composed dsp 5 3/4" x 4"
Gingham Embossing Folder
Forever Fern stamp set
Forever Flourishing dies
Stampin' Cut & Emboss Machine
Double Oval Punch
Just Jade ink
Iridescent Rhinestones
Trimmer
Simply Scored
Bone Folder
Dimensionals
Take Your Pick Tool
Multipurpose Adhesive

Instructions

On the long side, score the long thin piece of card at 4 1/8" and fold and burnish to make the flip front card.

Add the dsp to the remaining piece of just jade card and then adhere the folded piece in the centre with the fold at the top.


Stamp a sentiment on 1 of the pieces of white card and add some leaves in Just Jade, adhere on the inside of the flip front card.


Run the remaining piece of white through the machine in the Gingham Embossing Folder and then adhere to the card front.

Die cut some leaves in Just Jade and adhere to the card front.

Stamp a sentiment on a scrap of white and punch out, then punch out a scalloped mat layer and adhere them together.  Add to the card front over the join in the leaves on the front.

Scatter some rhinestones and the card is complete.

If you would like to see more of my Blog Posts, sign up on the pop up form and you will get my weekly Newsletter with all the details of my latest projects and news from Stampin' Up!

If you would like to join my Team or become one of my Discount Shoppers, you can message me on my Facebook Page at www.facebook.com/craftykarendesigns or via the Contact Me box below this Blog.

If you are interested in taking part in some challenges and having crafty chats with like minded people and a bit of a laugh, pop over to Craft and Banter on Facebook (link in the side bar), we would love your company.

Happy crafting,


Karen X

Product List

Saturday, 29 January 2022

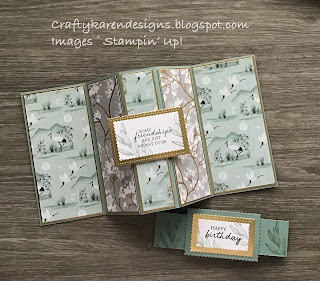
Symbols of Fortune Pop Out Gatefold Card - InspireINK Blog Hop

 Hi Everyone,


Today I am taking part in the InspireINK Blog Hop and the theme is 'Something Old with Something New'. I've chosen to make a fun fold card using the lovely new Symbols of Fortune designer series papers and Forever Fern and Shaded Summer from the annual catalogue. I do hope that you like it, I've made it for a very special friend for her birthday. Let me show you how I made it.

Materials

1 piece of soft succulent card stock 5 7/8" x 11 1/2", 1 piece 1 1/2" x 11 1/2"
4 pieces of gold foil 2 3/4" x 5 3/4", 2 pieces 1 7/8" x 5 3/4", 1 piece 1 3/8" x 5 3/4"
4 pieces of dsp 2 5/8" x 5 5/8", 2 pieces 1 3/4" x 5 5/8", 1 piece 1 1/4" x 5 5/8"
1 piece of basic white 1 3/8" x 5 3/4"
Scraps of gold foil, soft succulent and basic white for the sentiments
Evening Evergreen ink
Soft Succulent ink
Forever Fern stamp set
Shaded Summer stamp set
Stampin' Cut & Emboss Machine
Stitched So Sweetly dies
Trimmer
Simply Scored
Multipurpose Adhesive
Dimensionals
Bone Folder

Instructions

On the long side score the soft succulent card at 5" and 6 1/2" then flip over and score at 2 7/8" from either end, fold and burnish the score lines to make the card base.

Adhere all the dsp layers to the gold foil mats and then to the card base, two of the larger ones will be on display when the card is closed with the belly band.

Die cut 2nd and 3rd smallest rectangles in basic white, 3rd and 4th in gold foil and 4th again in soft succulent.

Stamp the sentiments in evening evergreen on the basic white layers and then using one of the leaf stamps and soft succulent, stamp off and then stamp around the edges (see pictures). Stamp the same image on the strip for the belly band using full strength ink this time.


Layer up the sentiments as shown.  Add the inside one on the centre panel using dimensionals.


Add the basic white mat to the back of the card for the message.

Close up the card and loosley wrap the belly band strip around the card and then adhere the remaining sentiment mat over the join and the card is finished.


I do hope that you like it.

Please pop over and see what everyone else has made too.

You are invited to the Inlinkz link party!

Click here to enter

If you would like to see more of my Blog Posts, sign up on the pop up form and you will get my weekly Newsletter with all the details of my latest projects and news from Stampin' Up!

If you would like to join my Team or become one of my Discount Shoppers, you can message me on my Facebook Page at www.facebook.com/craftykarendesigns or via the Contact Me box below this Blog.

If you are interested in taking part in some challenges and having crafty chats with like minded people and a bit of a laugh, pop over to Craft and Banter on Facebook (link in the side bar), we would love your company.

Happy crafting,


Karen X


Product List