Showing posts with label Butterfly Kisses. Show all posts

Friday, 14 October 2022

Butterfly Kisses Multi Bend Card - Fun Fold Friday

 Hi Everyone,


For this week's Fun Fold Friday I am trying a Multi Bend Card - another one of Sam Calcott's creations, such a talented lady! I have used the Butterfly Kisses designer series papers and the Charming Sentiments bundle. It's much easier than it may look, give it a go. I'm glad that I did and I think I may use this style for my family Christmas cards this year. This one is a 6" x 6" card and folds flat. Sam has also made some 5" x 7" examples, check out her channel on YouTube at Mixed Up Crafts.

Materials

4 pieces of parakeet party card stock 6" x 6", 1 piece 5" x 5", 1 piece 6" x 5", 1 piece 3 1/2" x 1"
8 pieces of dsp 2 3/4" x 5 3/4", scrap to die cut for the centre and decoration
1 piece of acetate/window sheet 6" x 7"
1 piece of basic white 3 3/4" x 4 3/4" to write your message, scrap for the sentiment
Trimmer
Simply Scored
Bone Folder
Paper snips
Stampin' Cut & Emboss Machine
Stylish Shapes dies
Charming Sentiments bundle
Multipurpose adhesive
Dimensionals
Red Line tape (strong double sided tape)
Night of navy ink

Instructions

Score the 4 x 6" square pieces of parakeet party on one side at 3" and fold and burnish to make the card base.

Add the dsp layers to the piece which will be the front of the card making sure the two sides are level with each other.

Score the 6" x 5" piece of parakeet party at 1/2" and 5 1/2" and fold and burnish, then curl the centre with a bone folder to put a curve in it between the score lines.
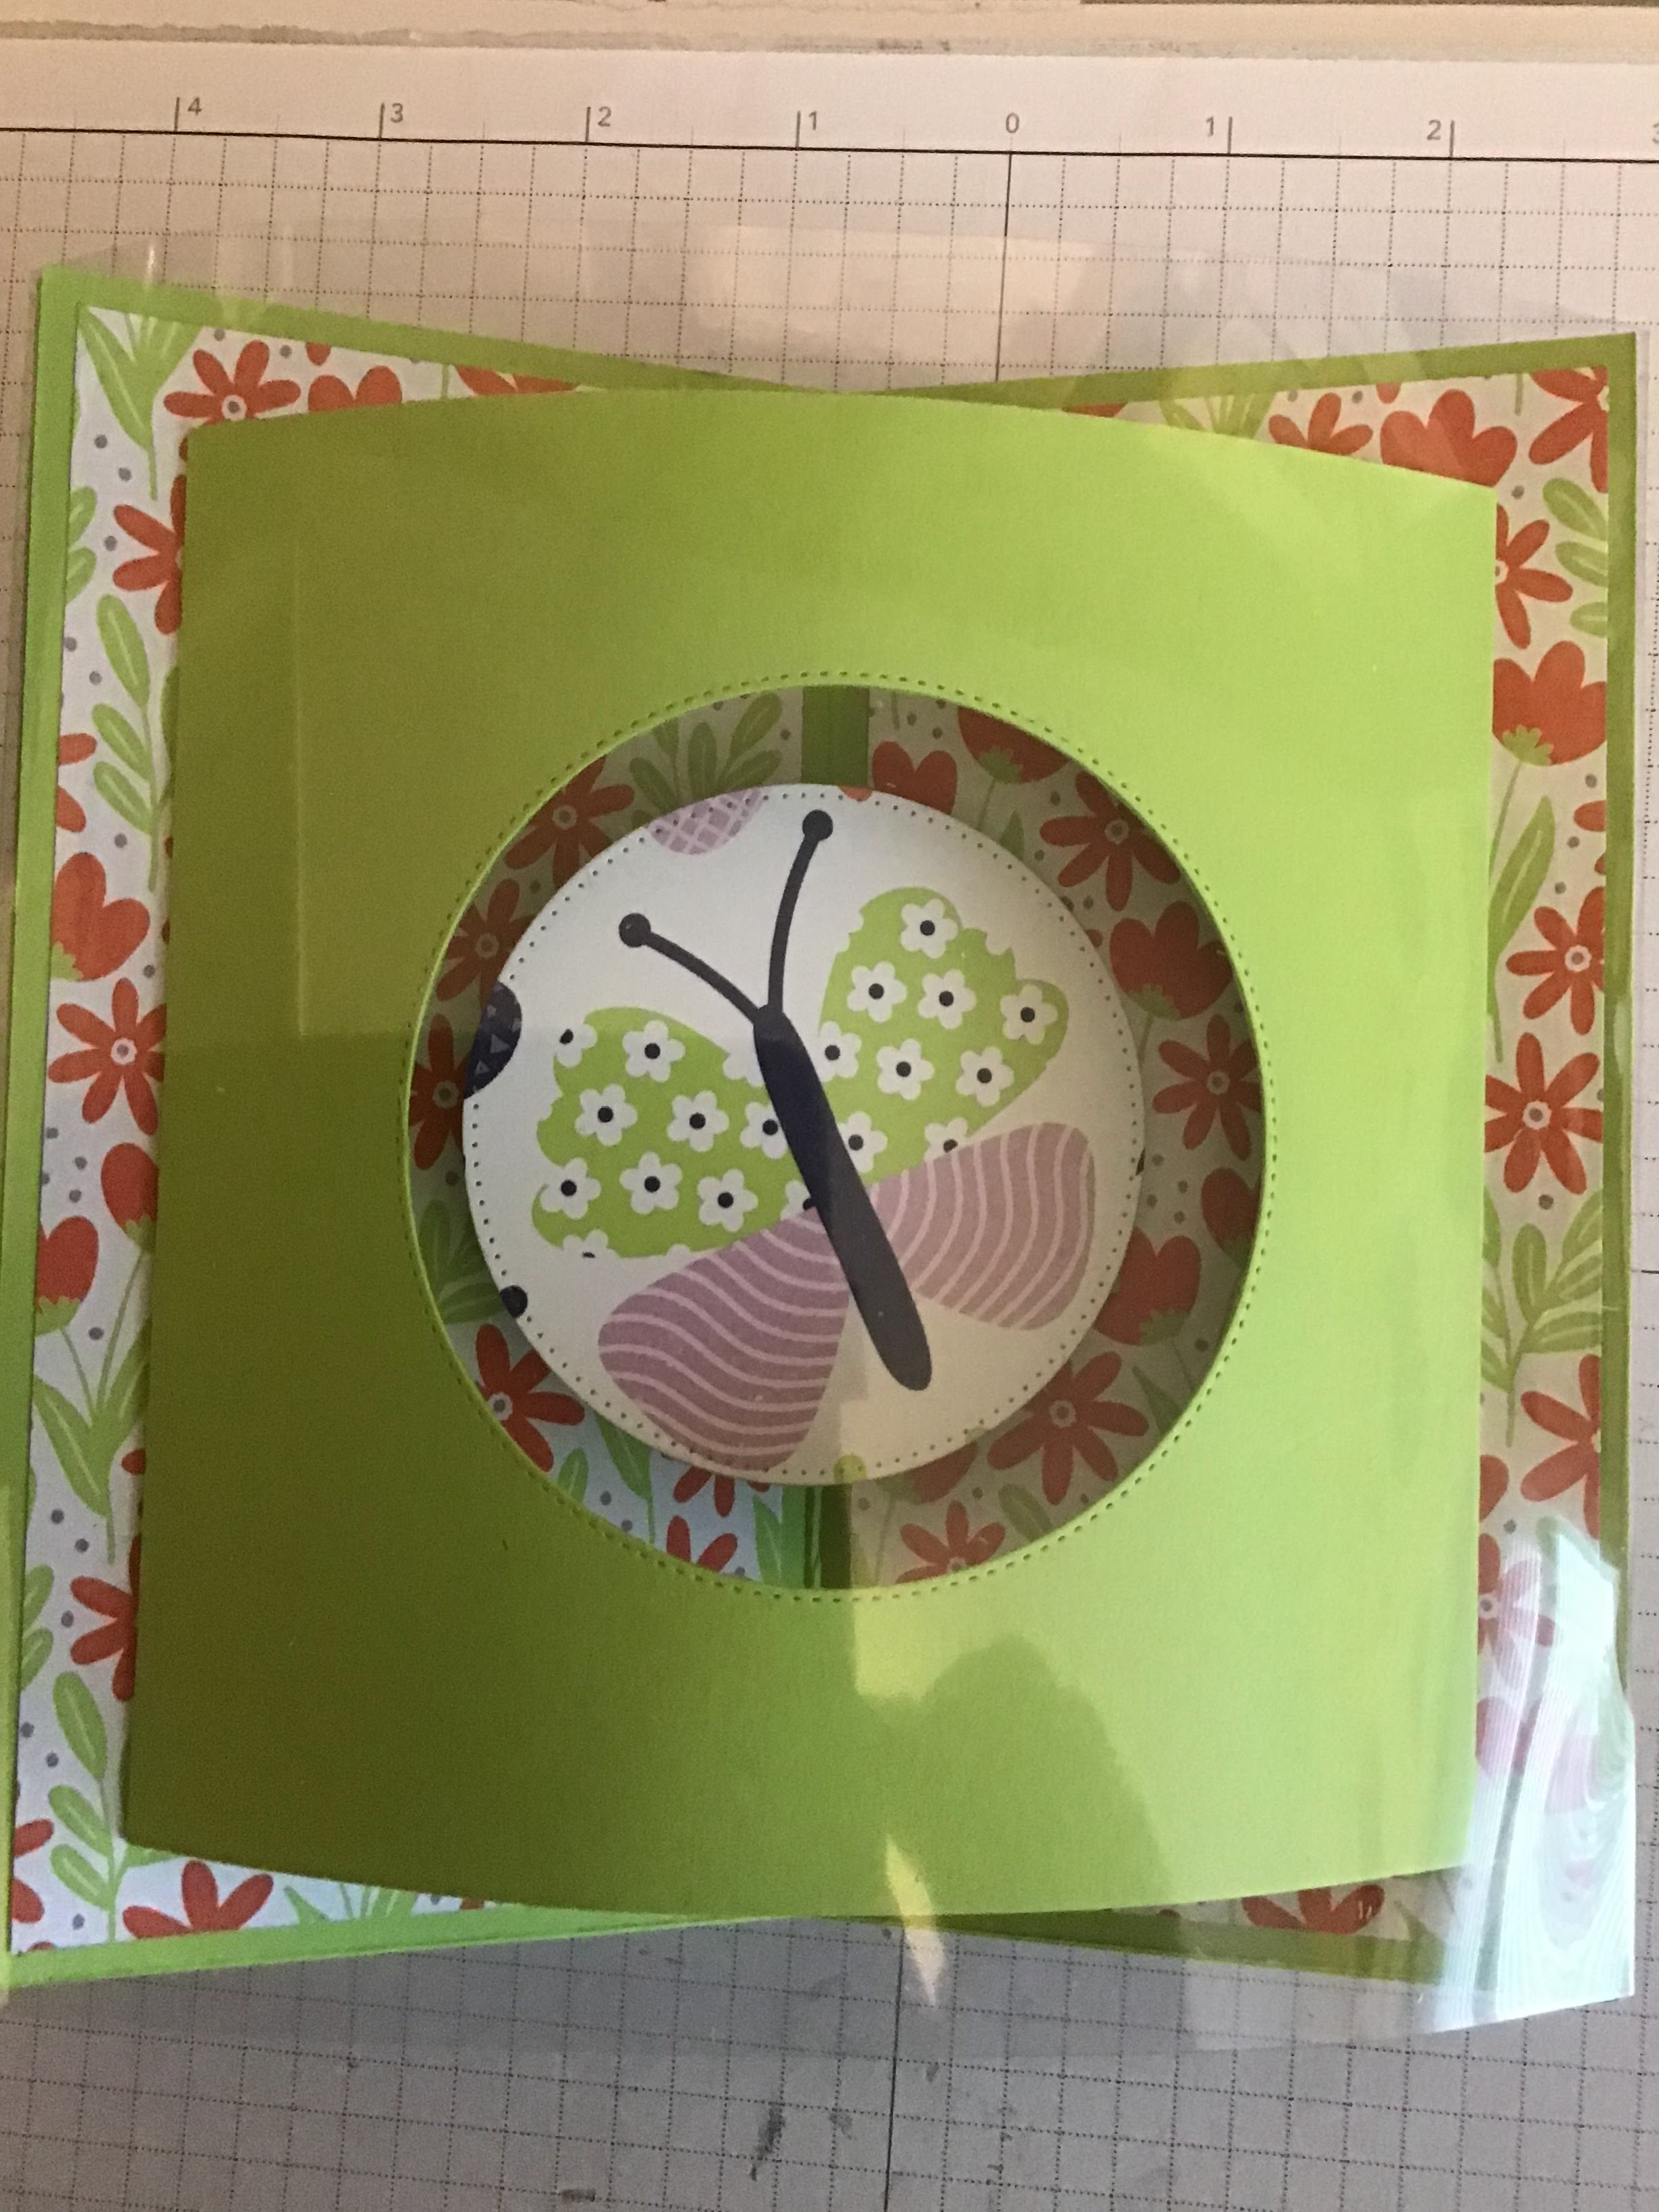

Using the largest of the circle dies, die cut a circle from the centre of this piece and cut a circle using the second largest to be the focal point within the circle (mine is one of the butterflies).

Add glue to the two side tabs of the 6" x 5" piece with the circle cut out and lay it on the card front so that it has an equal border all the way around.  

Score the 3 1/2" x 1" piece at 1/2" and 3" and fold and burnish, then curl as before, add glue to the tabs and fix in the centre of the aperture for your focal point.  Add the focal point using dimensionals to fix to this strip.  I then fussy cut a small butterfly to add to the bottom right hand corner ad adhered in place.

Score the acetate/window sheet at 1/2" and 6 1/2" and fold and burnish. Add red line tape to the inside of the tabs on this and then fold the ends over the sides of the card front to enclose it within the acetate, peel off the backing and stick down.

The three remaining pieces of 6" x 6" card form the back of the card and need to be stuck together as shown. Add the dsp panels and then stick the whole thing to the back of the card front.


Score the remaining piece of green card at 1/2" and 4 1/2" and curl as before, then add adhesive to the side tabs and add to the back of the card.  Stamp a sentiment on the remaining piece of white, curl that and then adhere to the green layer on the back.


Stamp a sentiment for the front and die cut, I also die cut a green layer to sit behind the stamped one for a bit more strength.  Add to the card front using dimensionals.


I hope that you like my card, I see many more of these in my future, I really like it. It uses lots of card and dsp but I think it's worth it.

Please pop over and see what Victoria has made this week.

Victoria Littlewood


If you would like to see more of my Blog Posts, follow me on Facebook or sign up for a copy of my Weekly Newsletter (emailed out every Monday morning and link copied to my Facebook Pages).

If you would like to join my Team or become one of my Discount Shoppers, you can message me on my Facebook Page at www.facebook.com/craftykarendesigns or via the Contact Me box below this Blog.

f you are interested in taking part in some challenges and having crafty chats with like minded people and a bit of a laugh, pop over to Crafty and Banter on Facebook (link in the side bar). This is a new group that some crafty friends and I are trying to get up and running and we would love your company.

Happy Crafting,

Karen X

Friday, 29 July 2022

Gingham Cottage Butterfly Kisses Faux Stepper Card

 Hi Everyone,


Today I have made a cute Faux Stepper Get Well Card using the lovely Gingham Cottage and Butterfly Kisses designer series papers and the Lovely You stamp set. This is a really simple fun fold and because it's a faux stepper card, it doesn't involve any complicated cutting and scoring. Let me show you how I made it.

Materials

1piece of night of navy card 4 1/8" x 10", 1 piece 3" x 8 1/4"
1 piece of basic white 4" x 3 1/4", scrap for the sentiment
1 piece of Gingham Cottage dsp 4" x 3 1/4", 1 piece 4" x 1 3/8", 1 piece 1/2" x 4"
1 piece of Butterfly Kisses dsp 2 3/4" x 5"
Double Oval Punch
Lovely You stamp set
Night of Navy ink
Basic Rhinestones
Take Your Pick Tool
Trimmer
Simply Scored
Bone Folder
Multipurpose adhesive
Dimensionals

Instructions

On the long side score the large piece of navy card at 1 1/2", 3" and 6 1/2" and fold and burnish into an M shape. Score the other piece at 3" and fold to make a tent shape (the back will be shorter than the front).


Add the 1 3/8" x 4" strip of dsp to the front section and then the larger piece to the section behind.  Add the Butterfly Kisses dsp to the long section of the other navy piece.

Add the 1/2" strip of dsp to the basic white layer  and then add to the inside of the card. You can also stamp a sentiment on this piece if you like.

Add dimensionals to the wrong side of the tent fold at the bottom, line it up with the bottom of the M shape card and making sure it's in the centre, press into place.  Add glue to the inside of the shorter section and adhere this on the back of the card.

Stamp a sentiment and then punch out with the small oval and add with a dimensional to the card front.

Sprinkle some bling and the card is complete. I hope that you like it.

Pop over and see what Donna and Victoria have made.

Donna Lester

Victoria Littlewood

If you would like to see more of my Blog Posts, sign up to my Weekly Newsletter.

New Class in the Mail


Click on the link in the side bar for more details.

If you would like to join my Team or become one of my Discount Shoppers, you can message me on my Facebook Page at www.facebook.com/craftykarendesigns or via the Contact Me box below this Blog.

If you are interested in taking part in some challenges and having crafty chats with like minded people and a bit of a laugh, pop over to Craft and Banter on Facebook (link in the side bar). This group is a collaboration with Taffy Crafting (Donna Lester) and Vickieloudesigns (Victoria Littlewood) and we would love you to join us.

Happy Crafting,


Karen X


Product List

Saturday, 9 July 2022

Butterfly Kisses Sketch Challenge - Stamp n Hop Blog Hop

 Hi Everyone,


Today's hop is a sketch challenge and I have used the pretty Butterfly Kisses dsp and the Eden's Garden and Framed Occasions stamp sets for my version. I love sketch challenges, they are great for using up scraps of dsp, showing off different patterns and getting your crafty mojo going if you are having trouble thinking of something to make.


Materials

1 piece of calypso coral card stock 5 7/8" x 8 1/4"
2 pieces of basic white 3 7/8" x 5 5/8", scrap for the sentiment circle
2 pieces of dsp 1 3/4" x 3", 1 piece 3 5/8" x 2", scrap to fussy cut the butterflies from
Decorative circle punch
Eden's Garden stamp set
Framed Occasions stamp set
Fresh Freesia ink
Parakeet Party ink
Memento Black ink
Paper snips
Trimmer
Simply scored
Multipurpose Adhesive
Dimensionals
Iridescent Pearls
Take Your Pick Tool

Instructions

On the long side score the calypso coral card at 4 1/8" and fold and burnish to make the card base.

Adhere one of the white mats to the card front and arrange the dsp panels leaving equal borders all around following the sketch layout.

Punch out a decorative circle and stamp a sentiment in the lower portion of the circle.  Stamp a flower and some leaves coming off the edges as shown in the picture.

Stamp another sentiment and some flowers and leaves on the remaining piece of white and add to the inside of the card.


Fussy cut some butterflies from the dsp and add to the circle with dimensionals.  Add the circle to the intersection of the dsp panels on the card front as shown with dimensionals.


I've added some iridescent pearls to the centre of the flower and the card is complete.

Please pop over and see what everyone else has been making too.

If you would like to see more of my Blog Posts, sign up to my weekly Newsletter.

New Class in the Mail


Click on the link in the side bar for more details.


If you would like to join my Team or become one of my Discount Shoppers, you can message me on my Facebook Page at www.facebook.com/craftykarendesigns or via the Contact Me box below this Blog.

If you are interested in taking part in some challenges and having crafty chats with like minded people and a bit of a laugh, pop over to Craft and Banter on Facebook (link in the side bar). This group is a collaboration with Taffy Crafting (Donna Lester) and Vickieloudesigns (Victoria Littlewood) and we would love you to join us.

Happy Crafting,


Karen X


Product List

Saturday, 25 June 2022

Butterfly Kisses - InspireINK - Colour Challenge

 Hi Everyone,


It's a colour challenge this month for the INspireINK Blog Hop so I have teamed up the Butterfly Kisses and Brights designer series papers and the Shaded Summer stamp set for my card.

The colours in the challenge are


Materials

1 piece of thick white card 5 7/8" x 8 1/4"
1 piece of Brights dsp 3 7/8" x 5 5/8" (Poppy Parade)
1 piece of Butterfly Kisses dsp 3 1/4" x 5", 1 piece 1" x 5", 1 piece 1/2" x 5 7/8"
Scraps to fussy cut butterflies
Scrap of basic white for the sentiment
Double Oval Punch
Orchid Oasis ink
Shaded Summer stamp set
Paper Snips
Trimmer
Bone Folder
Multipurpose Adhesive
Dimensionals
In Colour Matt Dots

Instructions

On the long side score the thick card at 4 1/8" and fold and burnish to make the card base.

Adhere the dsp layers to the card front as shown.

Fussy cut two butterflies and add to the card front using dimensionals.

Stamp a sentiment on a scrap of white and punch out with the Double Oval Punch and add to the card front.  Stamp a sentiment on the inside of the card and I've added a 1/2" strip of dsp too.


Add a few decorative dots and the card is done, really quick and easy and a great day of showing off different patterns in one card.

Please click on the links to see what everyone else has been making for this colour challenge.

You are invited to the Inlinkz link party!

Click here to enter

If you would like to see more of my Blog Posts, sign up to the email alert over in the right hand side bar of the page.

I'm putting in my order today to make up the Card Packs for my Class in the Mail, so if you are interested, please order by 9.00 a.m. 26th June at the latest.

New - Class in the Mail - Happiness Abounds


I am very excited to be offering my first Class in the Mail using the fabulous Happiness Abounds Bundle and the Hues of Happiness designer series paper, click on the link in the side bar to get details.

If you would like to join my Team or become one of my Discount Shoppers, you can message me on my Facebook Page at www.facebook.com/craftykarendesigns or via the Contact Me box below this Blog.

If you are interested in taking part in some challenges and having crafty chats with like minded people and a bit of a laugh, pop over to Craft and Banter on Facebook (link in the side bar). This group is a collaboration with Taffy Crafting (Donna Lester) and Vickieloudesigns (Victoria Littlewood) and we would love you to join us.

Happy Crafting,


Karen X


Product List