Showing posts with label Lights Aglow. Show all posts

Wednesday, 30 November 2022

Whimsical Woodland Faux Stepper Christmas Card

 Hi Everyone,


Today I have made a Faux Stepper Card using the fabulous Whimsical Woodland Embossing Folder and the Lights Aglow dsp and teamed it with the Framed & Festive stamp set for a cute card. You know I love to make fun fold cards and they really don't have to be complicated, this one doesn't have any complicated scoring and cutting, it's basically two strips of card scored and folded. Let me show you how I made it.

Materials

1 piece of thick basic white card 4 1/8" x 10", 1 piece 2 3/4" x 11 1/2"
Scraps of cherry cobbler (3/4" x 3 1/2") and basic white card (1/2" x 3") for the sentiment
1 piece of 2 1/4" x 5" gold foil
1 piece of dsp 3 7/8" x 3 1/4", 1 piece 2 5/8" x 5 5/8", 1 piece 3 7/8" x 1 3/8"
Whimsical Woodland Embossing Folder
Stampin' Cut & Emboss Machine
Framed & Festive stamp set
Cherry Cobbler ink
Gold gems
Lovely Labels Pick A Punch
Multipurpose adhesive
Dimensionals
Trimmer
Simply Scored
Bone Folder

Instructions

On the long side score the wider piece of thick white card at 3 1/2", 7" and 8 1/2" and fold and burnish.

Score the other piece on the long side at 5 3/4" and fold and burnish.

Adhere the dsp mats to the relevant sections.

Run the gold foil through the embossing machine and then adhere to the centre of the taller front piece.
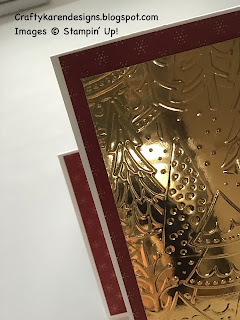

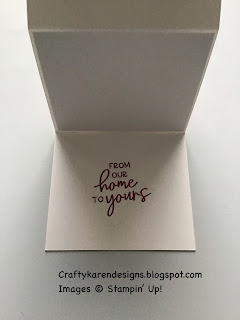
Before you stick the two sections together, stamp a sentiment on the inside as it is a bit easier to do it before you stick them together.

Add adhesive to the inside bottom edge of the front of the taller piece, line it up so that it is central and level with the bottom of the folded section and adhere in place. Flip over and adhere the back in the same way.
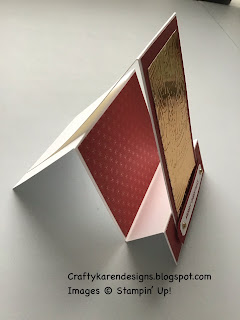

Stamp the sentiment on the strip of white in the centre and then punch out with the Pick a Punch, then punch out the ends of the strip of cherry cobbler and adhere them together.  Add dimensionals to the back and add them to the card front.  Add some gold gems and the card is complete.


If you would like to see more of my Blog Posts, follow me on Facebook or sign up for a copy of my Weekly Newsletter (emailed out every Monday morning and link copied to my Facebook Pages).

If you would like to join my Team or become one of my Discount Shoppers, you can message me on my Facebook Page at www.facebook.com/craftykarendesigns or via the Contact Me box below this Blog.

f you are interested in taking part in some challenges and having crafty chats with like minded people and a bit of a laugh, pop over to Craft and Banter on Facebook (link in the side bar). This is a new group that some crafty friends and I are trying to get up and running and we would love your company.

Happy Crafting,

Karen

Product List

Friday, 25 November 2022

Lights Aglow Pop Up Easel Block Card - Fun Fold Friday

 Hi Everyone,


It's Fun Fold Friday and I've made a Christmas Easel Card using the lovely Lights Aglow Suite teamed with the Framed & Festive stamp set and I've used Very Vanilla as my base which is a colour I don't often use but it goes really well with this dsp and the gold foil.


Materials


2 pieces of Thick Very Vanilla card stock 6" x 6", 1 piece 6" x 8 1/2"
1 piece of gold paper 5 3/4" square, 2 pieces 2 3/4" x 5 3/4", 3 pieces 3/4" x 5 3/4", scrap for the sentiment label and the star
1 piece of dsp 5 1/2" square, 3 pieces 1/2" x 5 1/2", 1 piece 2 1/2" x 5 1/2"
1 piece very vanilla card 2 1/2" x 5 1/2", scrap for the sentiment
Scrap of Lights Aglow dsp and Evening Evergreen to die cut the tree
Stampin' Cut & Emboss Machine
Twinkling Lights dies
Stylish Shapes dies
Christmas Lights stamp set
Framed & Festive stamp set
Trimmer
Simply Scored
Bone Folder
Take Your Pick
Multipurpose adhesive
Dimensionals

Instructions

On the long side score the 6" x 8 1/2" piece at 1", 2", 3", 4" and 8" and fold and burnish. Score one of the 6" x 6" pieces at 3" and fold and burnish.

The 4 score lines at one end form the block, so roll them up until you form the block and add adhesive to the last section and adhere in place to form the square block (see picture).  Fold the 1/2" tab at the other end in towards the block and add adhesive, add one end of the folded 6" x 6" piece to this tab to form the easel.


Add the gold foil mats to 3 of the sides of the block and add the dsp strips.   Add the remaining piece of gold to the inside and add dsp to the top section.  On the remaining vanilla piece, stamp a sentiment and a small tree and adhere to the gold mat on the base of the card on the inside to write your message.


Add the large square of gold foil to the remaining piece of vanilla and then add the dsp.  Put adhesive on the side of the easel which is folded forward and then add this piece to that taking care to line up the edges.

Stamp a sentiment on a scrap of vanilla and then die cut with one of the banners, die cut the larger one in gold foil and layer the two together.

Die cut the tree from the scrap of dsp and another one in the evening evergreen and the small star from gold foil.  Adhere the dsp tree to the green to strengthen it and add the star on the top.

Add the tree and the sentiment to the card front using dimensionals and the card is complete. I do hope that you like it. The card folds flat for posting.


If you would like to see more of my Blog Posts, follow me on Facebook or sign up for a copy of my Weekly Newsletter (emailed out every Monday morning and link copied to my Facebook Pages).

If you would like to join my Team or become one of my Discount Shoppers, you can message me on my Facebook Page at www.facebook.com/craftykarendesigns or via the Contact Me box below this Blog.

f you are interested in taking part in some challenges and having crafty chats with like minded people and a bit of a laugh, pop over to Craft and Banter on Facebook (link in the side bar). This is a new group that some crafty friends and I are trying to get up and running and we would love your company.

Happy Crafting,

Karen


Product List

Monday, 14 November 2022

Starry Starry Night Christmas Card

 Hi Everyone,


Another simple Christmas card for you today using the Lights Aglow dsp, gold foil and the Framed & Festive  and Christmas Lights stamp sets. I've also used the Starlit Punch and the Pretty Pillow box dies. I'm aiming to show you that you don't need to keep the one suite of products to make your cards, you can mix and match them from whatever you have.  I like to make lots of different cards, I rarely make multiples of any one design (I get easily bored haha).

Materials

1 piece of thick white card 5 7/8" x 8 1/4"
1 piece of soft succulent card 2 1/4" x 5 7/8"
1 piece of dsp 1 7/8" x 5 5/8"
Scraps of gold foil and basic white
Evening Evergreen ink
Starlit Punch
Pretty Pillow Box dies
Stampin' Cut & Emboss Machine
Framed & Festive stamp set
Christmas Lights stamp set
Trimmer
Simply Scored
Bone Folder
Multipurpose adhesive
Dimensionals


Instructions

On the long side score the white card at 4 1/8" and fold and burnish to make the card base.

Randomly stamp the stars from Christmas Lights along the top and bottom edges of the card front as you can see in the picture.

Stamp a sentiment on the inside of the card and a smaller one on the scrap of basic white.


Die cut the smaller sentiment using the label from the Pretty Pillow Box dies.

Add the soft succulent card across the card front and then add the dsp layer.  Add the sentiment using dimensionals in the centre.

Punch out some stars using gold foil and adhere them on the card front as shown.

If you would like to see more of my Blog Posts, follow me on Facebook or sign up for a copy of my Weekly Newsletter (emailed out every Monday morning and link copied to my Facebook Pages).

If you would like to join my Team or become one of my Discount Shoppers, you can message me on my Facebook Page at www.facebook.com/craftykarendesigns or via the Contact Me box below this Blog.

f you are interested in taking part in some challenges and having crafty chats with like minded people and a bit of a laugh, pop over to Craft and Banter on Facebook (link in the side bar). This is a new group that some crafty friends and I are trying to get up and running and we would love your company.

Happy Crafting,

Karen x


Product List