I'm hopping today with the Stampin' Dreams group and the theme is 'Scraps'. I had a lot of bits of coloured card and wanted to play with the Pierced Blooms dies as they are retiring soon. I love making cards with these dies, they are so pretty, I'm really going to miss them but I'm sure there will be something equally gorgeous coming in the new catalogue that I will love just as much.
Materials
1 piece of bermuda bay card stock 5 7/8" x 8 1/4"
2 pieces of basic white card 3 7/8" x 5 5/8"
Scraps of bermuda bay, polished pink, daffodil delight, granny apple green to make the flowers
Polished Pink ink
In Bloom stamp set
Pierced Bloom dies
Stampin' Cut & Emboss Machine
Trimmer
Simply Scored
Bone Folder
Take Your Pick Tool
Brushed Brass Butterflies
Iridescent Rhinestones
Blue adhesive backed gems
Multipurpose adhesive
Dimensionals
Instructions
On the long side score the bermuda bay card at 4 1/8" and fold and burnish to make the card base.
Die cut a selection of flowers and leaves with the dies. Arrange the flowers on a piece of white card and when you are happy with the arrangement, adhere them in place, I have used multipurpose adhesive and dimensionals to give some dimension to the card front.
Stamp a sentiment in the bottom right hand corner of the white card in polished pink ink and then adhere this layer to the card front. If you are worried about stamping, you should do this before you arrange the flowers (I was lucky and it worked out fine).
I've used a combination of iridescent rhinestones and blue adhesive backed gems for flower centres on some of the flowers and then added 3 butterflies (I love these).
Stamp another sentiment on the remaining piece of card and add to the inside of the card.
Card done! A quick and easy card to make with a handful of scraps.
Please pop over and see what everyone else has made, you are sure to be inspired.
If you would like to see more of my Blog Posts, sign up to the email alert over in the right hand side bar of the page.
If you would like to join my Team or become one of my Discount Shoppers, you can message me on my Facebook Page at www.facebook.com/craftykarendesigns or via the Contact Me box below this Blog.
If you are interested in taking part in some challenges and having crafty chats with like minded people and a bit of a laugh, pop over to Craft and Banter on Facebook (link in the side bar). This is a new group that some crafty friends and I are trying to get up and running and we would love your company.
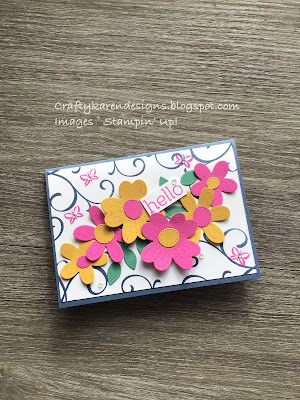
Today I am taking part in the Touches of Ink Blog Hop and I am using the Pierced Bloom dies and the Sentimental Swirls stamp set in 4 of the 5 In Colours (I don't like Cinnamon Cider so never bought that one!). This set of In-Colours will retire when the new Annual Catalogue is launched in May and a new set will replace them. It's sad to see them go as they are so bright and vibrant but I am excited to see what they will be replaced by.
Materials
1 piece of Misty Moonlight card 5 7/8" x 1/4"
2 pieces of basic white card 3 7/8" x 5 5/8"
Scraps of Magenta Madness, Bumblebee and Just Jade card for the die cuts
Misty Moonlight ink
Magenta Madness ink
Sentimental Swirls stamp set
Pierced Bloom dies
Stampin' Cut & Emboss Machine
Trimmer
Simply Scored
Paper Snips
Bone Folder
Multipurpose Adhesive
Dimensionals
Mini Glue Dots
Iridescent Rhinestones
Instructions
On the long side score the misty moonlight card at 4 1/8" and fold and burnish to make the card base.
Randomly stamp the large swirl in misty moonlight on one of the pieces of white card (see picture).
Die cut some of the larger flowers and flower centres from the scraps of magenta madness and bumblebee card and some leaves from the just jade. I have added magenta centres to bumblebee flowers and vice versa. Arrange the flowers and leaves across the centre of the card diagonally, some glued down and some on dimensionals to give some variety.
Stamp some magenta butterflies around the flowers and then adhere this piece to the card front.
Stamp more butterflies on the remaining piece of white card and adhere to the inside of the card. Stamp a sentiment on a scrap of white card and trim with paper snips if required. Add this in among the flowers using a mini glue dot on one end and a dimensional on the other.
Sprinkle with rhinestones and the card is complete.
Please pop over and see what everyone else has been making this month too. Angela is up next
If you would like to see more of my Blog Posts, sign up on the pop up form and you will get my weekly Newsletter with all the details of my latest projects and news from Stampin' Up!
If you would like to join my Team or become one of my Discount Shoppers, you can message me on my Facebook Page at www.facebook.com/craftykarendesigns or via the Contact Me box below this Blog.
If you are interested in taking part in some challenges and having crafty chats with like minded people and a bit of a laugh, pop over to Craft and Banter on Facebook (link in the side bar), we would love your company.
The theme for this week's Share it on a Sunday is 'One Sheet Wonder'. Now, that can be chop up a piece of designer series paper and see how many cards you can make, I've made several of these in the past and I will link them below if you want to have a look. Or, you can stamp your own design and cut that up to make cards and I have done several of these too, links below. But, I made this one ages ago and never got round to doing anything with it (I'll add the link to this too), so I decided that I would use up this one and decorate it to make 4 cards, I hope that you like them.
Links
A picture in greens This is the one I have used, all the details for what I used are on this link
Scraps of white, greens and crushed curry card for die cuts and sentiments
Pierced Bloom dies
Flourishing Fern dies
Intricate Leaves dies
Stampin' Cut & Emboss Machine
Art Gallery stamp set
Forever Fern stamp set
Lovely Labels Pick a Punch
Trimmer
Simply Scored
Bone Folder
Embellishments as required
Ribbon as required
Instructions
I die cut a pile of flowers from Pierced Blooms, some leaves from Intricate Leaves and some from Flourishing Ferns and started to play about with the design.
Then I stamped 4 different sentiments and punched them out with mats using the Lovely Labels Pick a Punch.
Then I started putting them together, adhere the stamped image to the card front and then arrange the die cuts and the sentiment and adhere them in place. Add embellishments and/or ribbon too if required.
Add a layer of 3 7/8" x 5 5/8" white card to the inside to write your message, you can also stamp images and sentiments on here too. It's your design, do what feels right for the occasion.
I hope that you liked my ideas and will give it a go yourself, stamp a design and cut it up and see what you get.
Please pop over and see what Donna and Victoria have made too, you are sure to find lots of inspiration.
If you would like to see more of my Blog Posts, sign up on the pop up form and you will get my weekly Newsletter with all the details of my latest projects and news from Stampin' Up!
If you would like to join my Team or become one of my Discount Shoppers, you can message me on my Facebook Page at www.facebook.com/craftykarendesigns or via the Contact Me box below this Blog.
If you are interested in taking part in some challenges and having crafty chats with like minded people and a bit of a laugh, pop over to Craft and Banter on Facebook (link in the side bar), we would love your company.