Showing posts with label Friendly Hello. Show all posts

Thursday, 24 February 2022

Friendly Hello Multi Diamond Panel Card

 Hi Everyone,


I saw this card on Mixed Up Crafts and thought I'd have a go, it's really simple but very effective. I've made this one for a very special lady for her birthday. Let me show you how I made it.

Materials

2 pieces of thick white card 6" square
1 piece of basic white 4" square, 8 pieces 2" square, 1 piece 3" square, 1 piece 2 1/2" square, 1 piece 2 1/2" x 2"
4 pieces of dsp (Friendly Hello) 1 3/4" square
2 pieces of granny apple green card 5 3/4"" square, 4 pieces 1 3/4" square
1 piece of acetate 6" x 6 1/2"
Scraps of daffodil delight
Tulip dies
Flowering Tulips stamp set
Memento Black ink
Brass Butterflies
Mini glue dots
Stampin' Cut & Emboss Machine
Gingham Embossing Folder
Trimmer
Simply Scored
Bone Folder
Multipurpose adhesive
Dimensionals
Tear and Tape/Red line tape

Instructions

Add the granny apple green mats to both pieces of thick white card.

Add the dsp squares to 4 of the basic white squares.

Run the 4 green squares through the machine in the Gingham Embossing Folder and then adhere them to the remaining 4 white squares.

On the long side score the acetate at 6" and fold and burnish.

Arrange the 2" square mats with dsp in a diamond orientation so that each of them is level with top or bottom and sides, stick them in place with a dimensional.  Layer over the 4 embossed ones in between the dsp ones as shown in the picture.

Stamp a sentiment across the centre of the smaller remaining white square (see picture) and then layer up on the granny apple green and then the larger white. Add to the front as shown using more dimensionals.

Add red line tape/tear and tape to the inside of the tab on the acetate and then stand it in front of one of the card layers and fold the tab over the top of this so it secures on the back.

Take the small tab piece of white card and on the long side score at 1/"2 1 1/4" and 2" and fold in a concertina to make an M shape.  Add one side of the M to the back centre of the acetate layer with red line/tear and tape and then fix the other side with adhesive to the granny apple green. This forms a stopper inside the card to stop it falling over when displayed.  Add a piece of red line tape/tear and tape to the back of the card over the acetate tab and then add the remaining white pieces with the granny apple green mat showing on the back.  Add the remaining 4" square piece of white to the centre of this to write your message.

Die cut two tulips from the daffodil delight and put them together with mini glue dots which will give them some dimension and then add them to the sentiment piece on dimensionals. Add some brass butterflies to finish the card.

This will go into an envelope when folded flat but I have made a box for it (1 piece of card 6 1/4" square, 1 piece 6 5/16" square, scored on all four sides at 1", cut up the tabs at each corner and glue in place).

If you would like to see more of my Blog Posts, sign up on the pop up form and you will get my weekly Newsletter with all the details of my latest projects and news from Stampin' Up!

If you would like to join my Team or become one of my Discount Shoppers, you can message me on my Facebook Page at www.facebook.com/craftykarendesigns or via the Contact Me box below this Blog.

If you are interested in taking part in some challenges and having crafty chats with like minded people and a bit of a laugh, pop over to Craft and Banter on Facebook (link in the side bar), we would love your company.

Happy crafting,


Karen X

Product List

Friday, 11 February 2022

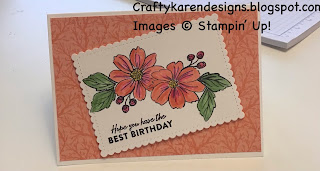
Friendly Hello - A Little Bit of Colouring

 Hi Everyone,


You know I'm not a fan of colouring but I need to keep trying, this time I tried inks and blender pens with the Friendly Hello stamp set and sat it on some Sweet Symmetry dsp which I haven't used for ages.

Materials

1 piece of thick basic white card 5 7/8" x 8 1/4"
1 piece of basic white card 4" x 3"
1 piece of dsp 3 7/8" x 5 5/8"
Calypso Coral ink
Melon Mambo ink
Garden green ink
Daffodil delight ink
Memento black ink
Blender Pens
Stitched So Sweetly dies
Stampin' Cut & Emboss Machine
Trimmer
Simply Scored
Bone Folder
Multipurpose adhesive
Dimensionals

Instructions

On the long side score the thick white at 4 1/8" and fold and burnish to make the card base.

Adhere the dsp layer to the card front.

I then stamped the image on a large scrap of basic white using memento black ink and coloured in the flowers with a mix of calypso coral and melon mambo and the leaves with garden green and added daffodil delight to the flower centres.

Then I used the largest of the stitched so sweetly dies to cut it out.

Stamp the sentiment using memento black ink and then add the layer to the card front with dimensionals.

You could colour this card in many different colour combinations and add different dsp to get dozens of different looks.

If you would like to see more of my Blog Posts, sign up on the pop up form and you will get my weekly Newsletter with all the details of my latest projects and news from Stampin' Up!

If you would like to join my Team or become one of my Discount Shoppers, you can message me on my Facebook Page at www.facebook.com/craftykarendesigns or via the Contact Me box below this Blog.

If you are interested in taking part in some challenges and having crafty chats with like minded people and a bit of a laugh, pop over to Craft and Banter on Facebook (link in the side bar), we would love your company.

Happy crafting,


Karen X


Product List

Saturday, 22 January 2022

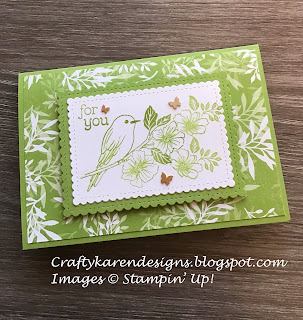
Friendly Hello - Pootlers Team Video Hop

 HI Everyone,


Today I am video hopping with the Pootlers Team and we are showcasing Saleabration products. I've chosen to use one of the Level 2 products which is a stamp set and matching designer series paper and available with a £90 purchase from the catalogues. It's a very bright card using only Granny Apple Green, I wanted to show how it was possible to make a pretty card without having lots of supplies. The only addition was a little bit of Wink of Stella to add a bit of sparkle. I mentioned adding embellishments in the video and forgot to put them one (duh!!) but I have added some Brass Butterflies.

The link to my video is below and from my YouTube channel you can access everyone else's video too, please pop over and give them some support.

Video Tutorial

Materials

1 piece of granny apple green card stock 5 7/8" x 8 1/4", 1 piece 4" x 3"
1 piece of basic white card 3 7/8" x 5 5/8", 1 piece 3 3/4" x 2 3/4"
Granny Apple Green ink
Granny Apple Green Stampin' Blends
1 piece of Friendly Hello dsp 3 7/8" x 5 5/8"
Friendly Hello stamp set
Brass Butterflies
Stitched So Sweetly dies
Stampin' Cut & Emboss Machine
Wink of Stella
Trimmer
Simply Scored
Bone Folder
Sentimental Swirls stamp set
Multipurpose adhesive
Dimensionals

Instructions

On the long side score the card stock at 4 1/8" and fold and burnish to make the card base.

Adhere the dsp mat layer to the card front.

Die cut the largest rectangle using granny apple green and the next size down in basic white.

Stamp the image on the basic white rectangle using the granny apple green ink and add in a couple of the little flower flourishes too to fill it out.  I've coloured in the tiny leaves using my Stampin' Blends.  I've added a Wink of Stella to the centre of the flowers and the birds tail and feathers to give it a little sparkle.

I wanted a very small sentiment so I've cheated a bit and pulled in one from the lovely Sentimental Swirls which is the Million Dollar Achievers stamp set designed by our lovely leader, Sam Hammond Donald - I think she will forgive me!

Adhere the white stamped layer to the granny apple green layer and then add to the centre of the card front using dimensionals.

Stamp some leaves on the remaining piece of basic white and add to the inside of the card.

Sprinkle some butterflies and the card is complete. I think it would look equally lovely using the Fresh Freesia, Petal Pink or Pool Party colourways too. I hope that you like it and will give it a try.

If you would like to see more of my Blog Posts, sign up on the pop up form and you will get my weekly Newsletter with all the details of my latest projects and news from Stampin' Up!

If you would like to join my Team or become one of my Discount Shoppers, you can message me on my Facebook Page at www.facebook.com/craftykarendesigns or via the Contact Me box below this Blog.

If you are interested in taking part in some challenges and having crafty chats with like minded people and a bit of a laugh, pop over to Craft and Banter on Facebook (link in the side bar), we would love your company.

Happy crafting,


Karen X


Product List