
Hi Everyone,
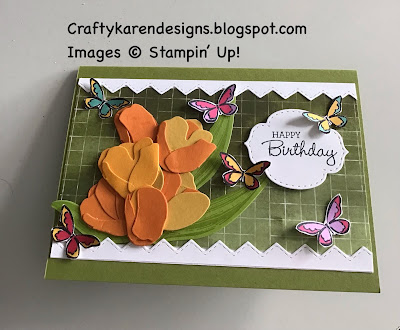
Today I have brought you a little bit of Spring cheer. I love Spring flowers especially Tulips, they come in so many bright and cheery colours. I've also sprinkled some brightly coloured butterflies around too, so maybe it's late Spring and lovely and warm - we can live in hope here in cold, wet, Manchester. I've used several sets of dies and stamp sets and mixed and matched them all together to make a pretty card.
Materials
1 piece of old olive card 5 7/8" x 8 1/4"
Scraps of pear pizzazz, pumpkin pie, mango melody and white card for the decoration
Fresh Freesia Stampin' Blends
Daffodil Delight Stampin' Blends
Real Red Stampin' Blends
Bermuda Bay Stampin' Blends
Polished Pink Stampin' Blends
1 piece of Flowering Fields dsp 3 1/2" x 5 5/8"
1 piece of basic white card 3 7/8" x 5 5/8"
Daffodil Daydream stamp set
Flowering Tulips stamp set
Pansy Patch stamp set
Tulip dies
Stampin' Cut & Emboss Machine
Paper snips
Mini Glue Dots
Multipurpose Adhesive
Dimensionals
Memento Black ink
Pear Pizzazz ink
Basic Border dies
Stitched So Sweetly dies
Trimmer
Bone Folder
Instructions
On the long side score the card at 4 1/8" and fold and burnish to make the card base.
Adhere the dsp as a central strip across the card, I wanted it to be a panel.
Die cut a 1" strip of basic white with the basic border die (this will effectively cut it into two and you can use both pieces). Adhere one along the top and one along the bottom of the dsp to frame it.
Die cut several tulips using a mix of mango melody and pumpkin pie card stock and add some pear pizzazz leaves. Stamp the leaf image onto the die cut after you have die cut it, I have found this to be easier.
Put the flowers together using mini glue dots to hold them together and then arrange on the dsp as in the picture to make a bunch. Tuck the leaves in and around them.
Stamp some butterflies on the white card and then colour in with the Stampin' Blends and then fussy cut them (you can use the dies but it was very quick to fussy cut them).
Stamp the sentiment on a scrap of white and then die cut and add to the card front using dimensionals. Sprinkle the butterflies (I've added them using mini glue dots), you don't have to use so many, it's up to you.
Stamp a sentiment on the remaining piece of white and add to the inside of the card.
If you would like to see more of my Blog Posts, sign up on the pop up form and you will get my weekly Newsletter with all the details of my latest projects and news from Stampin' Up!
If you would like to join my Team or become one of my Discount Shoppers, you can message me on my Facebook Page at www.facebook.com/craftykarendesigns or via the Contact Me box below this Blog.
If you are interested in taking part in some challenges and having crafty chats with like minded people and a bit of a laugh, pop over to Craft and Banter on Facebook (link in the side bar), we would love your company.
If you are interested in taking part in some challenges and having crafty chats with like minded people and a bit of a laugh, pop over to Craft and Banter on Facebook (link in the side bar), we would love your company.
Happy crafting,
Karen X
Product List


