
Hi Everyone,


I'm hopping with the Stamp 'N' Hop group and the theme is 'Masking' so I have brought out the lovely Butterflies and Flowers Layering Masks to make a pretty card with the soon to retire 2020-2022 In-Colours.
Materials
1 piece of misty moonlight card stock 5 7/8" x 8 1/4"
2 pieces of basic white card 3 7/8" x 5 5/8"
Butterflies & Flowers Layering Masks
Bumblebee ink
Misty moonlight ink
Just jade ink
Magenta Madness ink
Blending Brushes
Brushed Brass Butterflies
Gorgeous Leaves stamp set
Art Gallery stamp set
Trimmer
Simply Scored
Bone folder
Multipurpose adhesive
Instructions
On the long side score the misty moonlight card at 4 1/8" and fold and burnish to make the card base.
Tape one of the pieces of white card to some scrap paper/grid paper to keep your desk clean. Position the solid butterfly mask wherever you want it to be on the card and add some washi tape to secure it. Add post it notes or scrap paper over the edges of the card or to cover any of the other stencils so that you dont get any excess ink on your card.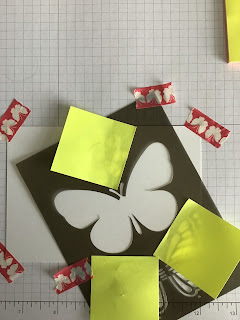
Product List 
Gently work the blending brush over the butterfly with your chosen colour (bumblebee) then peel this mask off and place the detailed one over the top of your image. Add post it notes all around as before and now work in your second colour (misty moonlight).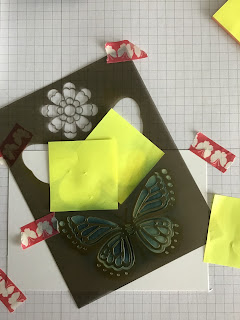

Now position the solid flower on the card and mask all around it while you colour with magenta madness, peel off this one and replace with the detailed flower and add misty moonlight.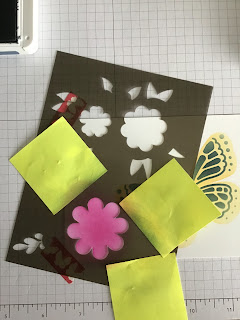

Repeat this process for the second flower using bumblebee and magenta madness. Now add in some leaves around the edges of the flowers with the just jade, masking off all the flower to try and tuck the leaves in among the petals.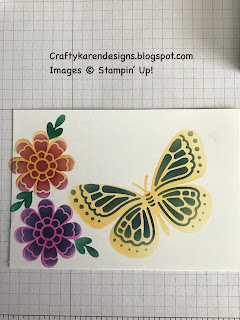


Using the splatter from Gorgeous Leaves in bumblebee, randomly stamp all around the images and add a few to the remaining piece of white for the inside of the card.
Stamp the sentiment in misty moonlight on the card front and inside the card if required.
Adhere to the card base and then add some brushed brass butterflies.
Please click on the links to see what everyone else has made too:
Roll Call
If you would like to see more of my Blog Posts, sign up to the email alert over in the right hand side bar of the page.
If you would like to join my Team or become one of my Discount Shoppers, you can message me on my Facebook Page at www.facebook.com/craftykarendesigns or via the Contact Me box below this Blog.
If you are interested in taking part in some challenges and having crafty chats with like minded people and a bit of a laugh, pop over to Craft and Banter on Facebook (link in the side bar). This is a new group that some crafty friends and I are trying to get up and running and we would love your company.
If you are interested in taking part in some challenges and having crafty chats with like minded people and a bit of a laugh, pop over to Craft and Banter on Facebook (link in the side bar). This is a new group that some crafty friends and I are trying to get up and running and we would love your company.
Happy Crafting,
Karen X


