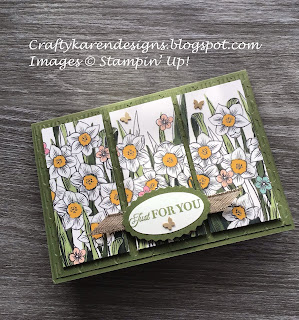
Today I have been playing with another of the free Saleabration papers - Daffodil Afternoon - it's so pretty, I love daffodils. I've teamed it with the Gingham Embossing Folder and some Mossy Meadow card stock and the Celebrating You stamp set and the gorgeous Brass Butterflies. Let me show you how I made it.
Materials
1 piece of mossy meadow card stock 5 7/8" x 8 1/4", 1 piece 3 7/8" x 5 5/8", scrap for the sentiment
1 piece of very vanilla card 3 7/8" x 5 5/8", scrap for the sentiment
1 piece of Daffodil Afternoon dsp 3 1/2" x 4 7/8"
3 1/2" piece of gold shimmer ribbon
Brass Butterflies
Mossy Meadow ink
Celebrating You stamp set
Gingham Embossing Folder
Stampin' Cut & Emboss Machine
Trimmer
Simply Scored
Bone Folder
Dimensionals
Double Oval Punch
Instructions
On the long side score the mossy meadow at 4 1/8" and fold and burnish to make the card base.
Run the other piece of mossy meadow through the Stampin' Cut & Emboss machine in the Gingham Embossing folder and adhere to the card front. Cut the dsp into three equal strips (1 5/8" wide) and add to the top of the embossed layer leaving equal space all around them.
Cut the ends of the ribbon at an angle and add to the card front in the centre panel.
Stamp a sentiment on the scrap of very vanilla and punch out with the oval punch. Punch out a scalloped layer for it, adhere them together and add to the card front on dimensionals over the top of the ribbon.
Stamp a sentiment on the remaining very vanilla piece and add to the inside of the card.
Add a sprinkling of brass butterflies to the card panels and the card is complete. I hope that you like it.
If you would like to see more of my Blog Posts, sign up on the pop up form and you will get my weekly Newsletter with all the details of my latest projects and news from Stampin' Up!
If you would like to join my Team or become one of my Discount Shoppers, you can message me on my Facebook Page at www.facebook.com/craftykarendesigns or via the Contact Me box below this Blog.
If you are interested in taking part in some challenges and having crafty chats with like minded people and a bit of a laugh, pop over to Craft and Banter on Facebook (link in the side bar), we would love your company.
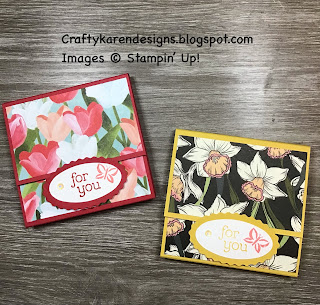
Welcome to the first Stampin' Dreams Blog Hop of 2022, the theme is 'Throwback Thursday'. I've decided to recreate some little post it pads that I made back in early 2021. I love these, they are quick and easy to make as treats for co-workers, teachers, customers or to sell at craft fairs. I thought that I would use some of our lovely new spring papers featuring my favourite spring flowers, daffodils and tulips. Let me show you how to make them.
Materials
1 piece of card stock 3 1/4" x 8" (You can get 3 of these from one sheet of A4, I've used crushed curry and real red)
1 piece of dsp 3 1/8" x 1", 3 1/8" x 2 7/8" and 3 1/8" x 1 7/8" (I've used Flowering Fields and Daffodil Afternoon)
Scraps of real red, crushed curry and basic white card for the sentiments
Sentimental Swirls stamp set
Real Red ink
Crushed Curry ink
Flirty Flamingo ink
Double Oval Punch
Multipurpose adhesive
Dimensionals
Trimmer
Simply scored
Bone folder
3" x 3" post it pad
Iridescent rhinestones
Instructions
On the long side, score the card stock at 2", 2 3/8", 5 1/2" and 5 7/8", fold and burnish all the score lines.
This holder folds around the post it pad, so decide which end of it will be the bottom flap and add the 1" strip of dsp to that closest to the fold but with a small border all the way round the bottom and sides. Add the 1 7/8" strip to the other end, this will be the top flap - make sure you have the direction of the paper going in the right way. Then adhere the largest piece to the back, keep an eye on your directional prints, you don't want flowers upside down.
Add glue to the back of the post it pad and position inside close to the fold lines top and bottom but with a border either side. Fold up the bottom flap and fold down the top one.
Stamp the sentiment on the scrap of basic white and punch out with the Double Oval Punch, punch out the matting oval in the card stock colour and layer the two together. I've also stamped a butterfly on these and added a rhinestone. Add a couple of dimensionals to the back of the oval and add to the lower flap so that it overlaps the top and that one will tuck behind to keep it closed.
You can make this quickly and simply in all of the colours using all of the dsp, the possibilities are endless, why don't you give them a try, even if you only make one for your craft desk or your handbag, they are very useful.
Click on the links below to see what everyone else has made for Throwback Thursday, you are sure to be inspired.
If you would like to see more of my Blog Posts, sign up on the pop up form and you will get my weekly Newsletter with all the details of my latest projects and news from Stampin' Up!
If you would like to join my Team or become one of my Discount Shoppers, you can message me on my Facebook Page at www.facebook.com/craftykarendesigns or via the Contact Me box below this Blog.
If you are interested in taking part in some challenges and having crafty chats with like minded people and a bit of a laugh, pop over to Craft and Banter on Facebook (link in the side bar), we would love your company.